Working with Text Boxes
Similar to a word processing document, a text box is an object that holds text (a single character, a single word, entire sentences, or paragraphs). Editing in a text box is just like working in a word processor. You can cut, copy, and paste selected text easily, and format the text as needed. In addition, a text box can hold other components. This topic introduces how you can insert text boxes in a report, format the paragraphs and text in a text box, and use the other text box features.
![]() You can use text boxes in page reports that use query resources only.
You can use text boxes in page reports that use query resources only.
This topic contains the following sections:
- Inserting Text Boxes in a Page Report
- Formatting Paragraphs
- Formatting Text
- Finding or Replacing a Text String
- Importing and Exporting Text
See an example: The SampleComponents catalog, included with Designer, contains reports that have examples of how you could use each component type in a report. For the text box example, open <install_root>\Demo\Reports\SampleComponents\ForTextBox.cls.
Inserting Text Boxes in a Page Report
You can insert text boxes in the page report areas listed in Component Placement.
To insert a text box into a page report, use either of the following methods:
- Select Insert > Text Box or Home > Insert > Text Box. If the mouse pointer is in the report body or a tabular cell, Designer inserts a text box there; otherwise, you need to select the mouse button in the desired location to place the text box there.
- From the Components panel, drag the Text Box icon
 in the Basic category to the desired location in the page report which allows the insertion of a text box, Designer then inserts a text box there.
After you insert a text box into a page report, you can then double-click it to type in text.
Formatting Paragraphs
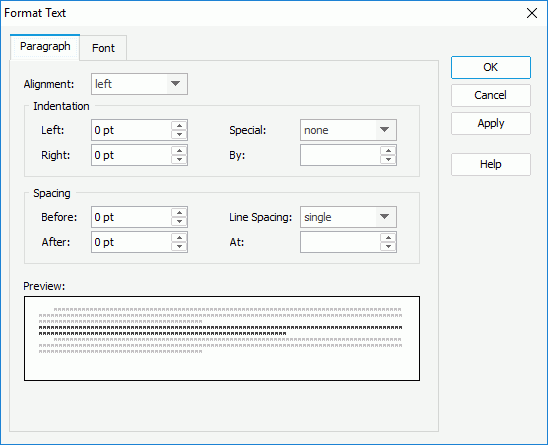
Designer creates paragraphs in a text box when you input text into it. You can easily format the paragraphs, for example, the alignment style, indentation format or line spacing. To do this:
- Right-click anywhere in the paragraph and select Paragraph on the shortcut menu. Designer displays the Format Text dialog box.

- In the Paragraph tab,
- To specify the alignment style of the paragraph, select the required option from the Alignment drop-down list: left, center, right, or justified.
- To set the indentation formats of the paragraph, in the Indentation box, specify the left and right indent distance in the Left and Right text boxes. If you want to set the paragraph to be indented, select first line or hanging from the Special drop-down list, then type a number in the By text box. This creates a first-line indent or hanging indent in the paragraph using the inputted number as the indent distance.
- To adjust the spacing before or after the paragraph, specify the required amount of spacing in the Before or After text box.
- To change the spacing between the lines in the paragraph, select the required item from the Line Spacing drop-down list. If you select at least, exactly, or multiple, specify the required amount of space or the number of lines in the At text box.
- Select OK to accept the changes.
You can also set the indentation formats of a paragraph by simply moving the tap stop icons on the ruler of the Design tab. To do this, position the mouse pointer anywhere on the paragraph, then,
- To create a first-line indent or hanging indent, drag
 to the position where you want the text to start.
 - To change the left indent, drag
 to the position where you want the paragraph to start.
 - To change the right indent, drag
 to the position where you want the paragraph to end.
Formatting Text
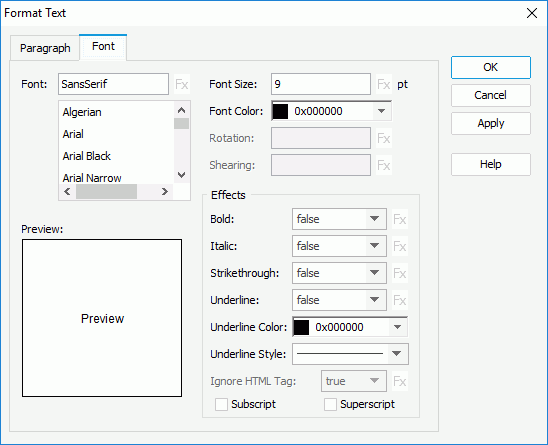
You can format the text you type into a text box to suit your requirements. For example, you can change the font size, color, alignment, and highlight the text with a distinguishing color. To do this:
- Select the text you want to format, right-click and select Font on the shortcut menu.
- In the Font tab of the Format Text dialog box, specify the font settings.

- Select OK to accept the changes.
You can also format the selected text by using the corresponding commands on the Format menu tab.
Finding or Replacing a Text String
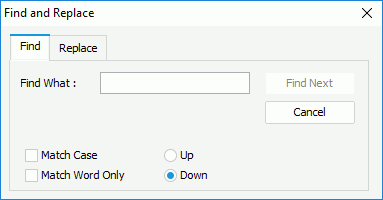
To find a character string in a text box:
- Right-click anywhere in the text box and select Find a String from the shortcut menu.
- In the Find tab of the Find and Replace dialog box, specify the string you want to search for and set the other settings as required.

- Select the Find Next button to start finding the specified string.
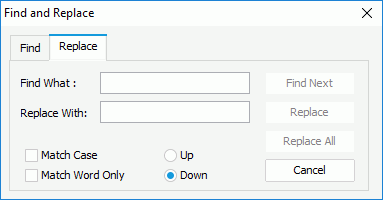
Similar to finding text, if you want to replace a string in the text box with another one,
- Right-click anywhere in the text box and select Replace from the shortcut menu. Designer displays the Find and Replace dialog box with the Replace tab selected.

- Specify the settings according to your requirements and select the Replace or Replace All button to replace the next or all the specified string with another one.
Importing and Exporting Text
To import text into a text box from an external file (.txt or .rtf):
- Position the mouse pointer at the location where you want to insert the imported text, then right-click and select Import External File.
- In the Import a File dialog box, select the .txt or .rtf file you want to import and select OK.
Designer inserts the text of the file in the text box.
To export the text from a text box:
- Position the mouse pointer on the text, right-click and select Save to RTF File.
- In the Save RTF File dialog box, specify the name of the file and select OK.
 Previous Topic