Using Dynamic Resources and Local Parameters
When you add fields to a report or use parameters to define filter conditions in a report, sometimes you may find that the view elements that have been predefined in the business view or the given parameters in the current catalog cannot meet your requirements. In those cases, you can create dynamic resources (including formulas and aggregations) and local parameters in the report and use them to get the desired data. Then when you save the report, the dynamic resources and local parameters will be saved along with the report as its resources.
Dynamic resources and local parameters are report level resources, which means they are only available to the report for which they are created.
Below is a list of the sections covered in this topic:
- Creating and Using Dynamic Formulas
- Creating and Using Dynamic Aggregations
- Creating and Using Local Parameters
Creating and Using Dynamic Formulas
You should have some knowledge of the formula syntax before you can successfully compose a formula with no errors. To learn the formula syntax, refer to Formula Syntax.
To create a dynamic formula:
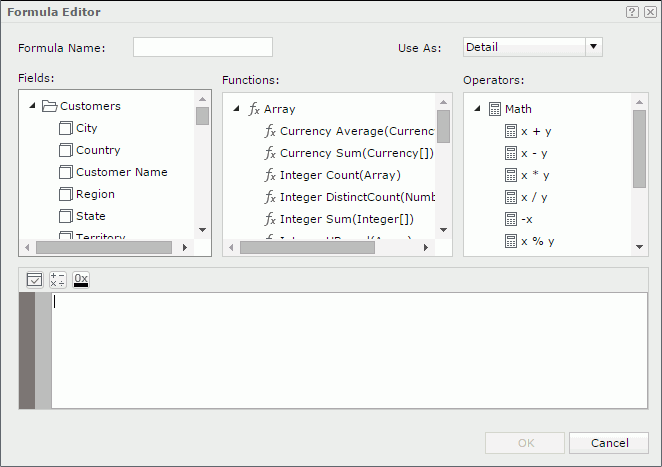
- In the Resources panel of Web Report Studio or the Resources box of the Web Report Wizard, expand the Dynamic Resource > Formulas node, then select <Add Formula…>. The Formula Editor appears.

- Enter a name for the formula in the Formula Name text field.
- By default, Logi JReport will decide whether the formula can be used as an aggregation object, and if not, the formula will be used as a detail object. You can specify to use the formula as a detail, group, or an aggregation object, by selecting the corresponding view element type from the Use As drop-down list on the toolbar.
Whether a dynamic formula can be used as a certain type depends on the following rules:
- Any formula can be used as Detail.
- Any formula that references a DBField and not an aggregation can be used as Group.
- A formula that refers only to aggregations can be used as Aggregation. For example, there are two aggregations Sum_Total and Sum_Quantity, and you can create a formula
@"Sum_Total" / @"Sum_Quantity"and use it as an aggregation. - A formula that follows the custom aggregation expression can be used as Aggregation.
- Compose the formula by selecting the required fields, functions and operators from the Fields, Functions and Operators boxes. You can also write the formula by yourself in the editing box.
For details about the functions and operators, refer to Built-in Functions and Operators.
- Select the Check button
 to check whether or not the syntax of your formula is correct.
 - When done, select the OK button to create the formula.
Once a dynamic formula is created, you can then drag it from the Resources panel to the desired position in the report for data analyzing, or add it as report field when working with the report wizard.
In the Resources panel of Web Report Studio, you can make use of the shortcut menu of an existing dynamic formula to edit or delete the formula, or change the formula type as Group, Detail, or Aggregation if possible.
Notes:
- You can only use JDK (not JRE) to compile formulas created in Logi JReport and save a dynamic formula with no errors into a web report.
- Currently, global variables are not supported in dynamic formulas.
- When formulas reference display names or mapping names, the names should not contain any of the following characters if the names are not quoted by double-quotation marks "":
"~", "`", "!", "@", "#", "$", "%", "^", "&", "*", "(", ")", "-", "+", "=", "{", "}", "[", "]", "|", "\\", ":", ";", "\", " ' ", "<", ",", ">", ".", "?", "/"
Examples:
- Expression @Customer#; will cause a syntax error. But @"Customer#" is ok.
- If a field has the display name Category.Aggregation, when adding it to a formula, quote it as "Category.Aggregation" or "Category"."Aggregation".
Creating and Using Dynamic Aggregations
In Web Report Studio, you can also create dynamic aggregations by mapping them to the available resources such as group objects, detail objects in the current business view and the dynamic formulas that have been created in the report.
To create a dynamic aggregation:
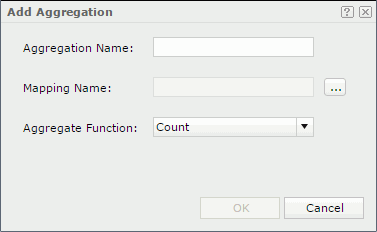
- In the Resources panel of Web Report Studio or the Resources box of the Web Report Wizard, expand the Dynamic Resource > Aggregations node, then select <Add Aggregation…>. The Add Aggregation dialog appears.

- In the Aggregation Name text field, specify the display name of the dynamic aggregation.
- Select the button
 next to the Mapping Name text field. In the Select Resource dialog, specify the field on which the dynamic aggregation is based.
 - From the Aggregate Function drop-down list, specify the aggregate function.
- When done, select OK to create the dynamic aggregation.
Once a dynamic aggregation is created, you can then drag it from the Resources panel to the desired position in the report for data analyzing, or add it as report field when working with the report wizard. And if you want to edit any dynamic aggregation or delete it, right-click the aggregation and select Edit or Delete on the shortcut menu.
Creating and Using Local Parameters
When you use parameters to compose the filter conditions applied to a report, if the given parameters in the current catalog cannot meet your requirements, you can create local parameters to use in the report. The local parameters created for a report can also be added to the parameter controls and parameter form controls in the report, or referenced in dynamic formulas used in the report.
To create a local parameter and use it in a filter:
- When filtering a business view in the Query Filter dialog, or a data component using the Filter dialog, select the button
 and select <Add Parameter…> from the Local Parameters node of the value drop-down list.
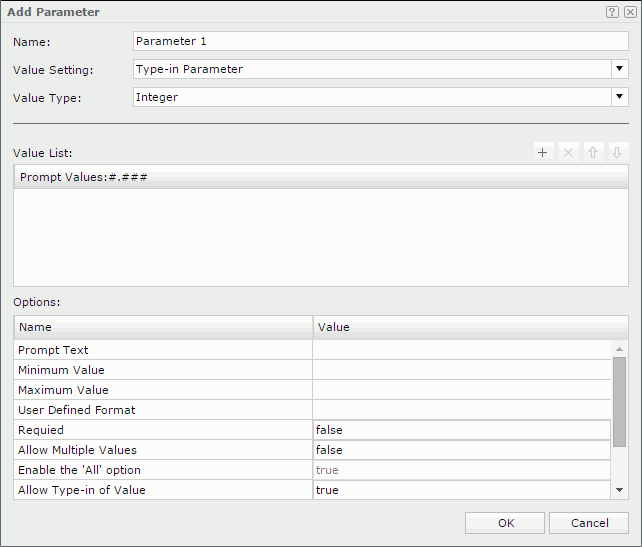
The Add Parameter dialog appears.

- In the Name field, input a name for the parameter.
- Select a parameter type from the Value Setting drop-down list. For parameters in XML connection, it can only be Type-in Parameter.
- In the values section, specify the parameter values as required. The section varies with the type you select from the Value Setting drop-down list.
- For Type-in Parameter:
- Specify the data type of the parameter value from the Value Type drop-down list.
- Select
 to add a value line, double-click in it and then type in a value of the specified data type.
If the parameter is of Date, DateTime, or Time type, you can also select the calendar button
 to set a date and time value using either calendar or expression functions in the Calendar dialog. If you use an expression to specify the value, when you hover the mouse pointer over this value, a tip will appear showing its expression. Select on the value, the expression will be displayed in the value text box and you can edit the expression in the text box directly if you want. After editing, when you select elsewhere outside of the value text box:
 - If the edited expression is correct, a new value calculated by the expression will be displayed in the parameter value text box.
- If the edited expression is wrong, no value will be created and the expression itself will be displayed and highlighted in red in the value text box. Correct the expression, or select the calendar button to specify a value.
- Repeat the second step to add more values.
To adjust the order of the values, select
 or
or  ; to remove any unwanted value, select it in the list and then select
  .
. - Specify the value which will be set as the default selected value in the Enter Parameter Value dialog by selecting it from the list.
- For Bind with Single Column:
- From the Source drop-down list, select the required business view in the current data source. Then, all fields in the specified business view will be available for value selection.
- Select a field from the Bind Column drop-down list. This field is used to filter the query when running a report with the parameter.
- If you want the values of another field to be displayed in the Enter Parameter Values dialog, which makes more sense to report end users than the values of the Bind Column field, select that field from the Display Column drop-down list.
- For Bind with Cascading Columns:
- From the Data Source drop-down list, select the required business view in the current data source from which to get the columns.
- Select
 to add a parameter row.
 - Select in the Bind Column cell and select a field from the drop-down list.
- If you want the values of another field to be displayed in the Enter Parameter Values dialog, which makes more sense to report end users than the values of the Bind Column field, select in the Display Column cell and then select that field from the drop-down list.
- Select in the Parameter cell to create the parameter. A name for the parameter will then be automatically added by Logi JReport.
- Repeat steps b to e to create more parameters. Make sure that the selected Bind Column fields are of cascading relationship one level by one level down. In this way, a group of cascading parameters are created.
To adjust the order of the parameters, select
 or
or  ; to remove any unwanted parameter from the cascading group, select it and then select
  .
.
- For Type-in Parameter:
- In the Options box, set options for the parameter according to your requirements.
- When done, select OK to create the parameter. The parameter is added to the Local Parameters node in the Parameters list.
To further edit the parameter, right-click it in the list and select Edit from the shortcut menu. Then in the Edit Parameter dialog, edit the parameter as required.
To remove the parameter, right-click it in the list and select Delete on the shortcut menu.
- Finish defining the filter condition using the parameter.
- Select OK to apply the settings. The parameter is then listed in the Parameters panel and you can specify the parameter value in the panel to dynamically set the filter condition.
 Previous Topic
 Back to top