Cached Query Results
The cached query results feature enables you to use the data from the cashed query result file when you are off-line and do not have a DBMS connection. By default, when you run a report, Logi Report Engine fetches data from the database using the JDBC driver. For reports that are built on queries (and also imported SQLs, stored procedures, user defined data sources and business views), Logi Report Designer enables you to create cached result files and save them somewhere in your machine. Then, when you view these reports, you can choose to use the data from the cached query result file as opposed to the database. This is very useful for working on the design of a report while you are off-line and do not have a DBMS connection. Also, it is helpful when you have problems with your reports and need to send the reports with data resources to Logi Analytics for reproducing the problems.
This topic includes the following sections:
- Creating Cached Query Results
- Applying Cached Query Results
- Generating Data Source Drivers for Cached Query Results
Creating Cached Query Results
Logi Report Designer provides you with two ways to create cached query results, the first is with the Catalog Manager and the second is with the Data panel.
- Creating a cached query result file in the Catalog Manager
- In the Catalog Manager, select the query for which you intend to create the cached query result file.
- Right-click the query, and select Create Cached Query Result from the shortcut menu.
- In the Save Cached Query Result dialog, specify the file name with or without an extension and the folder where you want to save the result file. It is recommended to use an extension such as .cqr to help you identify the files. Logi Report does not provide a default extension.
- Select Save and the cached query result file will be saved to the specified folder.
- Creating a cached query result file in the Data panel
- In the Data panel, right-click the query on which the report is built and select Create Cached Query Result from the shortcut menu.
- In the Save Cached Query Result dialog, specify the file name with or without an extension and the folder where you want to save the result file and then select Save.
Applying Cached Query Results
To make a library component or a page report created using query resources run using cached query result, you can set the Data Driver property on the dataset appropriately in the Report Inspector. You can specify the property value by inputting manually or selecting a predefined data source driver from the drop-down list.
The input format is as follows: jrquery:/jet.universe.resultfile.UResultFileResultSet;Fullpath_of_cached_query_result
For example, if the cached query result has been saved to C:\LogiReport\Designer\Cached with the file name test, the property value should be jrquery:/jet.universe.resultfile.UResultFileResultSet;C:\LogiReport\Designer\Cached\test.
However, the Data Driver property is not available to web reports and page reports that are created based on business views. In order to apply cached query result to them, you can select the option Use cached query result in the Catalog category of the Options dialog. Then whenever you view a report in Logi Report Designer, a dialog will prompt you to choose a cached query result to run the report.
Generating Data Source Drivers for Cached Query Results
When specifying the Data Driver property for a dataset, you may find it inconvenient to type in a property value that is long and complicated. To help you with this, Logi Report Designer provides a tool for generating data source drivers for cached query results. Then the generated drivers will be available on the Data Driver drop-down list for selection.
Assume that a cached query result file orderstat_cached has been created for the query OrderStat in the catalog file SampleReports.cat and saved in C:\LogiReport\Designer\Cached. To create a data source driver for the cached query result, follow the steps below:
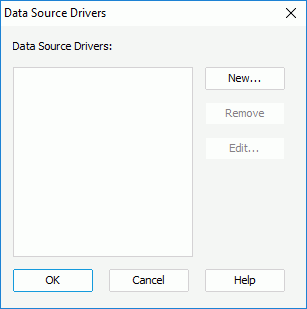
- Make sure SampleReports.cat is the currently open catalog file. If not select File > Open Catalog to open it from
<install_root>\Demo\Reports\SampleReports. - In the Catalog Manager, select Data Source Drivers on the toolbar. The Data Source Drivers dialog appears.

All the added drivers will be listed in the Data Source Drivers box. If you want to remove a driver, select the driver and select the Remove button. To edit a driver, select the driver and select the Edit button.
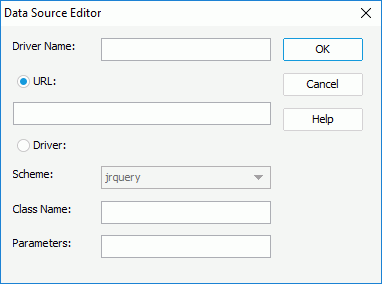
- Select the New button, and the Data Source Editor appears.

- Type a name for the driver in the Driver Name text box. Here, we name it OrderStat.
- Select the URL radio button and type the URL as follows:
jrquery:/jet.universe.resultfile.UResultFileResultSet;Fullpath_of_cached_query_result
In the example, the URL is
jrquery:/jet.universe.resultfile.UResultFileResultSet;C:\LogiReport\Designer\Cached\orderstat_cachedNote: If you select the Driver radio button to specify the driver, you will need to specify the class name and parameter of the driver as follows:- Class Name: jet.universe.resultfile.UResultFileResultSet
- Parameter: Full path of the cached query result (
C:\LogiReport\Designer\Cached\orderstat_cachedin this example)
Then, a URL will be generated according to the information you specify.
- Select OK to add the driver.
- Select OK in the Data Source Drivers dialog to close it.
- Now you can choose the driver from the Data Driver property's drop-down list directly without inputting the long value manually.
 Previous Topic