Grant File Access Permissions
A Logi application resides within an application folder on the web server. This document discusses the file access permissions you'll need to grant to sub-folders within your Logi application folder. The following topics are presented:
- About File Access Permissions
- Which Accounts?
- Which Application Sub-Folders?
- Granting File Permissions Under Windows
About File Access Permissions
A Logi application, on your web server, consists of an application folder with a set of sub-folders and files. Depending on the nature of the application, there'll be a need to write data into some of those sub-folders. For example, data caching, temporary file creation, and exports are but a few of the operations that will write data to these folders.
However, the default security settings for these folders may prohibit file writing by accounts normally used to run web applications (which is what a Logi application is), so you may need to explicitly grant file access permissions to these folders (which are identified below).
Tell-Tale Errors
If you receive these or similar errors when trying to preview or browse your report:
There was a problem running a DataLayer. The error was: The web application is unable to write to a folder.
Unable to save to the data cache. The file was: <application file path>\rdDataCache\???.xml. Access to the path is denied.
Access to the path 'C:\inetpub\wwwroot\HelloWorld\MyData' is denied.
then it is most likely that you need to grant Write permissions to the rdDataCache, rdDownload, and/or other folders.
.NET Application? Let the New App Wizard Do It
If you use the New Application Wizard in Studio (File ![]() New Application...) to create a .NET Logi app, it will set the appropriate file permissions for your application for you. It actually provides a pretty wide-open security setting, granting all rights to everyone, and you may care to set more restrictive rights manually. You may, nonetheless, need to manually grant rights when you deploy you app to a production server.
New Application...) to create a .NET Logi app, it will set the appropriate file permissions for your application for you. It actually provides a pretty wide-open security setting, granting all rights to everyone, and you may care to set more restrictive rights manually. You may, nonetheless, need to manually grant rights when you deploy you app to a production server.
Generally, if your application does anything more than put simple text on a page, granting file permissions will be required and you'll need to do this for each Logi application you develop and deploy.
Java Application? Usually Done for You
The New App Wizard doesn't set file permissions for Logi Java apps because, for the majority of Java web servers and configurations, it's already done. Your Java web server may already grant blanket permissions to apps deployed within certain folders, or that are auto-deployed, for the accounts that web apps run under. However, you may have to know something about your Java web server, and its security requirements and features.
Which Accounts?
File access permissions should be assigned to these accounts:
| Web Server OS | Grant File Access Permissions To |
Windows 7, Windows Server 2003+, | The NETWORK SERVICE account. |
| Windows 7, Windows Vista | You may also need to assign permissions to the named Application Pool your Logi application runs in. See following sections for details. |
| Windows Server 2000, Win XP | The localASPNET machine account. That's "ASPNET", without a period - not "ASP.NET" and it's a machine account, not a network domain account. |
| Linux and other UNIX flavors | The account that the web server uses to run web applications. |
This presumes a default OS installation in which no special renaming or removal of default accounts has been undertaken.
![]() If you're experiencing "Access denied to file XYZ" type errors when running your Logi application, try temporarily giving Full Control permissions to Everyone. If the errors stop appearing, then you know for certain that file access permissions are the source of the errors.
If you're experiencing "Access denied to file XYZ" type errors when running your Logi application, try temporarily giving Full Control permissions to Everyone. If the errors stop appearing, then you know for certain that file access permissions are the source of the errors.
Which Application Sub-Folders?
Your web server account will, of course, have to be able to Read all of the files in your application folder.
The two sub-folders in your Logi application folder that will routinely need to have Write permissions granted to them are rdDataCache and rdDownload. The latter is often used as a convenient place to hold temporary files and does not necessarily have anything to with actual downloads.
If, in the course of your development work, you add your own new sub-folders to hold data files or "save files" used with elements like a Dashboard, or decide to write data to another folder you will need to grant Write and possibly even Full Control permissions to them as well.
One approach that guarantees access is to give Full Control permissions to the Logi application folder itself (which is what Studio's New Application wizard does). All files and folders within the app folder then inherit the permissions. However, this is not necessary and, as mentioned earlier, may cause security concerns.
Granting File Permissions Under Windows
Depending on your OS, you'll use File Explorer or My Computer to set file permissions. The first set of examples below come from Windows XP Pro and the second set from Windows 7 Enterprise.
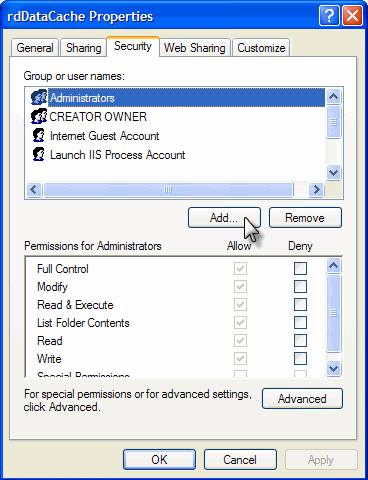
- On the web server, navigate into your Logi application's folder and select the rdDataCache folder.
- Right-click the folder and select Properties from the pop-up menu, as shown above, left.
- In the Properties dialog box, click the Security tab, as shown above, right. Click Add... No Security tab visible? See section below.
Screen shot s FilePerm_03 gif and FilePerm 03a.gif - If we're assigning NETWORK SERVICE, which not a local account, you could skip ahead to step 6. If we're assigning ASPNET, which is a local account on the computer, in the Select Users dialog box, shown above, left, click Locations...
In the Locations dialog box, select the computer's name, which will be at the top of the list. If the computer is not part of a network domain or even on a network, this step may be unnecessary.
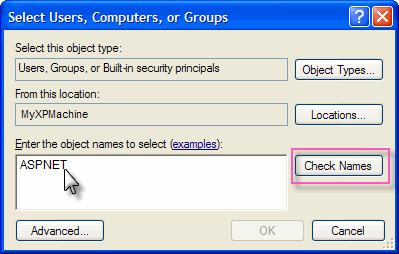
Enter the desired account name (ASPNET) into the Select Users dialog box, as shown above. If desired, you can click Check Names to verify spelling and account existence; if valid, the name should change to <computer name>\<account name>. Then click OK.
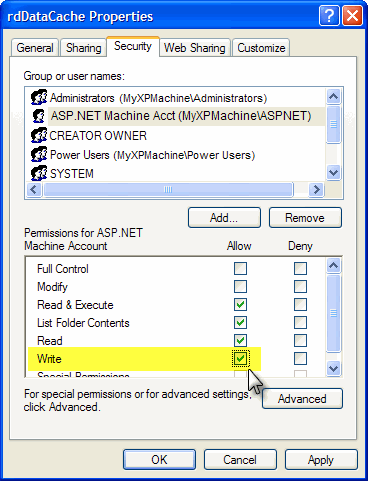
- Back in the rdDataCache Properties dialog box, you'll see that ASP.NET Machine Acct has been added to the list of user names, as shown above.
Select the ASP.NET account in the list and check the Write permissions checkbox. Ensure that the other checkboxes shown are also checked. Click OK.
Repeat this process for the rdDownload folder and for any other folders that you'll be writing data to.
Windows 7
In addition to setting the permissions shown earlier, you may also need to give permissions to the "application pool". Logi applications are generally run by IIS within an application pool, which provides isolation and performance improvements for web apps that may use different versions of .NET. To assign file access permissions to an application pool.
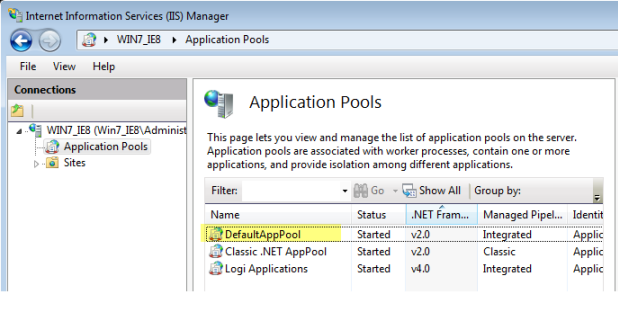
Open the IIS Manager utility, locate your Logi application and determine, by examining its properties, which application pool it's assigned to. Note the name of the pool ("DefaultAppPool" in the example).
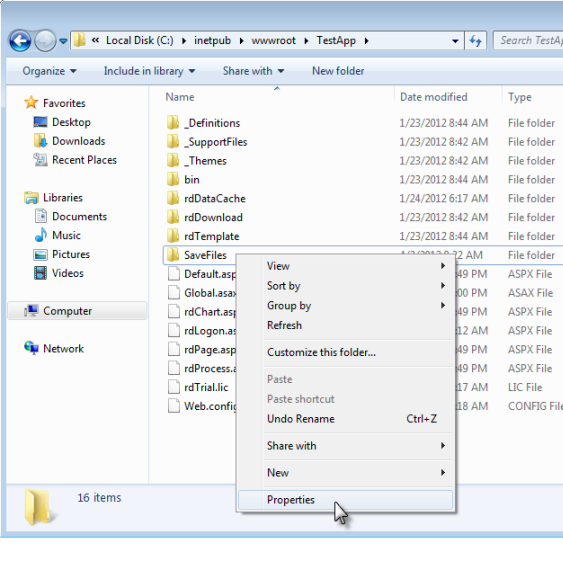
In the example above, we're setting permissions for the sub-folder "SavedFiles". Use File Explorer to navigate to your Logi app folder, then select and right-click the sub-folder in question, and select Properties.

- In the Properties dialog box, click the Security tab, and then the Edit button.
- In the Permissions dialog box, click Add.
- In the Select Users or Groups dialog box, enter "IIS APPPOOL\<the app pool name>" as shown above.
Click OK, to close the dialog box and return to the Permissions dialog box.
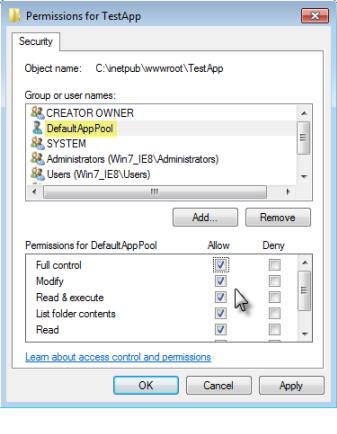
Finally, select the application pool in the names list, and set its permissions, as shown above. Then click OK.
No security tab visible?
In order to make the Security tab visible in the Properties dialog box, you must turn off Simple File Sharing. This is usually an issue only on stand-alone computers.
- Open Control Panel and locate the Folder Options link. In Windows XP, this is through the Appearance and Themes link. Or, instead, you can access Folder Options through the Tools menu item in My Computer.
- In the Folder Options dialog box, select the View tab.
- At the very bottom of the list of Advancedsettings, un-check the "Use simple file sharing" option. Click OK.
The security tab should now appear when you select a file or folder's properties.
Keywords: access denied, write error, save error