Applying the Switch Column
The following example illustrates how the Switch Column is used:
First, look at the example datalayer row above which shows the data as retrieved, with a numeric code for the ShipVia field.


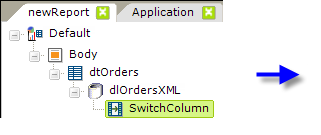
- As shown above, a Switch Column element is added as a child beneatha datalayer element.
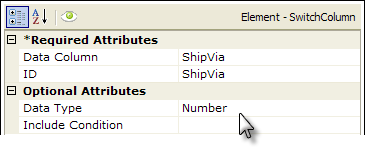
- Its Data Column attribute value is set to the column in that datalayer whose value will be evaluated.
- The ID attribute is set to name of a column that will receive the replacement data. If it's the same as the Data Column, as shown above, the original data will be replaced. If it's different, a new column by that name will be added to the datalayer.
- The optional Data Type attribute helps the comparison routine when the data may be ambiguous.


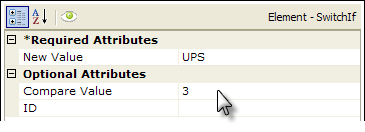
- Next add one (or more) Switch If elements beneath the Switch Column element, as shown above. These specify the Compare Value (3) which, when found, will trigger a replacement using the New Value ("UPS"). The evaluation is always "if the original value equals the comparison value, substitute the new value".
 You can leave the Compare Value blank in order to deliberately replace the original value in all rows.
If we look at the data again, we'll see that the ShipVia field has been changed.

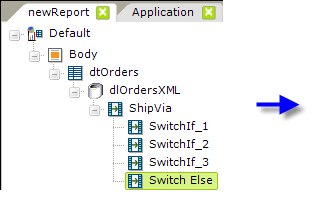
- Finally, if desired, you can add an optional Switch Else element as a child of Switch Column which will replace the original value with a New Value, shown above, in any row unaffected by the preceding Switch If elements.
In the complete example above, the sequence of events is that the datalayer reads in all the data from the XML data file, then the Switch Column examines the specified data column in each datalayer row and, depending on the original value found there, replaces the original value with the specified new value. Any rows that aren't affected by one of the Switch If elements have their original value changed by the Switch Else element.