Adding Automatic Bookmarks
Adding automatic bookmarks to your report is easy and the following examples provide step-by-step guidance.
Auto Bookmark Attributes
Here are the attributes for the Auto Bookmark element:
| Attribute | Description |
|---|---|
Bookmark Collection | (Required*) Specifies the name of a bookmark collection. Typically, there is one collection for each user. In this case, specify @Function.Username~ here.. * This attribute is not required when a global value has been specified in _Settings. |
Bookmark ID | (Required) Specifies a unique ID for the bookmark. The ID is returned by DataLayer.Bookmarks. |
Bookmark Custom Column 1 | Specifies a custom value to saved in the bookmark, which will be returned by DataLayer.Bookmarks. This could be use to provide additional information or datalayer filtering. |
Bookmark Description | Specifies default bookmark description text. |
Bookmark Name | Specifies a text string saved in the bookmark and returned by DataLayer.Bookmarks. It is typically used to store the report name. |
Bookmark Request | Specifies one or more Request variables names, in a comma-separated list, to be saved in the bookmark. For example, to save the value of the token @Request.State~, you would enter State here. Values for Request variables specified here will be automatically saved when the report is submitted or refreshed. |
Bookmark Session | Specifies one or more Session variables names, in a comma-separated list, to be saved in the bookmark. For example, to save the value of the token @Session.UserID~, you would enter UserID here. Values for Session variables specified here will be automatically saved when the report is submitted or refreshed.
|
Ensure that your report is a good candidate for automatic bookmarks: it needs to include one of the super-elements listed in the earlier About Bookmarks section of Bookmarks. Remember that automatic bookmarks do not record values for user input controls outside of super-elements.

- In Studio, open your application's _Settings definition and select the General element.
- Set the Bookmark Collection Default attribute to the name for the bookmark data file. Do not include a path or .xml file extension. If you're using Logi Security, you can use the @Function.UserName~ token to individualize the collection; if not, enter some other value of your choice.
 In general, specifying this value here and leaving the corresponding attributes blank in individual bookmark-related elements is good practice. If necessary, you can override this value by providing one in those other elements.
 - Set the Bookmark Location attribute value to the name of a folder, underneath the Logi application root folder where you want the bookmark files to be stored. You can use a token for the root folder here, as shown above. Don't use the system rdDataCache or rdDownload folders as these are periodically "cleaned up" automatically.
- If it doesn't already exist in the file system, create the bookmark location folder and be sure it inherits all the file access permissions of the application root folder.

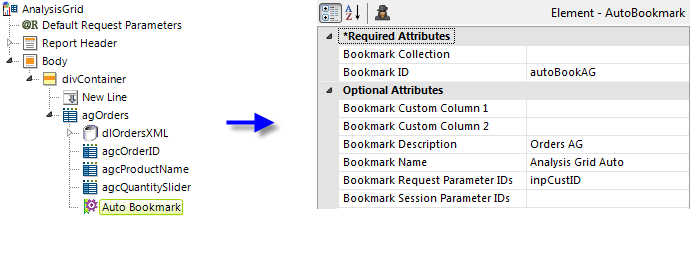
- Add an Auto Bookmark element as a child of the target super-element, as shown above.
- You can leave the Bookmark Collection attribute blank, unless you want to override the default value set in the _Settings definition.
- Specify a unique Bookmark ID to differentiate this bookmark in the collection. This value will be incorporated into the bookmark file names, so don't use any exotic characters here that the web server file system considers invalid in file names.
- With the exception of Allow Shared Bookmark Updates (discussed later), the rest of the element's attributes are identical to those for Action.Add Bookmark but, of course, without those for the Save Bookmark dialog box user interface. Refer to the table in Adding Manual Bookmarks to a Report for information about these attributes.
- The last thing you need to do to is initiate automatic bookmarks. This is done by calling the report with rdLoadBookmark=True in the query string. One way to do this is by using Link Parameters with the link that calls the report.
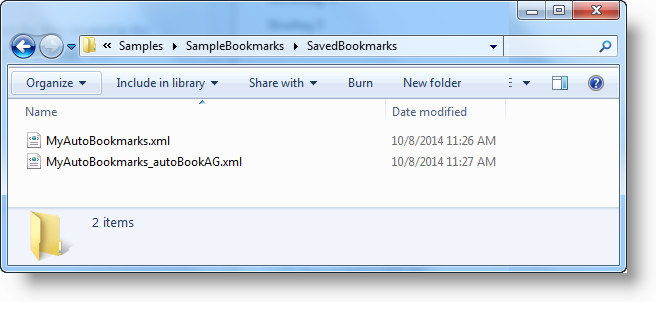
Now you can run the report and manipulate the super-element interface. After that you can inspect the files created in the specified bookmark file location. Assuming a bookmark collection name of "MyAutoBookmarks", you should see:

The first file is the main bookmark file and will always be present. The other file, with Bookmark ID you specified as part of its name, is referenced in the main file and contains information about the super-element in the report. It will appear once the super-element UI is manipulated.
Here are some additional important usage tips:

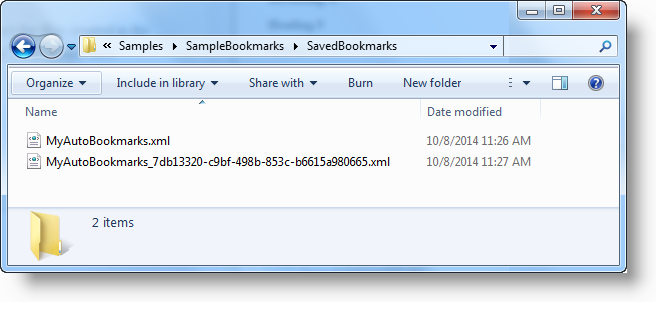
To automatically generate the Bookmark ID: If you want the application to generate the Bookmark ID automatically, using a GUID, as shown above, leave the element's Bookmark ID attribute blank and call the report with rdNewBookmark=True in the query string.
With Report Center Menu: If the report includes a ReportCenter Item element, the automatically-created bookmark will be listed with the ReportCenter Menu element.
With Dashboards: If using Auto Bookmark with a Dashboard, do not set the Dashboard element's Save File attribute. The bookmark will in effect become the dashboard's Save File.