Connecting to Databases
Logi DataHub is capable of connecting to a variety of commercial databases in order to retrieve data. This topic presents an example of how to create a connection to data on a SQL database.
The supported database servers include:
- Microsoft SQL Server
- MySQL
- ODBC database providers
- OLEDB database providers
- Oracle
- PervasiveDB
- PostgresSQL
- Vertica
Connections to applications are discussed in Connecting to Applications.
Create a New Data Source
In DataHub, a connection to data is called a "Source" and can be an application, database, or file connection. In this topic, we'll create a new Source based on a SQL database. There are multiple paths to the Add Source dialog box, including:
- Sources menu option
 Create New Source.
 - Dataviews menu option
 Create New Dataview
  From Source tab
 Add New Source
The Add Source dialog box will appear (the fields shown below will not be visible unless the Database option is selected):
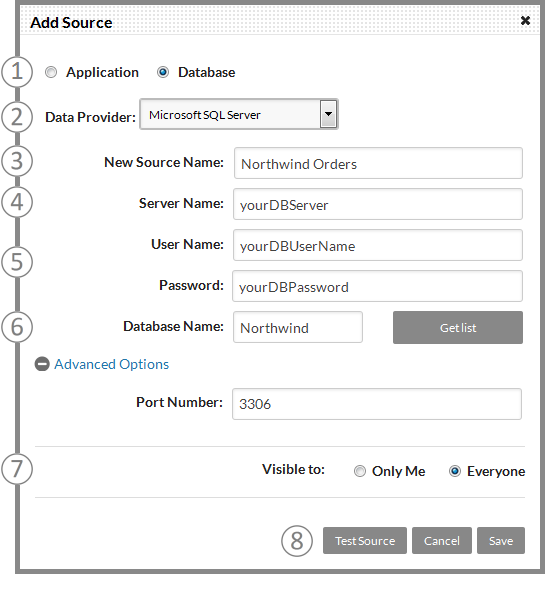
Select or provide the required information, as follows:
- Database - Select the Database radio button, making the fields shown above visible.
- Data Provider - Select the desired database or provider type. If you select the generic ODBC or OLEDB providers, skip down to the next section.
- New Source Name - Give the source an arbitrary name for easy recognition later.
- Server Name - Enter the database server name.
- User Name and Password - Enter the credentials required to access the database.
- Database Name - Enter the target database name (or, for Oracle, the Service Name).
For Microsoft SQL Server, MySQL, and PostgreSQL providers, you can use the Get List button to select the database name from a list.
For MySQL, Oracle, PervasiveDB, and PostgreSQL providers, the Advanced Options link and Port Number field will be shown. They are not shown for other providers.
- Visibility - Select the security settings to be applied to the connection: Only Me or Everyone. The user who creates a connection is the manager of the connection and may choose the connection sharing options.
- Test Source - This action will attempt to make the connection specified and provide a status message. In addition to indicating either success or failure, any existing Source with the exact same specifications will be identified so you can decide whether to use it instead or proceed to save your new Source.
Click Save to save your new Source. Repeat as necessary to create the Sources you need.
Generic Providers
If you select the generic ODBC or OLEDB providers, the dialog box will be reconfigured:
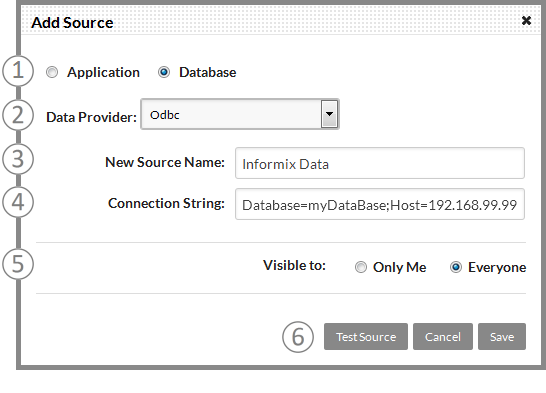
Select or provide the required information, as follows:
- Database - Select the Database radio button, making the fields shown above visible.
- Data Provider - Select the ODBC or OLEDB provider type.
- New Source Name - Give the source an arbitrary name for easy recognition later.
- Connection String - Enter an appropriate connection string. If you need help, see the ConnectionStrings.com web site.
- Visibility - Select the security settings to be applied to the connection: Only Me or Everyone. The user who creates a connection is the manager of the connection and may choose the connection sharing options.
- Test Source - This action will attempt to make the connection specified and provide a status message. In addition to indicating either success or failure, any existing Source with the exact same specifications will be identified so you can decide whether to use it instead or to proceed to save your new Source.
Click Save to save your new Source. Repeat as necessary to create the Sources you need.
Managing Data Sources
As you create Sources, they're represented in the Sources page with graphic "pills":
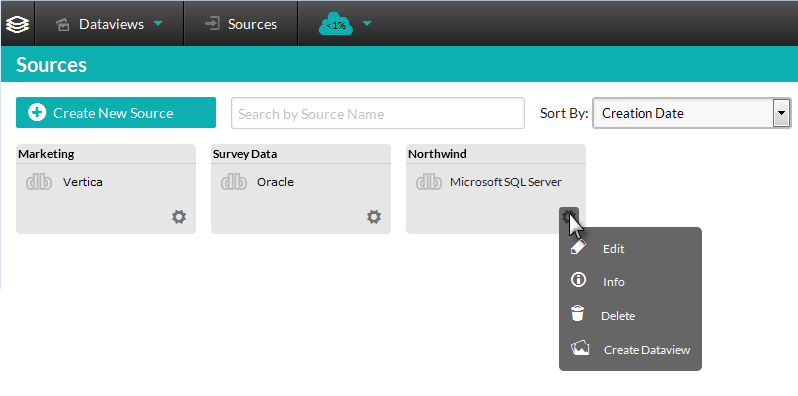
The collection of pills can be searched and filtered using the provided controls.
Each pill displays the Source name and database type, as shown above, and includes a "gear" icon. Hovering your mouse cursor over the icon displays a menu of management actions.
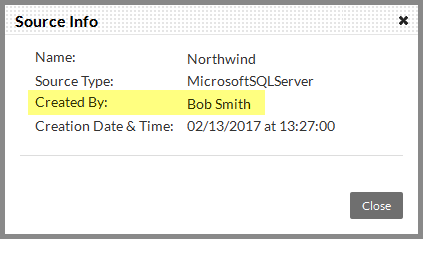
The Info menu option allows you to see, among other details, who created the Source, as shown above. This can be helpful if the Source has been shared with you by another user. The Delete option will only be included if you're the user who created the Source.
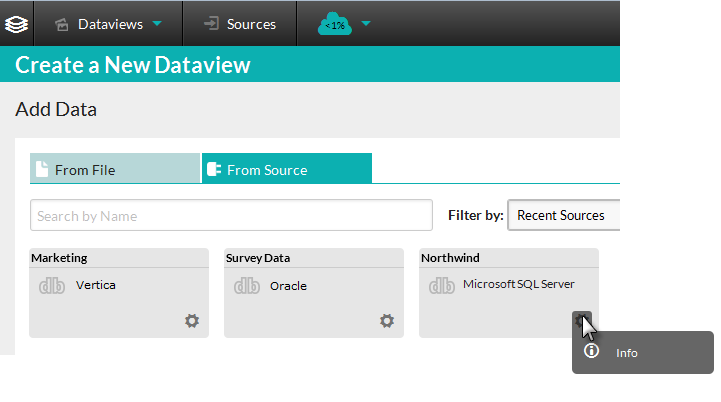
Source pills are also visible in the Create a New Dataview page, under the From Source tab, as shown above. The gear icon, however, only displays an information option from this page.