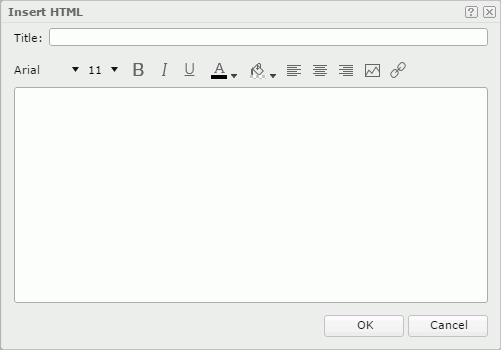
Insert HTML Dialog Box Properties
Use the Insert HTML dialog box to insert an HTML component into the dashboard body. This topic describes how to create an HTML component.
Server displays the dialog box when you drag HTML from Toolbox in the Resources panel to the dashboard body.

Title
Specify the title for the HTML component.
HTML text box
Type text in the box directly. You can make use of the buttons above the text box to format the text, insert images, and create hyperlinks.
You see these buttons:
 Font Face
Select the font of the text from the drop-down list. Font Size
Select the font size of the text from the drop-down list. Bold button
Select if you want to make the text bold. Italic button
Select if you want to make the text italic. Underline button
Select if you want to underline the text. Font Color button
Select the color of the text.To change the color, select the color indicator. Then, select a color, or select More Colors to access the Color Picker dialog box in which you can select a color within a wider range.
 Background Color button
Select the background color of the text. Align Left button
Select if you want to align the text to the left. Align Center button
Select if you want to align the text in the center. Align Right button
Select if you want to align the text to the right. Insert Image button
Select to open the Insert Image dialog box for inserting an image into the HTML component. Hyperlink button
Select to open the Hyperlink dialog box to create a hyperlink on the selected object.
OK
Select to insert the HTML component in the dashboard body.
Cancel
Select to close the dialog box without the insertion.
 Help button
Select to view information about the dialog box.
 Close button
Select to close the dialog box without the insertion.
 Previous Topic