Lesson 6: Security
Server provides a security system that protects its resources from inappropriate access by users. In addition to controlling resource-level access, the security system can control access to certain fields or certain information based on the user's role or group level information.
As an alternative to the built-in security system, you can use an LDAP server for Logi Report Security. Logi Report provides interfaces to synchronize with a variety of LDAP servers, and can directly authenticate to an LDAP directory. Conversely, you can pass a Security token to Logi Report for authentication. Logi Report provides an interface for authentication.
This lesson contains the following tasks:
- Task 1: Create a New User
- Task 2: Enable Auditing for the User
- Task 3: Assign Permissions to the User, Group, or Role
Task 1: Create a New User
To use Server, you must have a user account, which consists of a unique user name and a password. Server verifies your identity when you type your user name and password and then sign in. If your user account has been disabled or deleted, Server prevents you from accessing the web services that Server provides, in order to ensure that only valid users can access the resources that they have permission to see.
Server comes with two built-in user accounts, which are "admin" and "guest". You cannot delete the built-in user accounts. The "admin" user account can neither be deleted nor disabled.
To create a user account
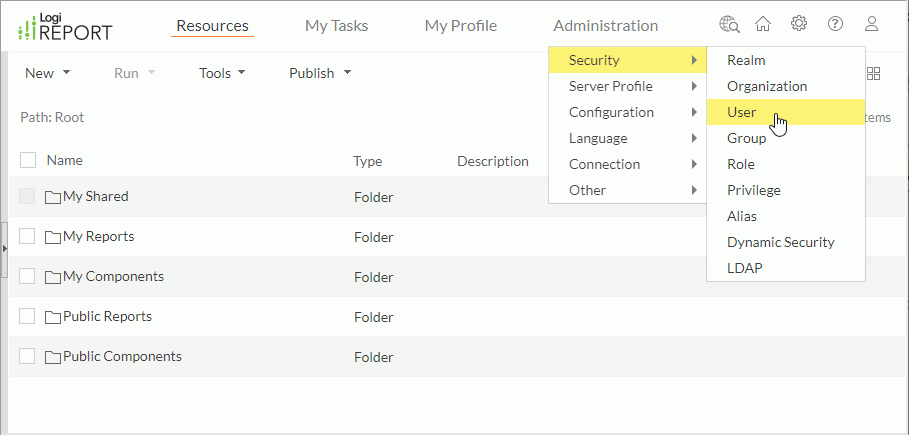
- On the system toolbar of the Server Console, navigate to Administration > Security > User.

- In the User page, select New User.

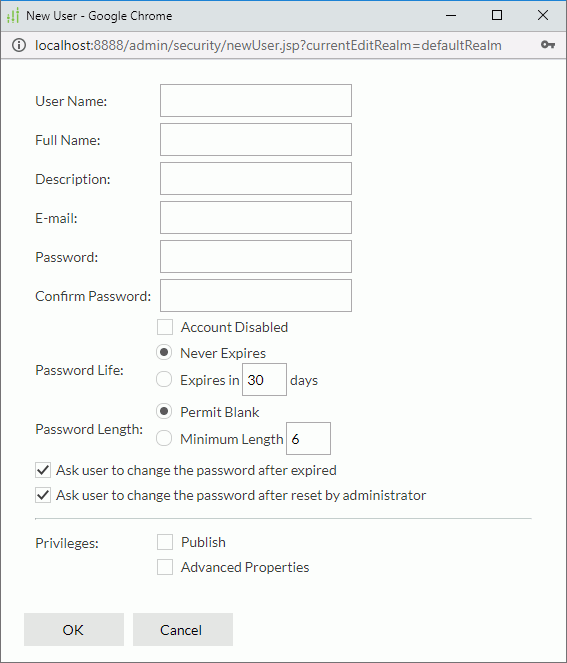
- Complete the New User dialog box with any user information you would like to use and select OK to create the user.

Although it does not matter in this lesson, the Publish privilege is an important aspect of user definition. You can either grant or deny users the ability to publish resources to Server using this checkbox.
- Server lists the new user in the user table.
You can group users. Often a set of users require the same security privileges, for example, everyone in the Sales organization can view the Sales reports. By creating a named group, you can efficiently manage the security of a set of users. This saves a lot of time when setting permissions. By setting permissions to the Sales group, you do not need to change anything when you delete or add users into the sales organization. Roles are very similar to groups. You can assign users to groups and assign groups to roles, and then apply permission just to the roles.
You can also assign roles to users. Roles help you efficiently manage the user rights and permissions that are required to perform operations on resources. Assigning one or more roles to users gives the users all of the user rights and permissions the roles have to perform their jobs with. You can also assign a role to other groups or roles, and hence the groups or roles inherit the resource and folder permissions that the roles have. Server comes with two built-in roles, which are "administrators" and "everyone". You cannot delete the built-in roles.
Task 2: Enable Auditing for the User
Server can record user access and management information in the log files by auditing the user.
To audit the user
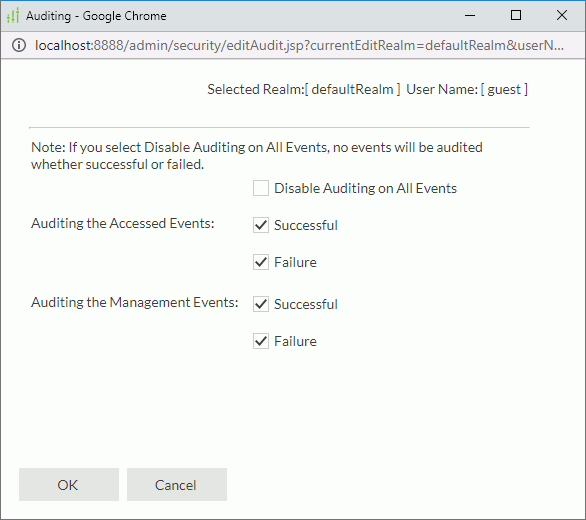
- In the User page, locate the user you want to audit from the user table, then select the Auditing link for the user in the Control column.
- In the Auditing dialog box, select OK to accept the defaults.

Server then records the events in the log file.
Task 3: Assign Permissions to the User, Group, or Role
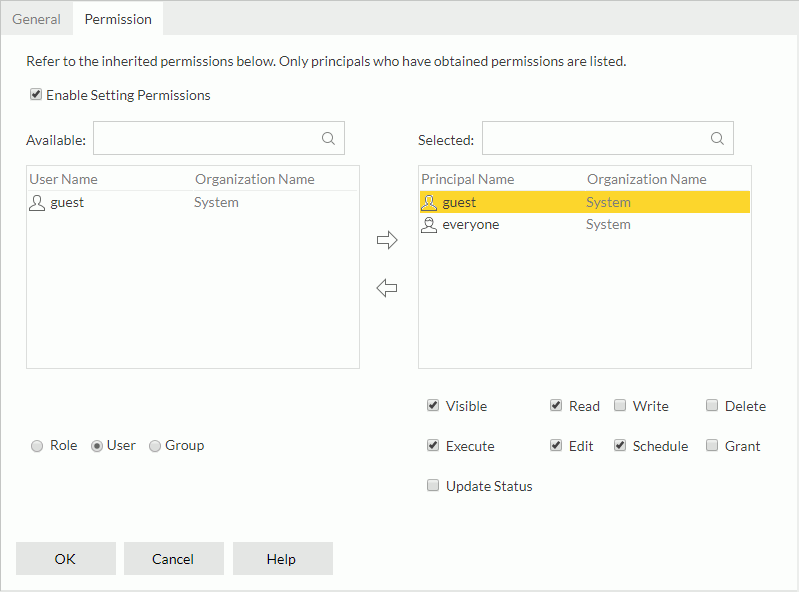
Permissions, associated with resources and folders which locate in the public folders, are the rules that are granted to users, groups, and roles to control their access to resources and folders. The permissions include: Visible, Read, Write, Execute, Edit, Schedule, Delete, Grant, and Update Status.
After you set permissions on a parent folder, new resources and subfolders created in the folder inherit these permissions. If you do not want them to inherit permissions, you can also set their permissions separately.
To set, view, change, or remove resource permissions
- In the Resources page of the Server Console, browse to the resource on which you want to set permissions.
- Point to the resource row, then select Properties
 on the floating toolbar.
 - In the Properties dialog box, switch to the Permission tab, select Enable Setting Permissions, then select the role/user/group in the Selected box and select or clear the required permissions. If the role/user/group is not available in the Selected box, select the corresponding radio button below the Available box, add the role/user/group to the Selected box and then assign the permissions accordingly.

To remove resource/folder permissions for all users, groups, and roles, clear Enable Setting Permissions.
- Select OK to confirm the settings.
 Previous Topic