Configuring Business View Security in a Catalog
To define security for the business views in a catalog, take the following steps:
- Open the required catalog.
- In the Catalog Manager, do any of the following:
- Expand the desired data source > Security node, right-click Business View Security and select Edit Business View Security on the shortcut menu. Designer displays the Edit Business View Security dialog box.
- When working with a business view in the Business View Editor dialog box, select Menu > Tools > Security Configuration. Designer displays the Edit Business View Security dialog box.
- When adding or editing a business view element using dialog box, switch to the Security tab.
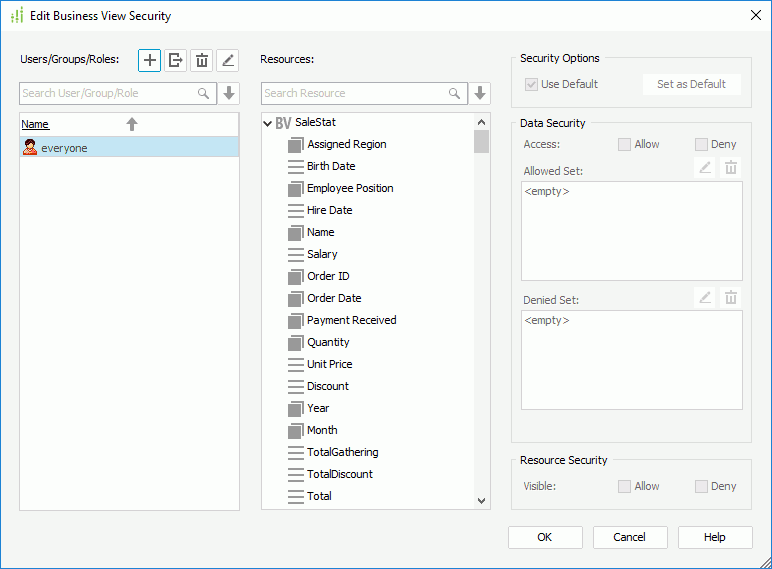
The following is a sample dialog box:

- In the Users/Groups/Roles panel, select the Add button
 and select Import from Logi Report Server from the drop-down menu (before importing, you should make sure Server is started). Designer then adds the users, roles, and groups created on Server in the principal box if Designer can connect to Server and log you in automatically; otherwise, it displays the Connect to Logi Report Server dialog box for you to specify the properties for connecting with Server first. The logged-in user should be an administrator user of the started Server so that Designer can perform the importing successfully.
You can also select
 and select Add User, Add Role, or Add Group from the drop-down menu to add principals manually in Designer or import them from an XML file, however if you choose to add users, groups, and roles using these two methods, in order to make the business view security take effect on Server, the Server administrator should have created the users, groups, and roles in its security system before you publish the reports involving the business view security to Server.
You can further edit or remove the principals in the User/Group/Role panel.
- To edit a user/role/group, select it and select the Edit button
 . In the corresponding edit dialog box, edit it as required. Changes to Server users, roles, and groups made in Designer cannot take effect on Server.
 - To delete a user/role/group, select it and select the Remove button
 .
.

- You cannot assign a user from Server to (or remove it from) a role from Server; similarly, you cannot re-assign a role from Server to (or remove it from) a user from Server. Therefore, if you obtain both users and roles from Server, you are not able to change their parental relationships.
- You cannot assign a role from Server to a local user created in Designer, while you can grant a user from Server a local role.
- During importing, if any existing users, roles, or groups that came from Server have the same names as those in Server, Designer refreshes their properties with new information from Server, for example, the role or group information and parental relationships; however, Designer reserves their permission settings. Specially, if you have assigned a user from Server to any roles defined in Designer, Designer reserves these roles in its member list.
- To edit a user/role/group, select it and select the Edit button
- Select one or more users/roles/groups in the principal box. If you want to select all users, roles, or groups at a time, select the down button
 and then select the corresponding item from the drop-down menu.
 - In the Resources box, select one or more view elements. You can select
 and select an item from the drop-down menu to select all the detail objects, group objects, aggregation objects, or categories in business views of the current catalog data source at a time.
 - In the Security Options box, clear the Use Default checkbox so as to customize the data security and resource security for the selected view elements. If you want to use the default security settings of the selected elements, make the checkbox selected.
If you only select one principal and one view element to define the security, after you finish defining the data security and resource security, you can save the current security settings as the element's default security settings by selecting the Set as Default button.
- In the Data Security box, specify whether the selected principals can access values of the selected view elements.
- In the Resource Security box, specify whether you want the selected view elements to be visible to the principals.
- If you select only a group object in step 4, you can further specify to allow or deny specific members of the group object for the principals in the Data Security box.
- Select the Pencil button
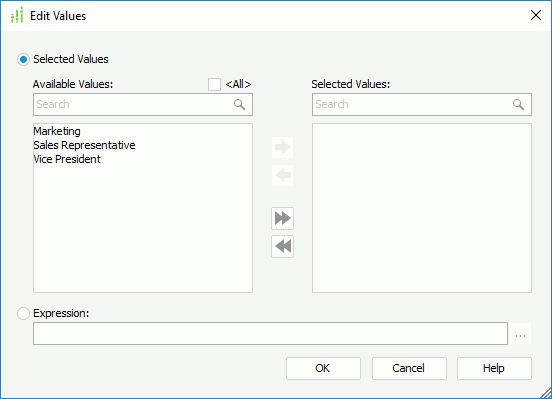
 above the Allowed Set or Denied Set box. Designer displays the Edit Values dialog box.

- Choose a method of specifying the members: select members from the available list, or compose an expression to retrieve members. You can use only one method.
- To select members, first select the Selected Values radio button.
If you would like to select all the possible members of the group object, select <All>.
If you just want to select some of the members, leave <All> unselected. Add the members one by one by selecting one and then selecting the Right Arrow button
 .
. - To compose an expression, select the Expression radio button, then select the ellipsis button
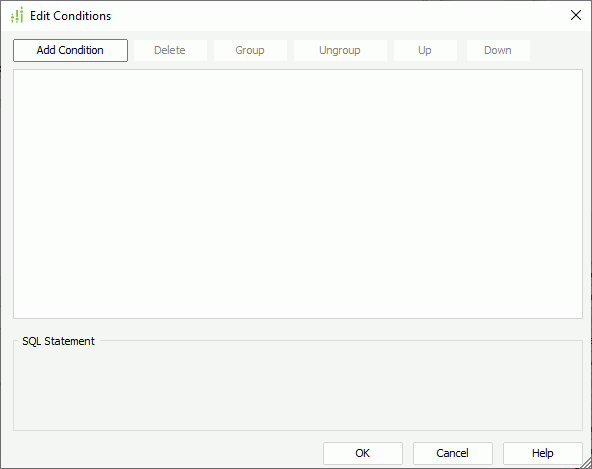
 . Designer displays the Edit Conditions dialog box.

Select the Add Condition button to add a condition line. Choose the operator with which to compose the condition expression from the operator drop-down list. From the value drop-down list, specify the value of how to build the condition. You can also type in the value manually. Repeat this to add more condition lines and define the logic relationship between the condition lines: "And", "Or", "And Not", or "Or Not".
To group some condition lines, select them and select the Group button, Designer then adds the selected condition lines in one group and applies them as one line of filter expression (you can also group conditions and groups together); to take out any condition or group from a group, select it and select Ungroup; to adjust the priority of the condition lines, select it and select the Up or Down button; to delete a condition line, select it and select the Delete button.
- To select members, first select the Selected Values radio button.
- Select OK in the Edit Values dialog box to apply the specified values.
- If you select users, specify whether the unspecified members of the group object are available to the users.
See Permission Logic on Group Objects for more information about the permission logic between allowed set, denied set, and unspecified members.
- Select the Pencil button
- Repeat steps 3 to 9 to customize other principals' permissions on the view elements.
- Select OK in the dialog box.
- Save the catalog.
When you save the catalog, Designer saves the permission settings at the same time in an authorization file in the same folder as the catalog file. The catalog and authorization files have the same file name but different extensions, for example, if the catalog file is test.cat, the authorization file is test.auth.
![]() After you publish a catalog with business view security to Server, only the principals on Server which match the principals defined in the business view security can keep the security settings. If the administrator deletes a principal from the security system of Server, Server removes the related business view security settings from all catalogs.
After you publish a catalog with business view security to Server, only the principals on Server which match the principals defined in the business view security can keep the security settings. If the administrator deletes a principal from the security system of Server, Server removes the related business view security settings from all catalogs.
 Previous Topic