Working with CSS Styles
Logi Report CSS styles enables you to create various visual presentation sets from a single report, and change the visual presentation of your report. A CSS style file is like a style group, which contains a set of styles with many predefined properties. Logi Report supports the CSS style file that is defined according to CSS 2.1 standard of W3C. You can control the properties of all the components in a report by a CSS file. You can customize, edit, and save a CSS style with visible UI of the CSS Editor in Designer, and can also compile and save a CSS file manually according to the W3C standard. After that, you can import these CSS style files to apply to a component. By using Logi Report CSS styles, you can create various visual presentation sets from a single report, and change the visual presentation of your report. This topic describes how you can create and manage CSS styles in Designer.
This topic contains the following sections:
Creating CSS Styles
Logi Report supports some of the W3C CSS 2.1 standard properties at present, which are background-color, border-style/border-top-style/border-bottom-style/border-left-style/border-right-style, color, font-size, height, padding/padding-top/padding-bottom/padding-left/padding-right, text-align, and width.
To create a CSS style in Designer:
- Right-click an object in the design area and select Save Style from the shortcut menu. Designer displays the New CSS Style dialog box.
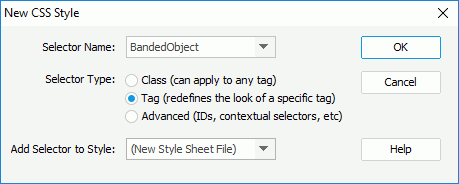
- Define the type of the CSS style:
- To create a custom style that you can apply as a class attribute to a range or block of text, select the Class option and type a name for the style in the Selector Name combo box.
 Class names must begin with a period and can contain any combination of letters and numbers (for example, .myhead1). If you do not type the beginning period, Designer automatically adds it for you.
 - To redefine the default formatting of a specific tag, select the Tag option and then select a tag from the Selector Name combo box.
- To define the formatting for a particular combination of tags or for all tags that contain a specific ID attribute, select the Advanced option and then type one or more tags in the Selector Name combo box or select one from the box. If the object is in a crosstab, when you select this option, the following advanced selector names are available in the Selector Name drop-down list according to the current object name.
Object Name CSS Tag Name Advanced Selector Name Example Aggregation Title CrosstabLabelField CrosstabLabelField[Depth=<current>] Aggregation Field CrosstabAggregationField CrosstabAggregationField[XDepth=<current>][YDepth=<current>]
CrosstabAggregationField[XDepth=<current>]
CrosstabAggregationField[YDepth=<current>]Special Aggregation Field CrosstabAggregationSpecialField CrosstabAggregationSpecialField[XDepth=<current>][YDepth=<current>]
CrosstabAggregationSpecialField[XDepth=<current>]
CrosstabAggregationSpecialField[YDepth=<current>]Label of Column/Row Field CrosstabDBTitleField CrosstabDBTitleField[Depth=<current>][IsXHeader=<true or false>]
CrosstabDBTitleField[Depth=<current>]
CrosstabDBTitleField[IsXHeader=<true or false>]Column/Row Field CrosstabDBField CrosstabDBField[Depth=<current>][IsXHeader=<true or false>]
CrosstabDBField[Depth=<current>]
CrosstabDBField[IsXHeader=<true or false>]Total Label CrosstabTextField CrosstabTextField[Depth=<current>][IsXHeader=<true or false>]
CrosstabTextField[Depth=<current>]
CrosstabTextField[IsXHeader=<true or false>]The following image illustrates the four selector attributes in a crosstab: Depth, XDepth, YDepth, and IsXHeader. IsXHeader is a Boolean type attribute which specifies whether it is a column header.
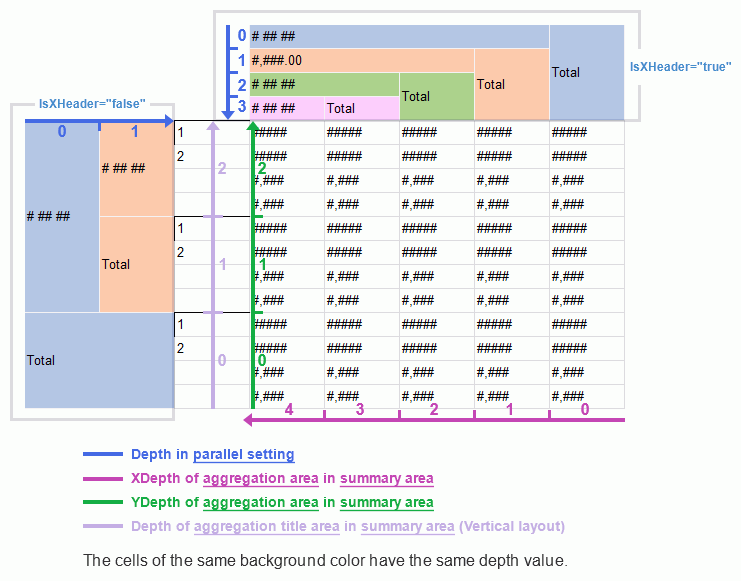
The four attributes are not String in the crosstab definition, so Designer needs to convert them to String to meet the CSS definition, for example:
- CrosstabTextField[Depth="1"]
- CrosstabTextField[IsXHeader="false"]
Depth, XDepth, and YDepth can use the dynamic value named "JR-MAX" to represent the maximum value in the parallel-setting or summary area they belong to, for example, CrosstabTextField[Depth=JR-MAX]. In this case, Designer also lists the JR-MAX conditions in the Selector Name drop-down list.
- To create a custom style that you can apply as a class attribute to a range or block of text, select the Class option and type a name for the style in the Selector Name combo box.
- From the Add Selector to Style drop-down list, select the location in which to define the style.
- If you want to create an external style file, select New Style Sheet File and select OK. Then,
- In the Save CSS As dialog box, specify the name of the new CSS file.
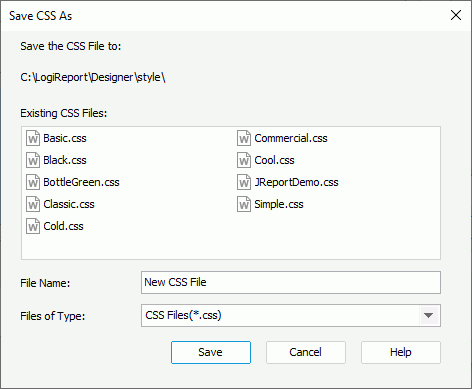
- Select Save to save the file. Designer then displays the CSS Style Definition dialog box.
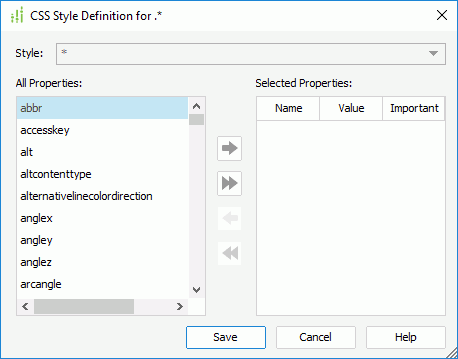
- Add the properties you want to contain in the style, specify the values for the properties, and check if the properties are important or not.
- Select Save to save the CSS file.
- In the Save CSS As dialog box, specify the name of the new CSS file.
- If you want to embed the style in an existing CSS file, select any of the existing styles and select OK. In the CSS Style Definition dialog box, define the properties of the style and select Save to save the file.
- If you want to create an external style file, select New Style Sheet File and select OK. Then,
Managing CSS Styles
You can manage CSS styles using the CSS Editor dialog box in Designer. However, you might find it easier to use a third party CSS editor such as Dreamweaver that enables you to use all of the CSS classes at one time.
To access the CSS Editor dialog box, select Home > CSS Editor.
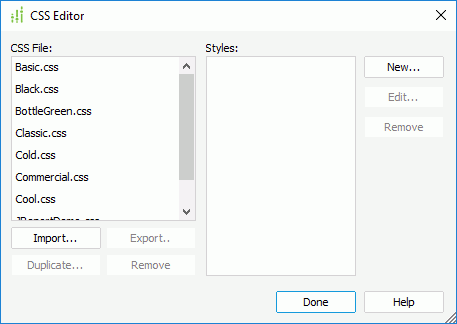
You can perform the following management tasks in the CSS Editor dialog box:
- Importing a CSS style:
- Select the Import button.
- In the Import CSS File dialog box, select the CSS style you want to import and select Open.
 In the imported CSS styles, only the valid property names, which match with those in Designer, can take effect.
 - Duplicating a CSS style:
- Select the CSS style in the CSS File box.
- Select the Duplicate button.
- Exporting a CSS style:
- Select the CSS style you want to output in the CSS File box, then select the Export button.
- In the Save As dialog box, specify the directory to locate the CSS style.
- Select Save to save the CSS style to the specified directory.
- Removing a CSS style:
- Select the CSS style file in the CSS File box.
- Select the Remove button below the CSS File box to remove the style.
- Creating a style sheet in a CSS style:
- Select the CSS style in the CSS File box, then select the New button on the right.
- Define the style sheet as seen above.
- Editing the style sheets in a CSS style:
- Select the CSS style in the CSS File box. Designer lists all the style sheets in the style file in the Styles box.
- Select the one you want to edit and select the Edit button on the right.
- In the CSS Style Definition dialog box, edit properties for the selected style sheet.
- Select Save to confirm the editing.
- Removing a style sheet from a CSS style:
- Select the CSS style in the CSS File box. Designer lists all the style sheets in the style file in the Styles box.
- Select the style sheet you want to remove and select the Remove button on the right.
 Previous Topic