New Cache
The New Cache dialog box is used to create a schedule task to generate cached report data for the specified data resources. It appears when an admin user selects the New Cache link in the Administration > Configuration > Cache > Data Cache page in the server console.
The dialog box is divided into two phases, one for selecting data resources and the other for defining the schedule task.
Selecting Data Resource Phase
At this phase, you need to specify the data resources for which to create cached data.
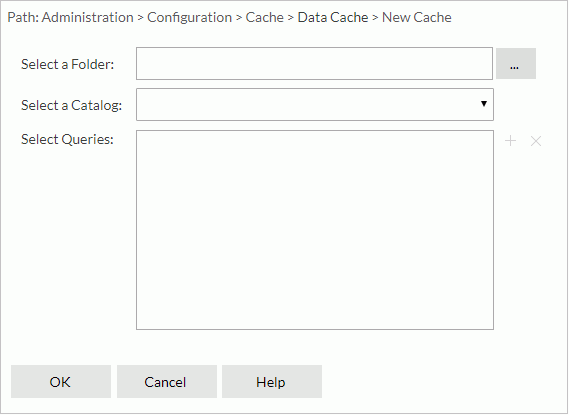
Select a Folder
Specifies the folder in the server resource tree that contains the required catalog. You can select the button  to open the Select Folder dialog box for selecting the folder.
Select a Catalog
Specifies the catalog in the folder.
Select Queries
Lists the selected data resources.

Opens the Select Queries dialog box to select the data resources that you are going to create data caches for.
Removes the selected data resources.
OK
Goes to the next phase to define the schedule information.
Cancel
Does not retain any changes and closes the dialog box.
Help
Displays the help document about this feature.
Scheduling Phase
At this phase, you need to define the data resource information and the updating policy of the data cache with the following tabs:
Back
Goes back to the previous tab.
Next
Goes to the next tab.
Finish
Applies the settings.
Cancel
Cancels any settings and returns to the selecting data resource phase.
Help
Displays the help document about this feature.
General
Before you can schedule a CRD task, you first need to configure the settings in this tab.
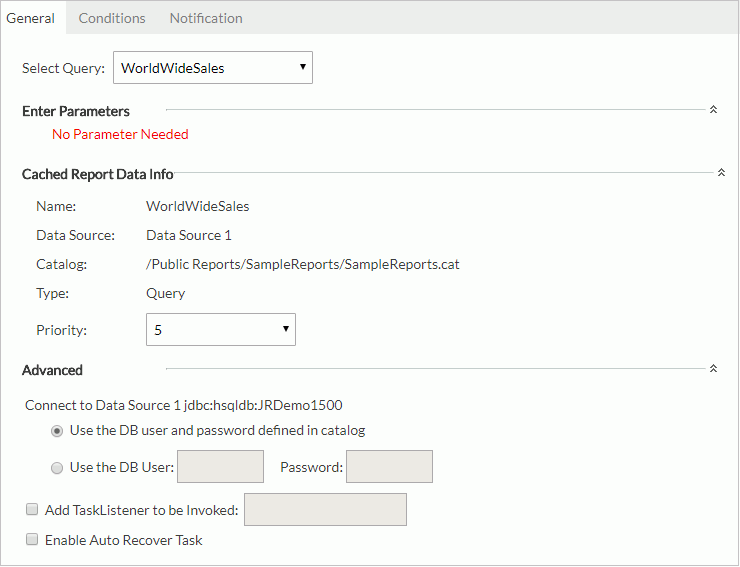
Select Query
Lists all the data resources selected in the selecting query phase. Select a data resource from the drop-down list and then specify the general properties of its scheduled CRD task.
Specifies values of the parameters applied in the selected data resource. You may specify parameter values in these ways.
If the data resource does not have parameters, Report Server displays "No Parameter Needed" here.
Cached Report Data Info
Specifies the data cache information.
- Name
Displays the name of the selected data resource. It is also used as the name of the new data cache. - Data Source
Displays the data source name. - Catalog
Displays the catalog information. The latest version is used by default. - Type
Displays the type of the data resource. - Priority
Specifies a priority level to the scheduling task. The priority levels are from 1 to 10 in ascending order of lowest priority to highest priority. By default this property is ignored unless server.properties is modified to set queue.policy not equal to 0.
Advanced
Configures some advanced settings.
- Connect to [Data Source Name]
Specifies the DB user and password with which you want to connect to the data source.- Use the DB user and password defined in catalog
If the option is selected, the DB user and password defined in the catalog will be used. - Use the DB User
If the option is selected, you can then specify another DB user and password instead of the one defined in the catalog.
- Use the DB user and password defined in catalog
- Add TaskListener to be Invoked
Enables you to call a Java application before/after the task runs so as to obtain information about the task. - Enable Auto Recover Task
Specifies to enable the task to be auto recovered.- Maximum Retry Times
Specifies the maximum number of times in which to retry running the task in order to recover it. - Retry Interval
Specifies the interval between retries. - Recreate All Results
Specifies whether to recreate all or just the failed results.
- Maximum Retry Times
Conditions
The Conditions tab allows you to specify the updating policy of for the task. It contains the following two sub tabs:
Time
The Time tab allows you to set settings for specifying the time for when the task is to be performed.
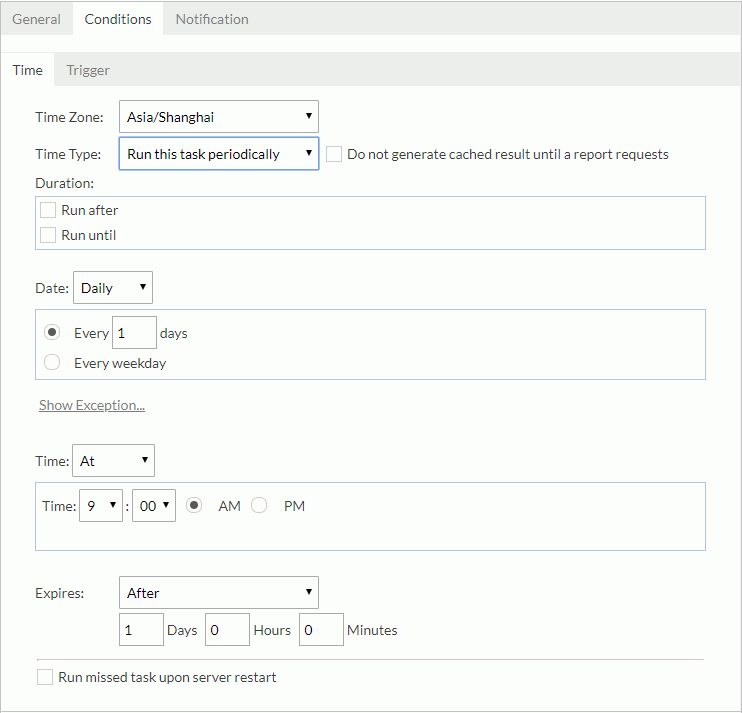
Time Zone
Specifies the time zone.
Time Type
Specifies when the task will be performed.
- Run this task immediately
Specifies to run the task as soon as you submit it. - Run this task at
Specifies the time for when the task is to be performed once.- Date
Specifies the date to run the task. You can select the Calendar icon to select a date from the calendar.
 - Time
Specifies the time to run the task. - Run missed task upon server restart
Specifies to run missed tasks when you restart the server.
- Date
- Run this task periodically
Specifies the time for when the task is to be performed on a repeated basis.- Do not generate cached result until a report requests
This option is unselected by default, which means the task will be performed to generate the cached report data according to the specified time condition. If it is selected, the task will be performed only upon the first report running request based on the query after each scheduled time. - Duration
Specifies the period during which the task is to be performed.- Run after
Specifies the start date and time of the period during which the task is to be performed on a repeated basis. - Run until
Specifies the end date and time of the period during which the task is to be performed on a repeated basis.
- Run after
- Date
Specifies the date for when a task is to be performed.- Daily
Performs the task every one day, two days, etc., or every weekday (from Monday to Friday). - Weekly
Performs the task every one week, two weeks, etc., and on Sunday, Monday, Tuesday, etc. - Monthly
Performs the task on the first day, second day, etc. of every one month, two months, etc., or on the first Sunday, Monday, etc. of every one month, two months, etc. - Show/Hide Exception
Shows/Hides the exception date box that lists the dates on which you do not want to run the task.- Add
Adds an exception date via the Select Condition dialog box. - Remove
Removes the selected exception dates.

- Add
- Daily
- Time
Specifies the exact time for when a task is to be performed on a selected day.- At
Specifies a specific time for when to perform a task on a selected day. - Hourly
Performs the task every one hour, two hours, etc., at a certain minute on a selected day. - Minutely
Performs the task every one minute, two minutes, etc.
- At
- Run missed task upon server restart
Specifies to run missed tasks when you restart the server.
- Do not generate cached result until a report requests
Expires
Specifies the expiration time for how long to keep the cached data.
- Never
The cached data will not expire. - At
Specifies a specific time at which the cached data will expire. - After
Specifies a period of time after which the cached data will expire.
Trigger
The Trigger tab allows you to set settings for specifying a trigger for the task.
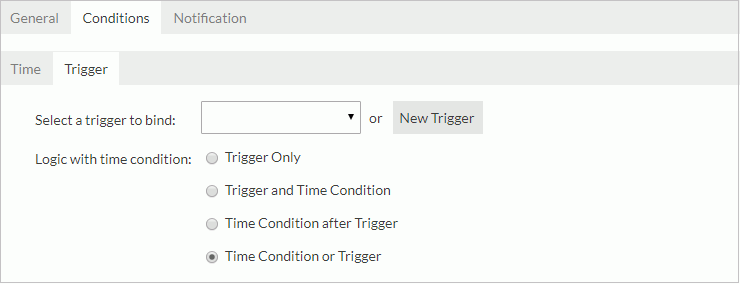
Select a trigger to bind
Specifies the trigger from the drop-down list for the task.
New Trigger
Opens the New Trigger dialog box for you to create a new trigger.
Logic with time condition
Specifies the logic between time condition and trigger condition.
- Trigger Only
Performs the task only when the trigger is fired. - Trigger and Time Condition
Performs the task when both time is up and the trigger is fired.Note: When this logic is selected:
- No matter which condition is ready, the task can only be performed when its counterpart is ready.
- If you specify the task to be performed at a specific time, you must select the option Run missed task upon server restart, otherwise the task will be regarded as expired and will be deleted when the time condition is ready before the trigger condition.
- Time Condition after Trigger
Performs a task when time is up after the trigger is fired. If the time condition is ready before the trigger condition, the task will be regarded as expired and will be deleted. - Time Condition or Trigger
Performs the task when either time is up or the trigger is fired.
Notification
The Notification tab allows you to notify someone by e-mail when the task finishes running, regardless of whether it is successful or unsuccessful.
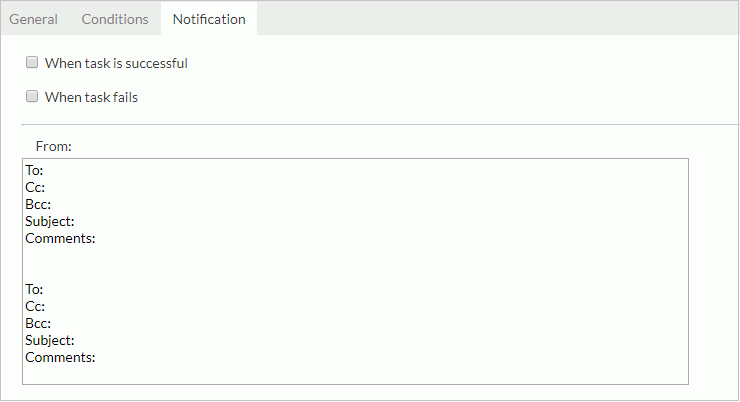
When task is successful
Specifies to send an e-mail when the task is successful.
When task fails
Specifies to send an e-mail when the task is unsuccessful.
To
Specifies the address you want to send the e-mail to.
Cc
Specifies the address you want to copy to.
Bcc
Specifies the address you want to secretly copy to.
Subject
Specifies the subject of the e-mail.
Comments
Specifies the contents of the mail or comments to the contents.
 Previous Topic