Configuring Export Settings
Administrators can configure the default settings for exporting report results to e-mail and fax, and customize the precision level for different export formats.
This topic contains the following sections:
- Configuring Settings for Exporting Reports to E-mail
- Configuring Settings for Exporting Reports to Fax
- Customizing the Layout Precision
Configuring Settings for Exporting Reports to E-mail
The settings are applied when end users schedule report tasks to publish report results to e-mail.
- In the Server Console, point to Administration on the system toolbar, and then select Configuration > Export from the drop-down menu to open the Export page. Server displays the E-mail tab by default.
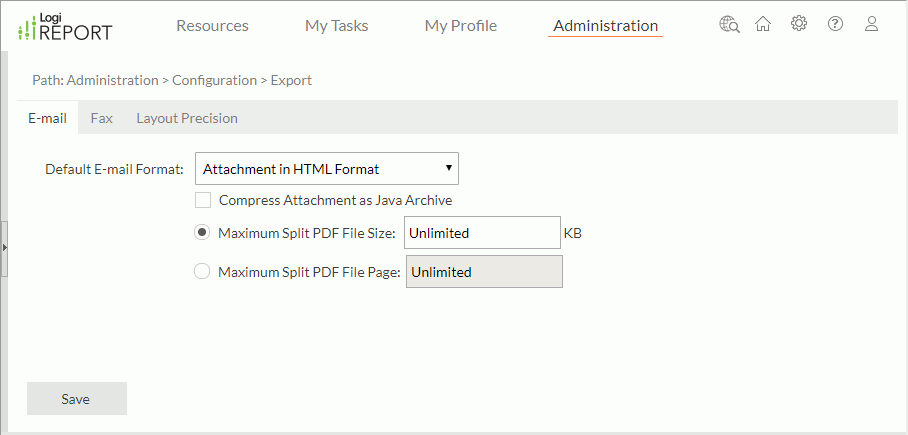
- From the Default E-mail Format drop-down list, specify the format in which to send a report result by e-mail. The format can be one of the following:
- E-mail Result in HTML E-mail Format
Sends the report result via e-mail to the specified address in HTML format. The report result will be shown in HTML format in the mail body. - E-mail Result in Plain Text E-mail Format
Sends the report result via e-mail to the specified address in plain text format. The report result will be shown in plain text format in the mail body with no other information such as color and images. - Attachment in Logi Report Result Format
Sends the report result via e-mail to the specified address with a Logi Report result file as attachment. - Attachment in HTML Format
Sends the report result via e-mail to the specified address with an HTML file as attachment. - Attachment in PDF Format
Sends the report result via e-mail to the specified address with a PDF file as attachment. - Attachment in Excel Format
Sends the report result via e-mail to the specified address with an Excel file as attachment. - Attachment in Text Format
Sends the report result via e-mail to the specified address with a Text file as attachment. - Attachment in RTF Format
Sends the report result via e-mail to the specified address with a RTF file as attachment. - Attachment in XML Format
Sends the report result via e-mail to the specified address with an XML file as attachment. - Attachment in PostScript Format
Sends the report result via e-mail to the specified address with a PostScript file as attachment.
- E-mail Result in HTML E-mail Format
- If you want to compress the mail attachment as Java archive, select the Compress Attachment as Java Archive check box.
- To split the PDF file in the mail attachment, specify in which way and how to split.
- To split the PDF file by file size, select the Maximum Split PDF File Size radio button and then type the largest size in KB each PDF file could have after splitting. The default value "Unlimited" means not to split.
If you choose to split by file size, then how to split the PDF file depends on the following two aspects:
- The separated pages by the before-split PDF file
- The maximum file size specified for an after-split PDF file
Here the before-split PDF file refers to the big PDF file to be split and an after-split PDF refers to one of the smaller PDF files generated after splitting the big PDF file. When a PDF file is to be split by file size, the splitting will be carried out based on the pages the file separates but not physically on the maximum file size specified for an after-split PDF file. However, the maximum file size helps to decide by which page to split: the page that the maximum size comes to is not included with the previous pages in an after-split file, but instead is the beginning page of the following after-split file. For example, there is a 2M PDF file with 1M per page. If the maximum file size is set to 1.5M, we will get two PDF files with each 1M and one page as the split result.
- To split the PDF file by file page, select the Maximum Split PDF File Page radio button and then type the number of pages each PDF file could have at most after splitting. The default value "Unlimited" means not to split.
- To split the PDF file by file size, select the Maximum Split PDF File Size radio button and then type the largest size in KB each PDF file could have after splitting. The default value "Unlimited" means not to split.
- Select Save.
- Restart Logi Report Server to make the e-mail settings take effect.
![]()
- You can enable the Split PDF feature only when the value is not Unlimited no matter which splitting way you choose.
- When the before-split PDF file contains only one page, the split function does not take effect as the only one page cannot further split either by file size or by file page, and therefore the result is one PDF file as attachment no matter whether you enable the Split PDF feature.
- Accessible PDF files will lose their accessibility after being split.
Logi Report Server saves the e-mail settings in the configuration file mailconfig.properties in the <install_root>\bin directory. You can also use the file for default e-mail configuration. The following table lists the available properties and the UI options they are mapped to.
| Property in mailconfig.properties | Mapped UI Option |
|---|---|
| default.format | Default E-mail Format |
| compress.mail | Compress Attachment as Java Archive |
| Tag_MaxMailSize | Maximum Split PDF File Size |
| Tag_MaxMailPage | Maximum Split PDF File Page |
Configuring Settings for Exporting Reports to Fax
Administrators can specify to export the report results via either a fax machine or a fax server. Report Server will use the settings when end users schedule report tasks to publish report results to fax.
To export report result to fax via a fax machine:
- Configure the running environment first. Download Java Communications API (Version 2.0): http://www.jinfonet.com/download/third_party_tool/JavaCommAPIV2_Win32.zip for Win32 or http://www.jinfonet.com/download/third_party_tool/JavaCommAPIV2_Solaris.zip for Solaris, and place the following files in the specified locations:
- For Windows:
File Name Location comm.jar <server_install_root>\libjavax.comm.properties <Java_install_root>\jre\libWin32Com.dll <Java_install_root>\jre\bin - For Solaris:
File Name Location comm.jar <server_install_root>/libjavax.comm.properties <Java_install_root>/jre/liblibSolarisSerialParallel.so LD_LIBRARY_PATH
- For Windows:
- In the Server Console, select Administration > Configuration > Export on the system toolbar. Server displays the Export page.
- Select the Fax tab. Report Server selects the Fax Machine radio button by default.
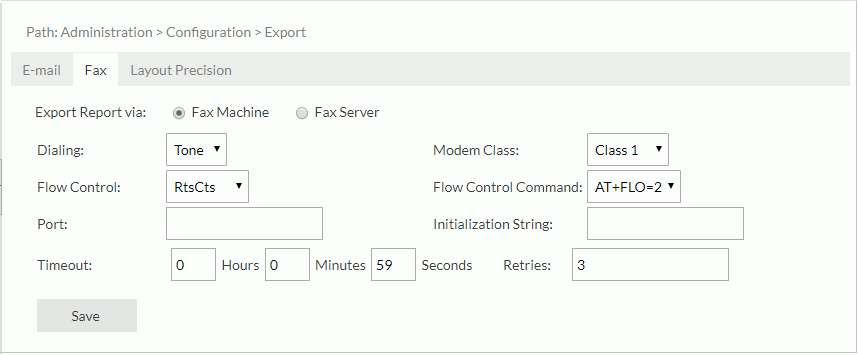
- From the Dialing drop-down list, select the dialing mode for the fax modem: Tone or Pulse.
- From the Modem Class drop-down list, select the class of the modem: Class 1, Class 2, or Class 2.0. Most modems only support Class 1. If you select Class 2 or Class 2.0, you should make sure that your modem can support it.
- From the Flow Control drop-down list, select the flow control mode between DTE (Data Terminal Equipment) and DCE (Data Circuit-terminating Equipment). Specifying flow control can help the compressing data function of the modem work better.
- RtsCts
Flow control of the hardware (recommended). - Xon/Xoff
Flow control of the software. - None
No flow control specified.
- RtsCts
- From the Flow Control Command drop-down list, select the flow control command according to the modem in use. If not contained in the drop-down list, you can leave this empty and type the command as part of the initial string. You should obtain the command from your modem manual.
- In the Port text box, type the port number. You should obtain the port from your modem manual.
- In the Initialization String text box, type the string to initialize the modem. You should obtain the string from your modem manual.
- In the Timeout text boxes, specify the maximum amount of time that the fax should wait for a response from the destination before timing out.
- When the line is busy, the report result may fail to fax, so you can specify the maximum number of times the modem re-tries faxing the report result in the Retries text box.
- Select Save.
- Restart Logi Report Server to make the fax settings take effect.
To export report result to fax via a fax server:
- In the Server Console, select Administration > Configuration > Export on the system toolbar. Server displays the Export page.
- Select the Fax tab.
- Select the Fax Server radio button.
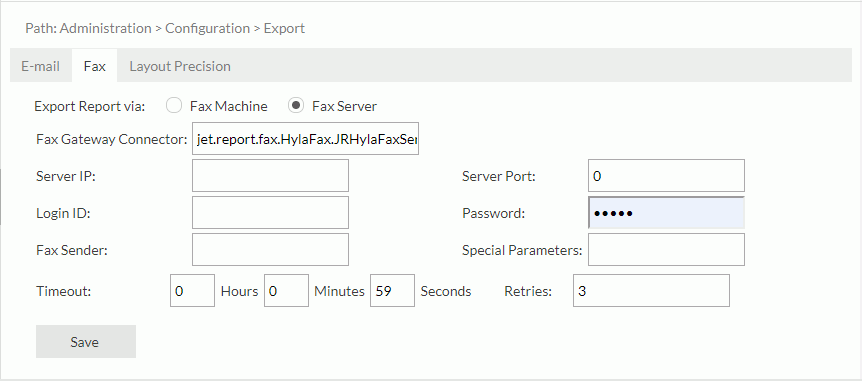
- In the Fax Gateway Connector text box, type the name of the implemented class.
By default, the fax server Logi Report uses is based on Hylafax Server. However, if you want to export your report result via Hylafax Server, you need to download the gnu-hylafax packages according to your requirements from http://sourceforge.net/projects/gnu-hylafax/, for example, gnu-hylafax-util-0.0.9.2.jar, gnu-inet-ftp-0.0.9.2.jar, and gnu-hylafax-0.0.9.2.jar, and then add them to the class path of the file setenv.bat in
<server_install_root>\bin. - In the Server IP text box, type the IP address or domain name of the fax server.
- In the Server Port text box, type the port number of the fax server.
- In the Login ID text box, type the username for the class communicating with fax server.
- In the Password text box, type the password for the class communicating with fax server.
- In the Fax Sender text box, specify the user's name that is shown in the fax server manager.
- In the Special Parameters text box, type the parameters for the fax server.
- In the Timeout text boxes, specify the maximum amount of time that the fax should wait for a response from the destination before timing out. For Hylafax Server the value should not be larger than 59 seconds. It is a limitation of Hylafax Server.
- In the Retries text box, type the number of times the modem retries faxing the report result.
- Select Save.
- Restart Logi Report Server to make the fax settings take effect.
Logi Report Server saves the fax settings in the file faxconfig.properties in the <install_root>\bin directory. You can also use the file for default fax configuration. The following table lists the properties in the file and the UI options they are mapped to.
| Property in faxconfig.properties | Mapped UI Option |
|---|---|
| via_fax_server | Fax Machine/Fax Server |
| time_out | Timeout |
| max_retries | Retries |
| dialing | Dialing |
| modem_class | Modem Class |
| flow_control | Flow Control |
| flow_command | Flow Control Command |
| port | Port |
| init_string | Initialization String |
| connector | Fax Gateway Connector |
| server_ip | Server IP |
| server_port | Server Port |
| user_id | Login ID |
| password | Password |
| user_name | Fax Sender |
| special_parameters | Special Parameters |
Customizing the Layout Precision
Administrators can customize the precision to apply when running reports or exporting reports and dashboards to different formats. However, for page reports created in Logi Report Designer, the customized precision can take effect only in report tabs whose Precision Sensitive property is set to true.
- In the Server Console, select Administration > Configuration > Export on the system toolbar. Server displays the Export page.
- Select the Layout Precision tab.
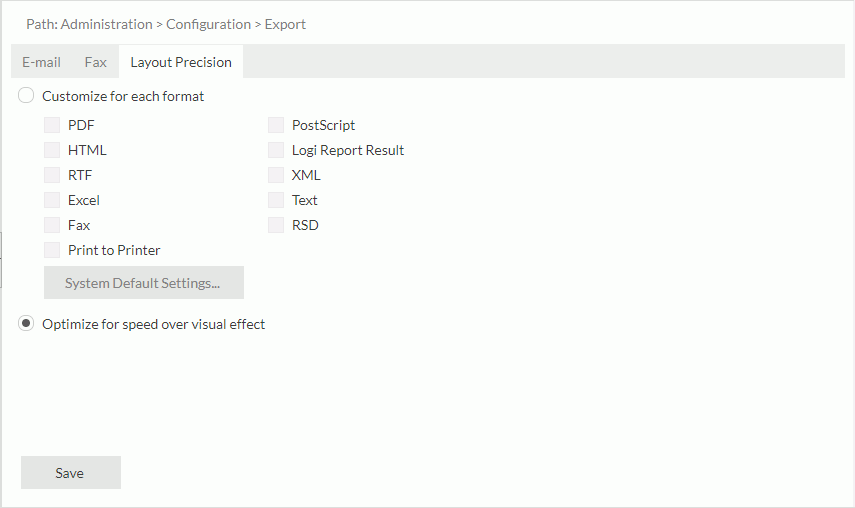
- Select Customize for each format.
By default, Logi Report selects Optimize for speed over visual effect, which means Logi Report will decide the precision level which is oriented towards speed more than visualization.
- Select the System Default Settings button. Server displays the System Default Settings dialog box.
- Specify the precision level for each format. The RSD format controls only the Page Report Result format when scheduling to run page report tabs.
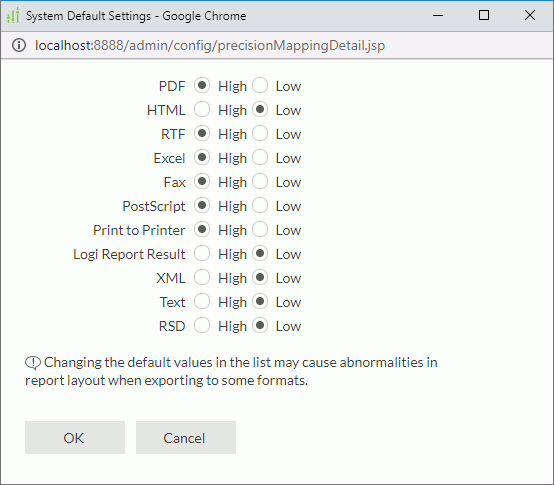
Logi Report provides two precision levels: high and low. High precision provides better layout but slower efficiency while low precision brings higher performance but maybe poorer visual effect. If low precision can give reports well looks, it is reasonable to apply low precision for at the same time faster performance is guaranteed. By default, Logi Report applies high precision for formats such as PDF, RTF, Excel, Fax, and PostScript, thus the report result layouts of these formats are different from the other formats such as HTML, Logi Report Result, XML, and Text.
- Select OK.
- In the Layout Precision tab, select the required formats to apply the defined precision level. For formats that you do not select, Logi Report will decide their precision.
- Select Save.
- Restart Logi Report Server to make the settings take effect.
 Previous Topic