Applying Filters to Page Report
You can apply filters to a page report to narrow down the data in the report. This topic describes how you can filter business views and data components such as banded objects, tables, crosstabs, and charts in page reports.
This topic contains the following sections:
Applying Filters to Datasets
For data components created on business views or converted to use business views in a page report, you can apply filters to the datasets of the data components to narrow down the data scope of the data components. Filters for datasets are defined into two categories in Logi Report: predefined filters and user defined filters. As the name suggests, predefined filters are defined in advance when you create or edit the related business views in Designer, and user defined filters are created on the datasets when you use them.
You can define dataset filters on the component level in Page Report Studio, which means each time you create a data component, you can apply a filter to its dataset without affecting other data components based on the same dataset.
You need a Logi Report Live license for Server to use this feature. For more product information, including new purchases and upgrades, contact US Sales or UK Sales.
To apply a filter to the dataset that a data component uses:
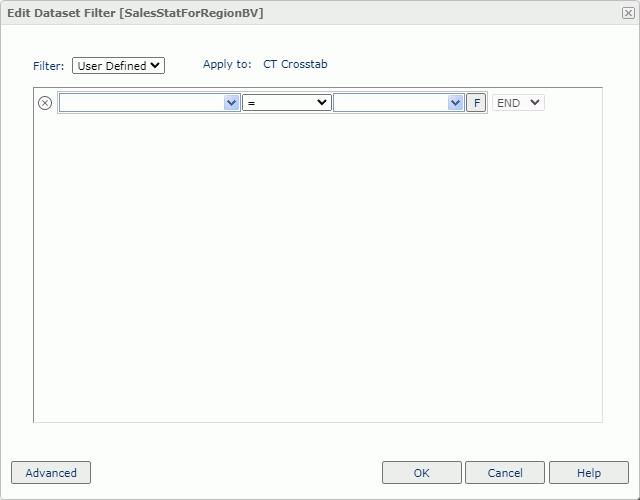
- Do any of the following to open the Edit Dataset Filter dialog box.
- Select the Dataset Filter button
 on the toolbar.
 - Select Menu > Report > Edit Dataset Filter.
- Right-click on the cross icon
 at the upper-left corner of a data component and select Edit Dataset Filter from the shortcut menu.
- Select the Dataset Filter button
- Specify the filter you want to apply to the dataset.
Server lists all the predefined filters of the business view the data component uses in the Filter drop-down list. Choose the one you want to apply. If you want to further edit the filter, select Edit and then redefine the filter. Server saves the edited filter as a user defined filter to the dataset.
If you prefer to define a filter on your own, select User Defined from the Filter drop-down list, then define the filter according to your requirements.
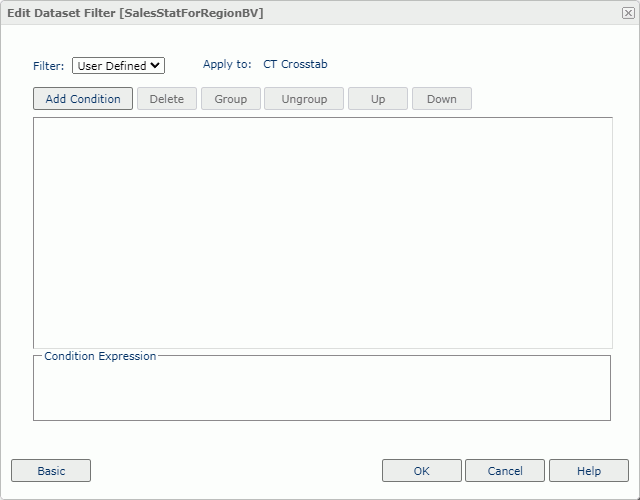
The dialog box has the basic and advanced modes for you to define either simple expressions or complex expressions.
- To define a filter using simple expressions:
- Make sure the dialog box is in the basic mode.

- Select the field you want to filter from the field drop-down list.
- From the operator drop-down list, select the operator with which you want to compose the filter expression.
- Type the values of the field in the value text box, or select one or more values from the drop-down list.
When you type multiple values, you should separate them with ",", and if "," or "\" is contained in the values, write it as "\," or "\\". To specify an empty string as the value for a field of String type, simply leave the text box blank (value length=0).
You can also filter the field by another field by selecting the Toggle to Field button
 and then selecting the field from the drop-down list. The provided field list contains the following: the group and detail information objects in the business view and the parameters in the current catalog which are of the same data type as the field that you want to filter, and the special field User Name. To go back to filter the field by value, select the Toggle to Value button
  .
. - If you want to add another condition line, from the logic operator drop-down list,
- To add a condition line of the AND relationship with the current line, select AND, then define the expression.
- To add a condition line of the OR relationship with the current line, select OR, then define the expression.
You can repeat this to add more condition lines. To delete a condition line, select the Remove button
 on its left.
- Make sure the dialog box is in the basic mode.
- To define a filter using complex expressions:
- Select Advanced to switch to the advanced mode.

- Select Add Condition to add a condition line.
- From the field drop-down list, select the field you want to filter.
- From the operator drop-down list, select the operator with which you want to compose the filter expression.
- Type the values of the field in the value text box, or select one or more values from the drop-down list.
When you type multiple values, you should separate them with ",", and if "," or "\" is contained in the values, write it as "\," or "\\". To specify an empty string as the value for a field of String type, simply leave the text box blank (value length=0).
You can also filter the field by another field by selecting the Toggle to Field button
 and then selecting the field from the drop-down list. The provided field list contains the following: the group and detail information objects in the business view and the parameters in the current catalog which are of the same data type as the field that you want to filter, and the special field User Name. To go back to filter the field by value, select the Toggle to Value button
  .
. - To add another condition line, select Add Condition and define the expression.
- Select the logic button until you get the required logic to specify the relationship between the two filter expressions. The logic can be AND, OR, AND NOT, or OR NOT.
- You can repeat the preceding steps to add more condition lines.
- To group some conditions, select them and then select Group. Server adds the selected conditions in one group, and they work as one line of filter expression. It is the equivalent of adding parenthesis in a logic expression.
- You can further group conditions and groups together.
- To take any condition or group in a group out, select it, and then select Ungroup.
- To adjust the priority of a condition line or a group, select it and then select Up or Down.
- To delete a condition line or a group, select it, and then select Delete.
- Select Advanced to switch to the advanced mode.
- To define a filter using simple expressions:
- Select OK to apply the filter to the dataset. Server only fetches the data that meets the filter conditions from the dataset and displays the data component.
If you use the special field User Name in the filter condition, the username you used to sign into Server will apply to compose the filter expression. If you have used a parameter, after you select OK, Server will prompt you to specify the parameter value to dynamically define the filter condition.
You can also apply a filter to the dataset that a data component uses in the Dataset Filter screen of the report wizard while creating the data component.
Applying Filters to Data Components
When applying filters to the data components themselves in a page report, there are the following ways you can take: using the Filter dialog box, using shortcut menu, or using filter controls.
Filtering Using the Filter Dialog
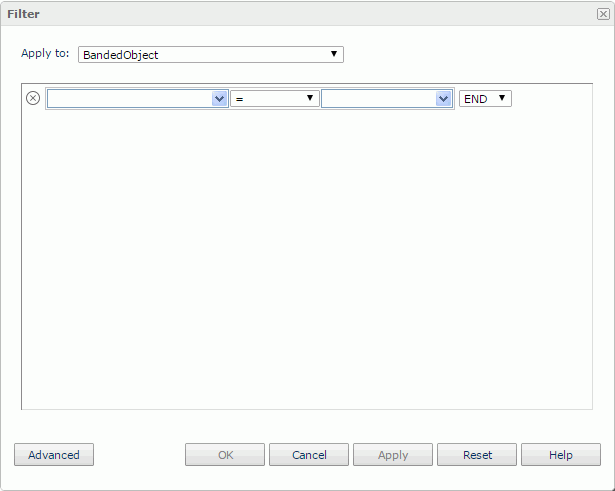
- Select Menu > Report > Filter, or the Filter button
 on the toolbar. Server displays the Filter dialog box.

- From the Apply to drop-down list, select the data component in the report to which you want to apply the filter.
Tip: For page reports created in Designer, the default selected data component and available data components in the Apply to drop-down list are determined by the "Default for Filter" and "Invisible for Filter Dialogs" properties of the components.
- Define the filter conditions using either simple expressions or complex expressions as you would do while filtering the dataset of a data component. However, there are the following differences when you edit conditions to filter a data component:
- You cannot filter a field by another field.
- To specify an empty string (value length=0) as the value for a field of String type, type a pair of single quotes ('') in the text box and then click outside of the condition line to accept the condition.
- Select OK to make the filter take effect and return to the report.
Filtering Using Shortcut Menu
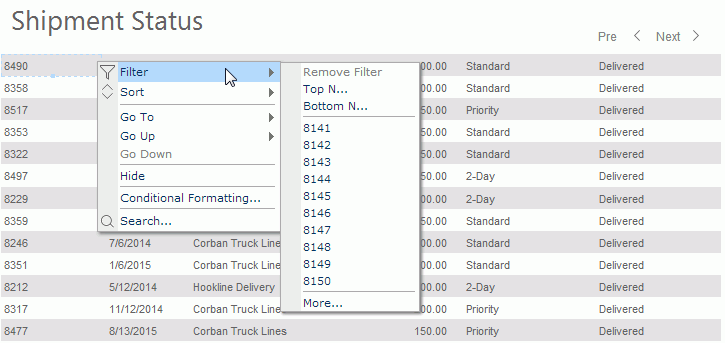
You can use filter-related commands on the shortcut menu to filter the data in a banded object or table. To do this, right-click any value of a field other than the group-by field by which you want to filter data, to show the shortcut menu. You will see the Filter drop-down menu with these commands:

- Remove Filter
Select to remove the filter from the field. Server enables this command after you have filtered the field. - Top N
Select to display the Top N dialog box, with which you can filter the field to display only its top N values. - Bottom N
Select to display the Bottom N dialog box, with which you can filter the field to display only its bottom N values. - Field values
"Field values" is not the name for a command on the Filter submenu, but represents the values of the field. Select a value to filter the field to show only the specified value. - More
Server enables this command if the Filter submenu cannot list all values of the field. Select the command to display the Select Values dialog box. Then specify a value, and Server filters the field to show only the selected value.
After you apply a filter using the Filter shortcut menu, if you open the Filter dialog box you can find that the corresponding filter expression in the dialog box.
Tip: You can customize the following filter-related features for a page report using Designer:
- Set the Bind Column property for labels in banded objects or tables to enable the Filter shortcut menu on the labels, and show the filter button beside the labels which provides a filter list containing All, Top N, Bottom N, Custom Filter, the field values, and More (if there are too many distinct values for the bound field) for easy filtering.
- Customize the items available on the Filter shortcut menu of a field or label with the Filter Options property.
- Specify the default selected component and available components in the Apply to drop-down list of the Filter dialog box via the Default for Filter and Invisible for Filter Dialogs properties of the components.
 Previous Topic