Using Studio's Info Application Deployment Tool
Logi Studio's Application Deployment Tool is easy to use and allows you to set up reusable deployment operations. The tool provides a great deal of flexibility, allowing you to develop, for example, on a 32-bit platform and deploy to a 64-bit platform, or to develop on a Windows platform and deploy to a Java platform.
The Deployment tool is capable of copying all or part of your application to the production server, using either file system commands (to local or shared network folders) or one of three flavors of FTP (standard, SSL, or SSH). In Logi Studio, the details of each operation are called a "deployment target" and they can be saved for later reuse.
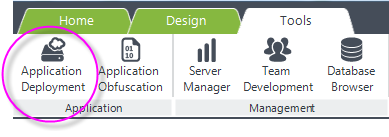
The Application Deployment tool is opened in Studio by clicking its menu item, in the main menu's Tools tab, shown above.
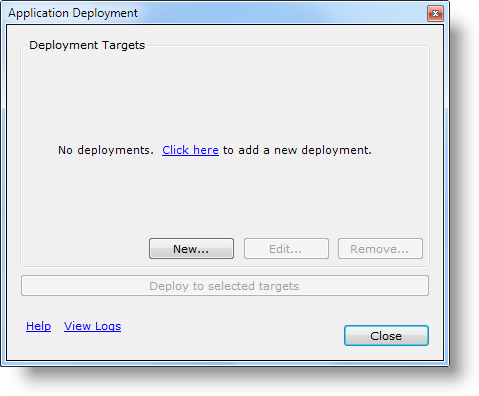
If no deployments have been defined, the dialog box shown above appears. Click the link or New... to define your first deployment target.
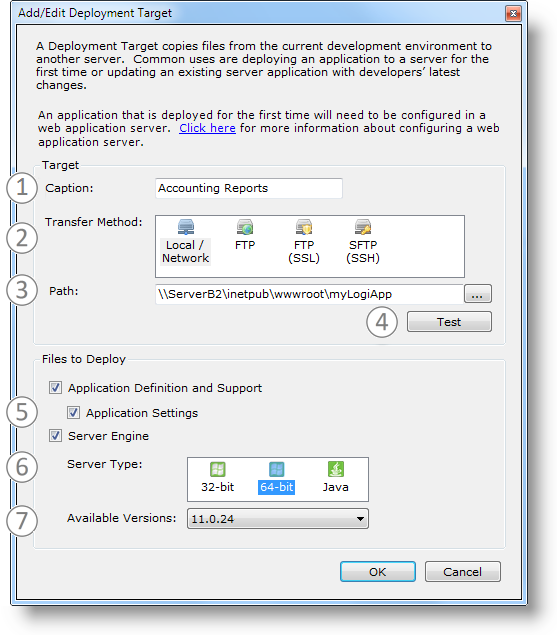
The Add/Edit Deployment Target dialog box contains the following:
- Caption - An arbitrary name you give the deployment, for future reference.
Note: This is also used as the Deployment Log File name, so it has to adhere to the OS file naming standards. For example, in Windows, these characters are invalid in a file name: * | / \ : " < > ? and should not be used here. - Transfer Method - Copy to Local or Network drive, FTP, FTP (SSL), or FTP (SSH).
- Path - If the "Local/Network" transfer method is selected, enter a UNC file path to a destination app folder on the production server. For example:
\\myWebServer\myLogiApp
If the destination app folder is not on the local machine, it must be shared on the network.
If one of the FTP transfer methods is selected, enter an FTP protocol URL to the destination app folder and arguments. Examples of these include:
For FTP & FTP SSL: ftp://myWebServer/myLogiApp, ftp://myWebServer.com:8082/projects/myLogiApp
For FTP SSH: sftp://test.myServer.local//opt/tomcat/webapps/myLogiApp
Note use of two forward slashes after server name. Also you'll have to create the target application folder and grant permissions, as described in Alternate Method: Manually Copying Your Info Application, because the application is not being deployed to a user's home directory.
If necessary, you'll be prompted to supply a user ID and a password; do not include them in the URL. - Test Button - This button can be used to test the connectivity to the destination.
- Files to Deploy - Check which types of files are to be deployed. Files are overwritten at destination without warning!
- Server Type - If "Server Engine" has been selected above, the server type options for the deployment are shown (scroll down to see additional types, such as Java). Select the server type.
- Available Versions - If "Server Engine" has been selected, the available Logi Info versions installed on the development machine are listed. An effective way to perform an application upgrade, when a new release of your Logi product comes out, is to select only the Server Engine.
If the destination requires a user ID and password in order to access it, when you click the Test button, you'll be prompted for login credentials. If the credentials are successfully authenticated, the user ID will automatically be saved with the deployment target details and, optionally, the password as well.
Once a deployment target has been defined, it appears in a list:
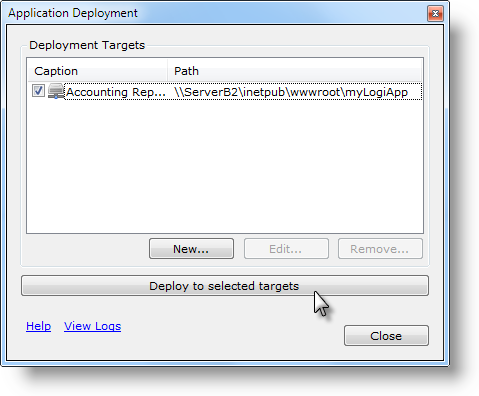
Once a deployment target has been defined, it appears in a list, as shown above, where they can be managed and edited. To run a deployment, check its check box and click the Deploy button. If multiple deployments are selected, they'll run consecutively.
The connection with the destination server will be established and then the files will be deployed to it.
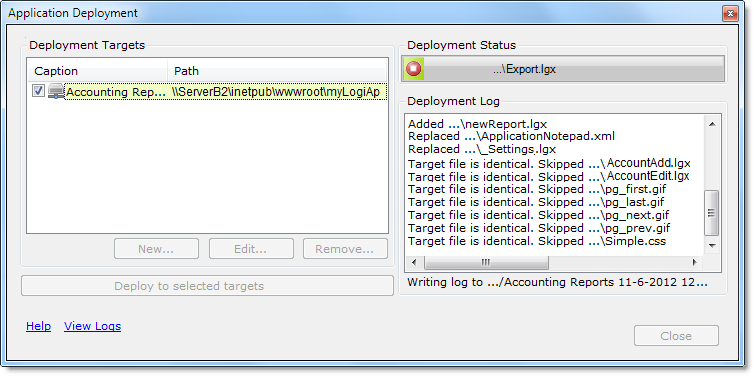
The Deployment dialog box will expand to display the results of the process, as shown above. Text log files, stored in the rdDeployment folder beneath each Logi application folder, are accessible through the View Logs link, and document each deployment.
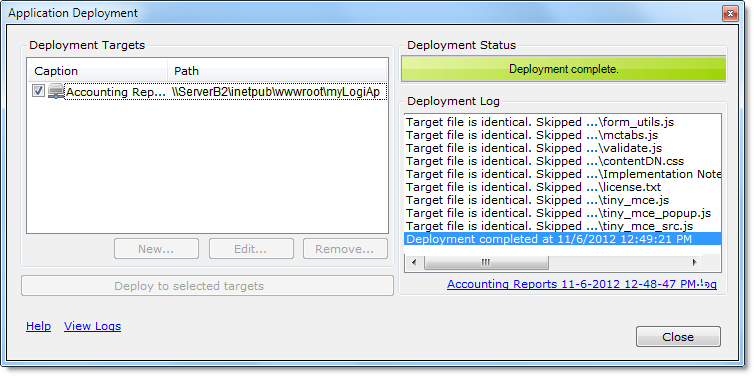
Finally, the deployment will be complete, and the link to the log file will be displayed.
![]() It's very important that you understand that copying the files, using the Deployment Tool, does not register the application with a web server on the target machine. So, after the first deployment, this has to be done by the developer using Studio, Server Manager, or the web server's tools.
It's very important that you understand that copying the files, using the Deployment Tool, does not register the application with a web server on the target machine. So, after the first deployment, this has to be done by the developer using Studio, Server Manager, or the web server's tools.
Logi Java Application Folder Permissions
After deployment of a Logi Java application, you can elect to grant 775 (full access) permissions manually on the application root folder and all of its child folders and files. If you prefer a more selective approach, typical Logi application folders require these permissions:
| Folder | Permission |
|---|---|
Logi app root | 440 |
assemblies | |
rdDataCache | 660 |
rdDownload | 660 |
rdTemplate | 660 |
WEB-INF | |
lib | |
PhantomJS (binary) | 550 |
_Definitions | |
_SupportFiles | |
goBookmarks (InfoGo app only) | 660 |
(your custom folders) | 660 |
Controlling Which Files Are Deployed
The Add/Edit Target dialog box allows you to select the files to be deployed by category:
| Category | Description |
|---|---|
Application Definition and Support | Copies all files in all folders with names beginning with an underscore, such as _Definitions, and _Support Files. Identical files will be skipped. |
Application Settings | Copies _Settings.lgx only. Identical files will be skipped. |
Server Engine (.NET app) | Copies the rdTemplate and bin folders - identical files will be skipped. Also copies any .aspx, .asax, and .config files if they do not already exist; does not overwrite them if they do exist. |
Server Engine (Java app) | Copies rdTemplate, Assemblies, and WEB-INF folders - identical files will be skipped. Also copies any .aspx, .asax, and .config files if they do not already exist; does not overwrite them if they do exist. |
Why not deploy all of the categories all of the time? You'll want to do so for your first deployment but, generally, you won't want to for subsequent deployments in order to avoid overwriting files that may have been customized for the production server, such as _Settings.lgx. And, unless you're changing engine versions, deploying the engine files with every deployment is unnecessary and a waste of time. So the tool offers you the opportunity to tailor your deployments as needed.
The Deployment tool will not copy every file in your application folder:
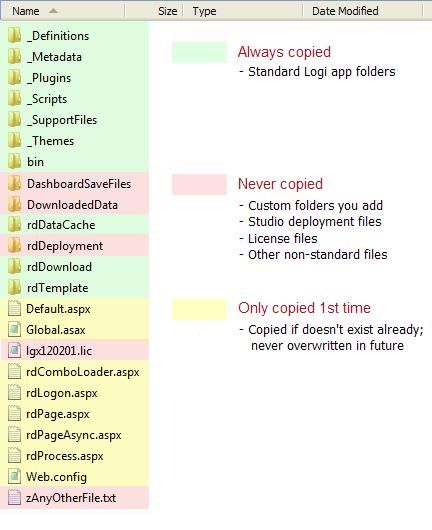
The image above illustrates which folders and files are copied. Files are compared during the process and identical files will be skipped. Of special note is the fact that custom folders you may add to the application, for example to hold Dashboard Save files, are not copied and you will need to create these during your first deployment manually. Other files you may create in the application folder that are not stored in folders will not be copied, as well.
However, developers may want to exclude specific application definition and support files from a deployment, and Studio provides an easy way to do that:
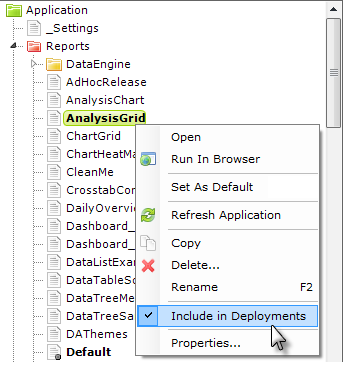
By default, all files in Studio's Application Panel are included in deployments. However, if you wish to exclude a file, select it in the Application Panel, right-click it, and click the Include in Deployments item in the popup menu, as shown above.
You can also exclude an entire folder in the Application Panel in the same way. Suppose you want to deploy just 1 or 2 report definitions. This can be done by first selecting the _Reports folder, right-clicking it, and clicking the checked Include in Deployments item, which unselects all report definitions. Then select and right-click the 1 or 2 report definitions you want to deploy, and click their Include... items to include them in the deployment. Then run the Deployment Wizard.
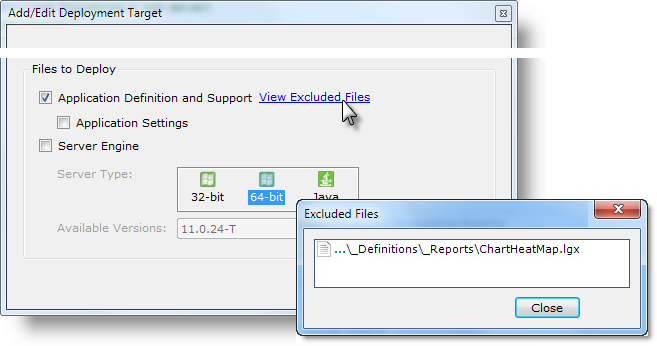
If files have been excluded, the View Excluded Files link, shown above, will be displayed to alert you to this situation when you add or edit a deployment target in the Deployment tool. Clicking the link will display a list of the excluded files.
License Files
License files are never included in deployments, so you will have to manually deploy your license file the first time you deploy your application, or configure it to use a centralized license file. For more information about license files, see Product Licensing.
After a First-Time Deployment
After an application is deployed for the first time, you must make some configuration changes to ensure it will run. See Post-Deployment Server Configuration for details.
For subsequent deployments, you need only run the Deployment tool to update the files on the target server.