Managing Metadata Definitions
Metadata definitions are managed using the icons in the last table column. Additional icons become available once a definition has been created.
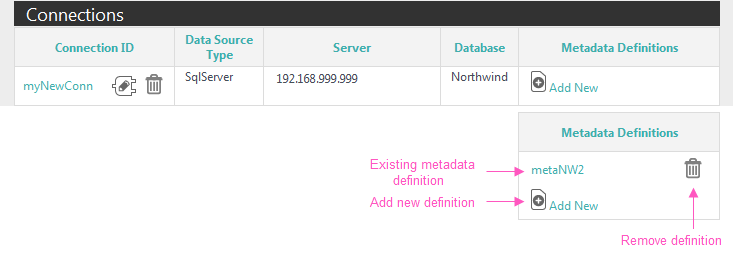
The Metadata Definition column will display the Metadata name, if available; otherwise it will display the Metadata ID.
To create a new metadata definition, click the Add New icon, then click OK in the confirmation panel that appears.
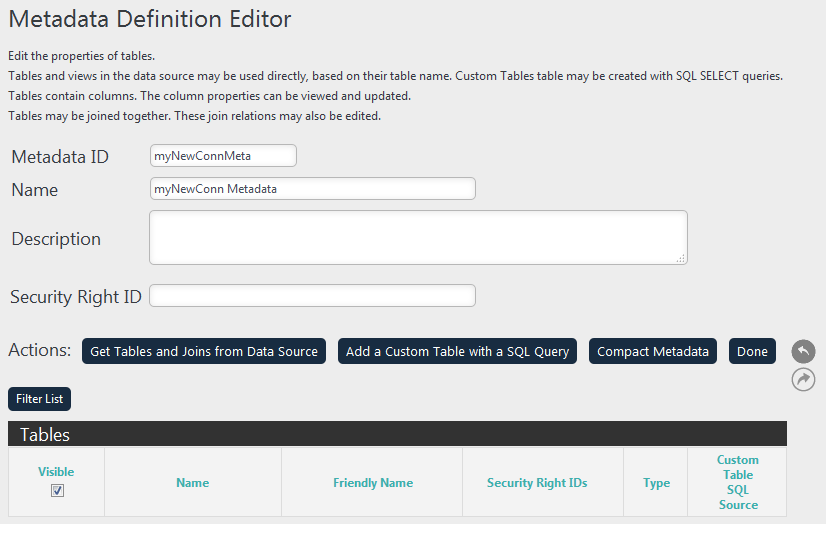
If this is new metadata definition, the page will look like the example shown above. An ID and Name will be suggested, based on the related Connection element.
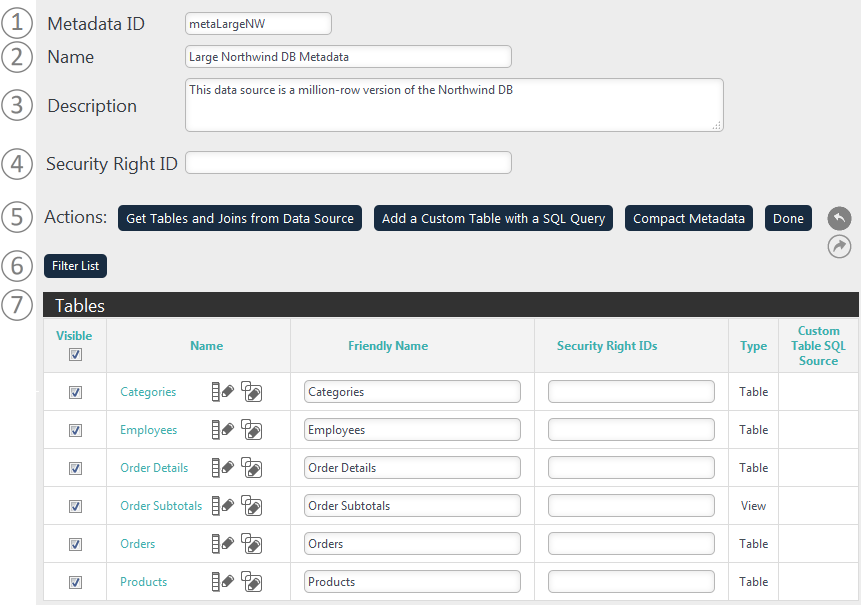
If the metadata definition already exists, you'll see a page that looks like the one shown above. Here's an explanation of its controls:
- Metadata ID - (Required) A unique element ID for the Metadata element that will be inserted into your _Settings definition. Do not include any spaces in this ID or a file extension. This value will also be used as the metadata file name, which will be created in the _Metadata folder with a .lgx file extension. By default, a default value will be provided associated with the related data source connection.
- Name - (Required) A descriptive name. If you create multiple metadata files, this name will appear as a selection in the user interface as a "data source".
- Description - More detailed information that appears in the Active Query Builder as a tooltip.
- Security Right ID - A comma-separated list of one or more security Right IDs, used to control access to this Metadata definition.
- Actions - Actions related to the metadata definition:
- Click Get Tables and Joins... to retrieve that table and join data from the data source schema. Will not overwrite values you may have entered in Friendly Name, Security Right IDs, etc. Reverses the effects of the Compact Metadata feature and may be useful if the metadata has been altered outside of this tool, for example, with Logi Studio.
- Click Add a Custom Table... to leave this page and create a new custom table based on a SQL query. This is discussed in more detail below.
- Click Compact Metadata to physically remove, from the metadata definition, all tables in the list that do not have "Visible" checked. This makes the metadata smaller and faster to load and is useful when there are a lot of tables in the data but only a few are used. The effects of compacting can be reversed by clicking the "Get Tables and Joins..." button.
- Click Done to save any changes and return to the previous page (earlier versions may have a "Back" link at the top of the page instead of this button).
- Click the Undo/Redo icons to reverse and retry changes, if automatic bookmarks are being used.
- Filter List - Allows you to filter the list of tables, based on a variety of criteria, in order to work with it more easily.
- List of Tables - Displays a list of tables that will be included in the metadata definition. Columns include:

The Column and Join editor pages are only available if the table has been selected as Visible.
Adding a Custom Table Based on a SQL Query
You can include custom tables, created on-the-fly from a SQL database at runtime, by clicking Add a Custom Table with a SQL Query. Click OK at the confirmation prompt.
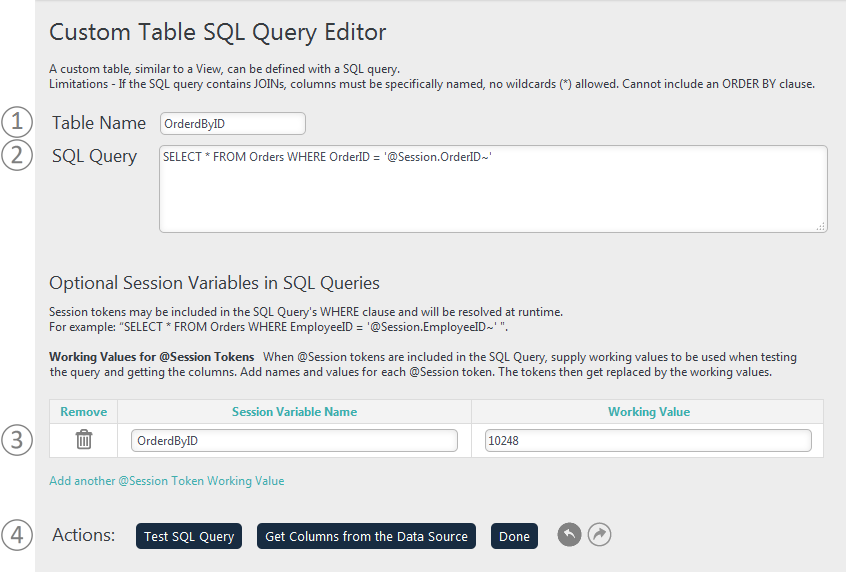
The Custom Table SQL Query Editor page will appear, as shown above. If you're editing an existing custom table, the controls will be filled-in with the current definition. The page's controls are:
- Table Name - (Required) A unique name for the custom table.
- SQL Query- (Required) The SQL query that will retrieve data for your custom table. If your query includes Joins, you may not use wildcards as columns must be specifically named. You may not include an ORDER BY clause in any query. Session tokens may
be used in a WHERE clause and will be resolved at runtime.
 You may not use an EXEC statement to call a Stored Procedure in order to create the custom table.
 - Session Variables - Session tokens can be used in your SQL query, and these controls allow you to provide "working" values for them that will be used when the WMB tests the query and retrieves column information. Click the "Add another..." link to add additional session tokens and values.
- Actions - Actions related to the custom table definition:
- Click Test SQL Query to execute the query against the data source and display the first 100 rows returned. This will not work if a token is used in the query, as it won't exist. You may care to temporarily hard-code a value in place of the token in order to test it.
- Click Get Columns from the Data Source to execute the query against the data source and display the first 100 rows returned AND add the columns to the metadata definition. The same limitations apply regarding tokens as with the Test SQL Query feature.
- Click Done to save any changes and return to the previous page(earlier versions may have a "Back" link at the top of the page instead of this button).
- Click the Undo/Redo icons to reverse and retry changes, if automatic bookmarks are being used.

New custom tables will appear in the table list, with some additional icons, as shown above. The table Type will be shown as "Custom" and the (possibly truncated) SQL Query code will also appear. The custom table can then be configured in the same manner as any regular table, with the configuration of columns, friendly name, and Security Right IDs.
Using the Column Properties Editor Page
By default, all columns in visible tables are included in the metadata, using standard properties. If you want to specify their properties more exactly, click the Edit Columns icon ![]() for the desired table and the Column Properties Editor page will be displayed:
for the desired table and the Column Properties Editor page will be displayed:
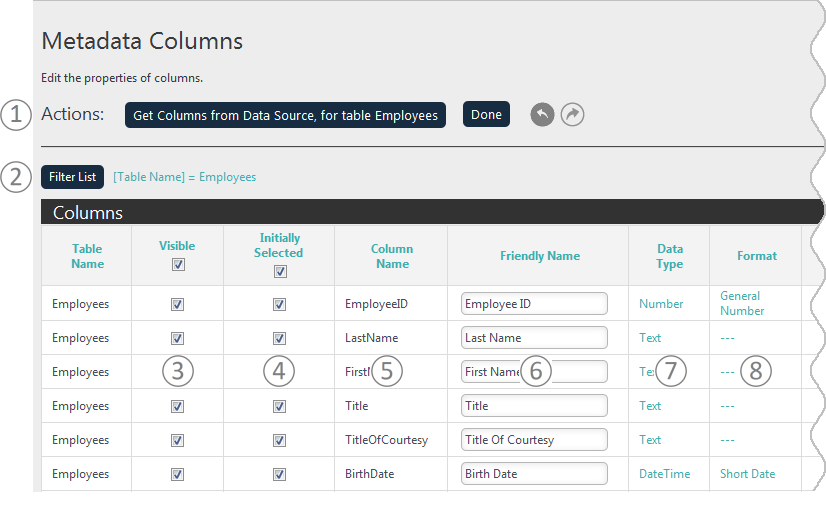
The Column Properties Editor is very wide, so we're going to show it to you in two horizontal parts. The left part is shown above and includes the following details and controls:
- Actions - Actions related to the column properties:
- Click Get Columns from Data Source to retrieve the schema information for all of the columns for this table from the data source. This may be useful if the metadata has been altered outside of this tool, for example, with Logi Studio.
- Click Done to save any changes and return to the previous page(earlier versions may have a "Back" link at the top of the page instead of this button).
- Click the Undo/Redo icons to reverse and retry changes, if automatic bookmarks are being used. - Filter List - Allows you to filter the list of columns, based on a variety of criteria, in order to work with it more easily. The list is initially filtered on the name of the table whose icon you clicked in the list of tables on the previous page. The filter controls work like this:
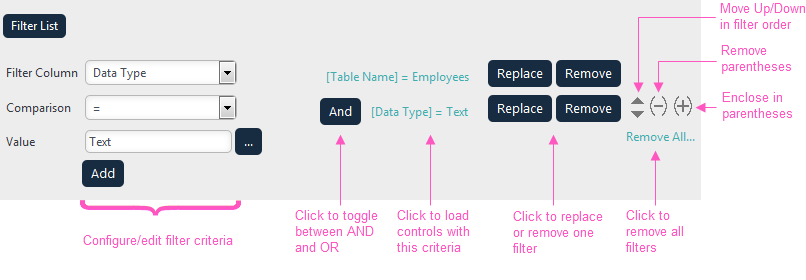
- Visible - Check the box for each column to be included in the metadata. Check the box in the column header to select/unselect all columns at once.
- Initially Selected - Check the box for each column to be initially selected for viewing in the Data Table in the target visualization element (i.e. Analysis Grid). Check the box in the column header to select/unselect all columns at once.
- Column Name - The actual column name in the data source.
- Friendly Name - (Required) The "user-friendly name" for each column that will appear in the user interface. Edit this to provide end-users with a more understandable or relevant column name.
- Data Type - Specifies a data type for each column. The data type specified here affects the default column display format. Click this link to select the data type in a pop-up panel. Options include Boolean, Date, DateTime, Number, and Text.
- Format - Specifies the display format for each column. The default format is based on the column data type. Click this link to select the format in a pop-up panel and 20 options are available. Leave this blank ("---") to use the data type default.
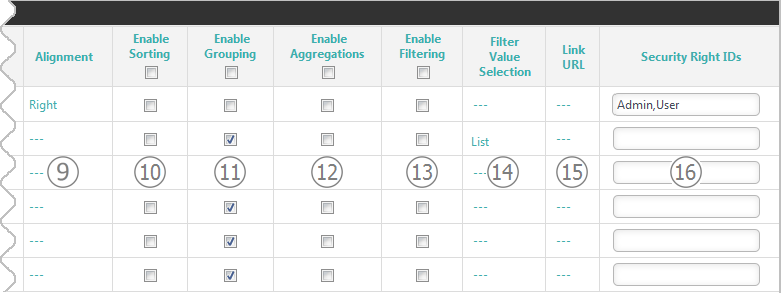
- Alignment - Specifies an alignment (Left, Center, Right) for data displayed in each column. If nothing is specified, a default alignment will be used based on the data type.
- Enable Sorting - Specifies whether this column can be sorted; check the box to allow it.
- Enable Grouping - Specifies whether data can be grouped on this column; check the box to allow it.
- Enable Aggregations - Specifies whether data in this column can be aggregated; check the box to allow it.
- Enable Filtering - Specifies whether this column can be used in a filter; check the box to allow it.
- Filter Value Selection - Specifies the option that will appear for this column with filtering controls: nothing, a List of columns, or a pop-up Calendar.
- Link URL - Specifies that the data in this column will be a link, with a dynamic URL associated with it. Click to open a pop-up panel where you can enter the URL code and select a destination window (New, Parent, or Top).
 The data will not be rendered as a live link in any tables or visualizations created using the Thinkspace.
Use the following format for your URL entry, substituting your application, report name, request variable, table, and column names. The special token @Data.TableName_ColumnName~ will be replaced with actual data values at runtime. You can also run JavaScript by beginning the URL with "javascript:". Examples:
http://myServer/myApp/rdPage.aspx?rdReport=myOrdersReport&OrderID=@Data.myOrdersTable_OrderID~
http://www.bing.com/search?q=@Data.Categories_CategoryName~
javascript:myScript('@Data.Categories_CategoryName~'); - Security Right IDs - Select, or enter a comma-separated list of, Security Right IDs which will control access to the column, when Logi Security is in use.
Using the Join Editor Page
This page allows you to manage the Joins, or relationships, between tables. The table whose icon you clicked in the list of tables is considered the "From" table. Another table you select later is considered the "To" table.
The WMB supports two types of Joins: an Inner Join, which returns all rows from both tables, as long as there is a match on the "From" column and the "To" column, and a Left Outer Join, which returns all rows from the "From" table, even if there are no matches in the "To" table, with NULL values in the right side when there is no match.
To manage Joins, click the Edit Joins icon ![]() for one of the tables:
for one of the tables:
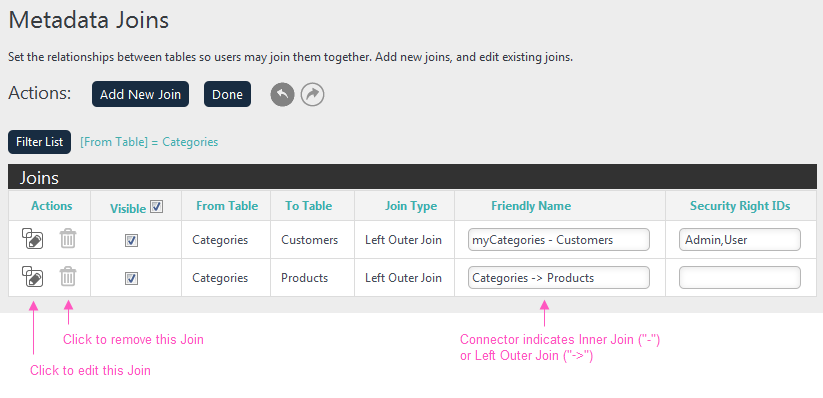
If you have existing Joins defined, you'll see them in the list of Joins, as shown above.
Actions - Actions related to the Join definitions:
- Click Add New Join to define a new Join involving the current table.
- Click Done to save any changes and return to the previous page(earlier versions may have a "Back" link at the top of the page instead of this button).
- Click the Undo/Redo icons to reverse and retry changes, if automatic bookmarks are being used.
Filter List - Allows you to filter the list of Joins, based on a variety of criteria, in order to work with it more easily. See the previous section for a discussion of the filter controls.
Click the icons shown above to edit or remove a specific Join.
The Friendly Names that the WMB suggests when a Join is created include a table and column name connected by a symbol. The symbol indicates whether it's an Inner Join ("-") or a Left Outer Join ("->") and this is informative when using the Active Query Builder later to select data for analysis.
If you click Add New Join, and then OK in the confirmation panel that appears, the following page will be displayed:
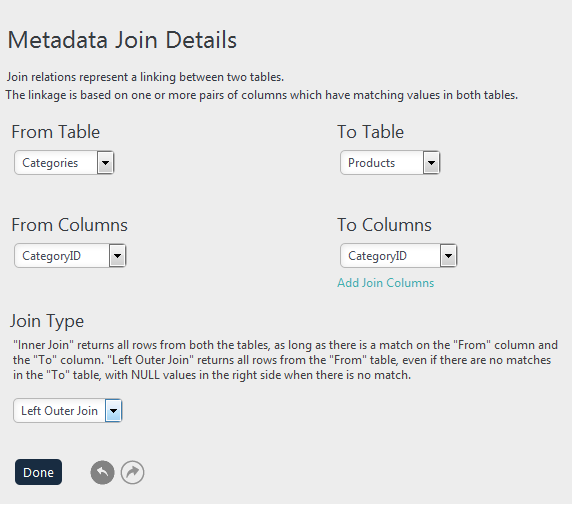
To create a Join, you simply select the tables and columns to be related and the desired Join type, from the selection lists. You can join additional columns by clicking Add Join Columns.
Click Done to save any changes and return to the previous page (earlier versions may have a "Back" link at the top of the page instead of this button).
Click the Undo/Redo icons to reverse and retry changes, if automatic bookmarks are being used.
The Metadata File
The WMB has been automatically saving any changes you've made to the metadata file:
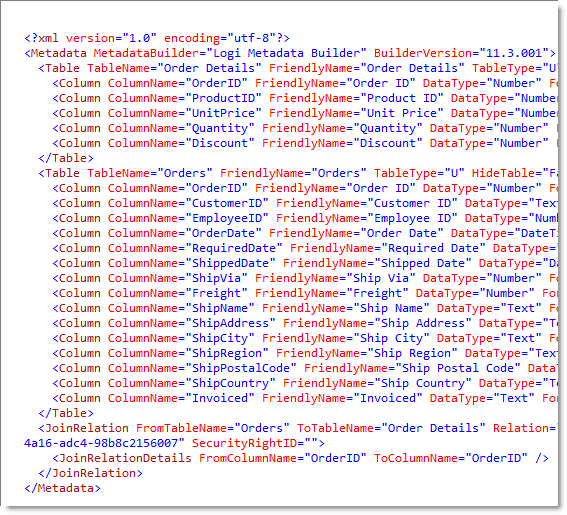
An example of the contents of a metadata file is shown above. It's an XML file that describes all of the data, relationships, and other details you specified in the WMB.