Join Datalayers
The Join element provides the functionality of a SQL-style join, allowing developers to combine and relate data from different datasources.
- About Joins
- Joining Datalayers
- Debugging Joins
About Joins
The traditional SQL SELECT statement can include an optional JOIN clause, which combinesrecords from two or more tables in a database. The combining action may be predicated on common values in the columns of the tables. The SQL query that contains a JOIN returns a result set that includes the combined data.
Logi products offer a Join element that operates in the same way on the data retrieved into datalayers in Logi reports. The effect of using this element is to create a datalayer that contains the combined data. One of the interesting features of the Join element is that it's not restricted to SQL datasources, so it can perform the joining action with non-SQL datasources as well, or between databases that don't support the same JOIN syntax.
Here's an example of a JOIN that combines two tables, based on their common Order ID values:
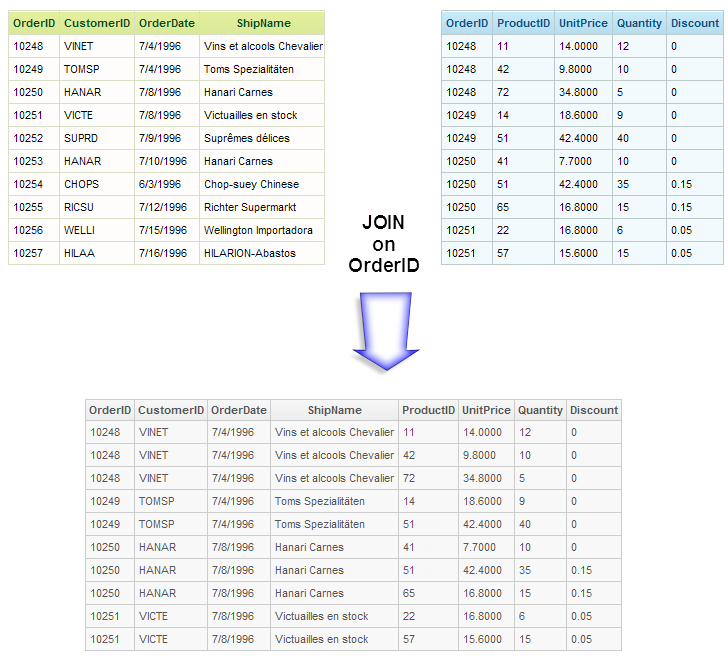
As you can see, the records from both tables are combined into a single table using the Order ID column as the key to matching rows from one table to rows from the other table. In a Logi application that uses a Join element, this occurs in the datalayer, and the resulting data is available using the usual @Data tokens.
The example shown above uses an Inner Join, one of four types of joins available using the Join element. The Inner Join is the most common join operation used in applications; it creates a new result table by combining column values of two tables based upon a "match condition". The match condition in the example was that the Order ID value in one table equals the Order ID value in the other table.
The Left Outer Join produces a result that includes all of the records of the "left" table, plus matched values from the "right" table. NULLs are filled-in when values from the right table don't match the match condition.
The Full Outer Join produces a result that contains all records from both tables, and fills in NULLs for missing matches on either side.
Finally, the Union Join simply builds a result that includes all rows and columns from both source tables, without trying to do any matching. NULLs are filled-in for columns in any row that don't have a value.
More information is available here about SQL joins.
Dynamic Joins
The Join element has an Include Condition attribute:
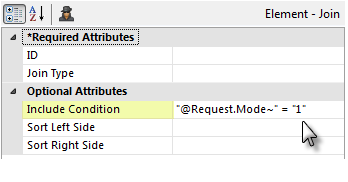
If the value of this attribute is left blank or contains a formula that evaluates to True, the element is applied to the datalayer. If the value evaluates to False, the element is ignored and does not affect the datalayer. This powerful feature allows developers to dynamically determine if the datalayers will be joined or not.
Joining Datalayers
Here's how the join in the example above was created:

In the example, we wanted to display our data in a table, so a Data Table element, with a supporting datalayer element beneath it, was used. This datalayer retrieves data from the Orders table. Then a Join element was added beneath the datalayer, as shown above. Its attributes were set to give it a unique ID, and the InnerJoin type was selected.

Next, a Match Condition element was added beneath the Join element. This element is used to identify the columns in the joined tables that will determine which records are selected, or "matched". The Left Data Column attribute identifies the column in the left table, the Right Data Column attribute, the one in the right table. In the example, the column names were the same. You
can use tokens to specify the column names.
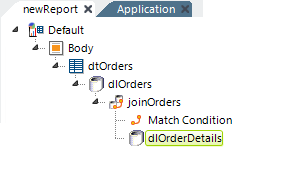
Finally, a second datalayer is added, which retrieves records from the Order Details table. And that's all there is to it. When the report runs, all of the joined data is available to the Data Table using the usual @Data tokens.
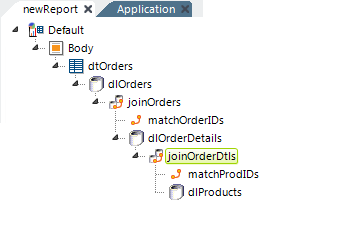
You can have many joins in a report definition. So, you could even extend the example by adding another join, as shown above, on the Products table. One of the default steps of the join process is sorting the data before the join, and this can take time. If the data being retrieved into the datalayers is already sorted, skipping the join process sort can improve performance. You can skip the sort by setting the Join element's Sort Left Side or Sort Right Side attributes to False.
Debugging Joins
Joins can get tricky very quickly, especially if you have NULL data in your datasources. It's very useful to be able to see what's actually going in each step of the join process and this can be done using the Debugging Trace Report. As you may know, debugging can be turned on using the Debug icon in Studio's toolbar and in the _Settings definition by setting the General element's Debugger Style attribute to DebuggerLinks.
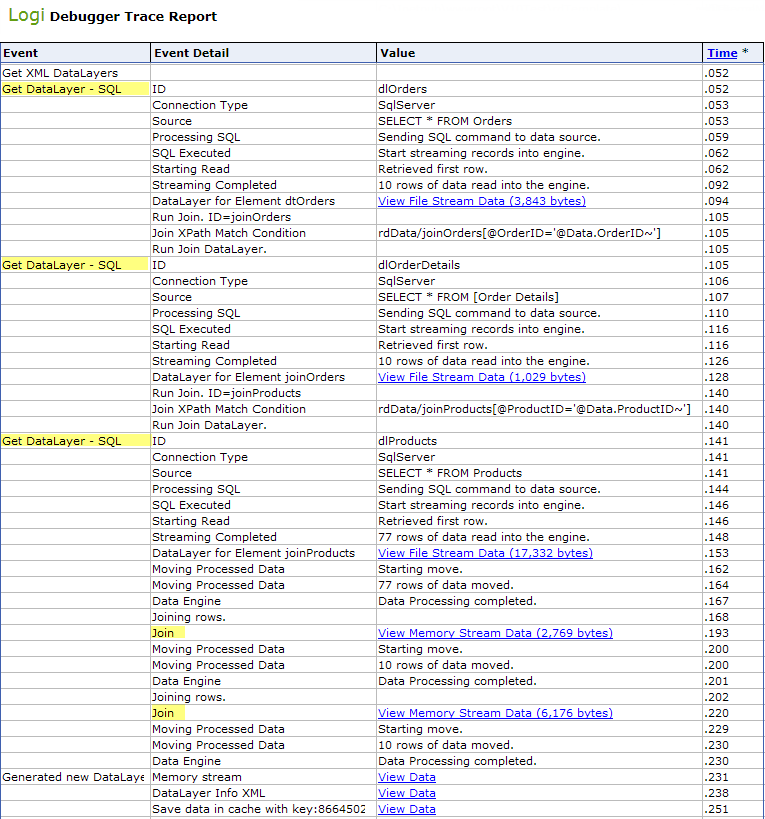
A truncated version of the Debugger Trace Report is shown above. The highlighted areas indicate where the datalayers are run, and where the joining occurs (based on the last element tree example, with two joins). You can look at the data at each step of the way, using the links provided, to see how the retrieved data comes in and what happens to it when the joins are applied. This can be very useful in understanding what's happening to the data "behind the scenes". The time scale is also
useful in determining whether or not a join is creating a performance bottleneck.