InfoGo - Reporting Scheduling Details
To schedule a report, you need to provide the delivery details and report generation frequency:
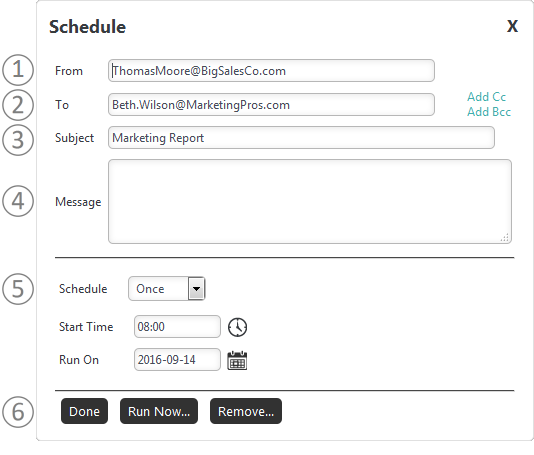
The Schedule panel is shown above. Its controls are:
- From - Enter your email address (or the email address you want to appear as the "Sent From" address).
- To - Enter the email address of the report recipient. Separate multiple addresses with a semi-colon (";").
- Subject - Enter a brief subject description.
- Message - Enter the text of the email message, included when the PDF or Excel format option is chosen.
- Schedule - Select the interval and frequency for generating and delivering the report. These options change depending on the initial selection and are described in more detail below.
- Buttons - Click Done to save the settings. If you're editing a schedule, two more buttons will be shown: click Run Now... to generate and deliver the report immediately, click Remove... to remove this scheduled occurrence.
You can also click the "X" icon to close the panel, without saving any changes, at any time.
Schedule Options: Once
This option generates and delivers the report exactly one time:
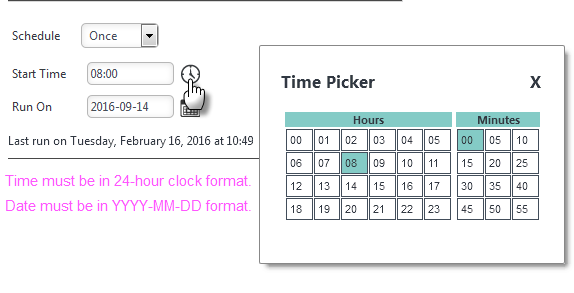
- Start Time - Format must use the 24-hour clock. You can select it from the Time Picker by clicking the clock icon, as shown above (selected time can be made more exact by editing it once it's in the input control).
- Start Date - Format must be YYYY-MM-DD. You can select it from a Calendar by clicking the calendar icon
Schedule Options: Minutes, Hours, Daily
This option generates and delivers the report every X minutes, hours, or days:
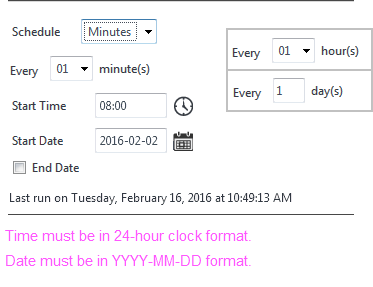
- Every - Select the interval of minutes, hours, or days desired. Use caution if selecting minutes; repetitive short time intervals may impact server performance.
- Start Time - Format must use the 24-hour clock. You can select it from the Time Picker by clicking the clock icon, as shown above (selected time can be made more exact by editing it once it's in the input control).
- Start Date - Format must be YYYY-MM-DD. You can select it from a Calendar by clicking the calendar icon.
- End Date - An optional date for stopping the scheduled deliveries. Format must be YYYY-MM-DD. You can select it from a Calendar by clicking the calendar icon.
Schedule Options: Weekly
This option generates and delivers the report at various weekly intervals, on specific days of the week:
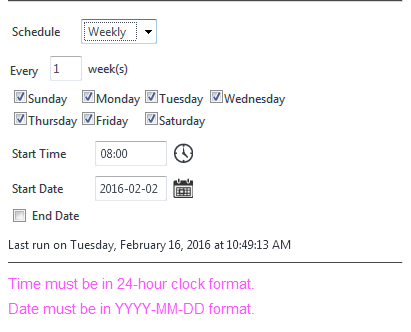
- Every - Select the interval of weeks desired.
- Days - Use the check boxes to specify the exact days desired.
- Start Time - Format must use the 24-hour clock. You can select it from the Time Picker by clicking the clock icon, as shown above (selected time can be made more exact by editing it once it's in the input control).
- Start Date - Format must be YYYY-MM-DD. You can select it from a Calendar by clicking the calendar icon.
- End Date - An optional date for stopping the scheduled deliveries. Format must be YYYY-MM-DD. You can select it from a Calendar by clicking the calendar icon.
Schedule Options: Monthly
This option generates and delivers the report on specific days in specific months:
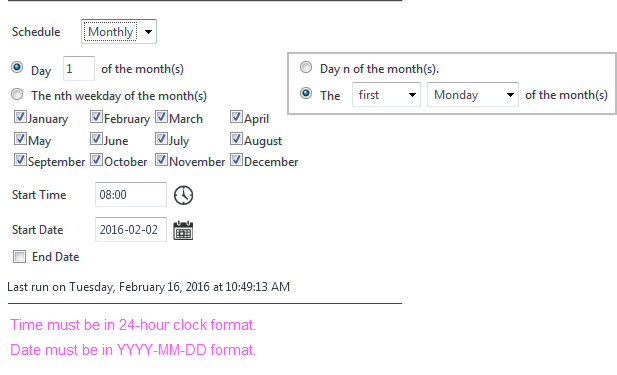
- Day X of the Month - Enter a specific day number, 1-31, for report delivery in each of the selected months. Ensure that the day number actually exists in each selected month (non-existent days will be skipped). - or -
- Nth Weekday - Select first, second, third, fourth, or last specific day of the week for report delivery in each of the selected months.
- Start Time - Format must use the 24-hour clock. You can select it from the Time Picker by clicking the clock icon, as shown above (selected time can be made more exact by editing it once it's in the input control).
- Start Date - Format must be YYYY-MM-DD. You can select it from a Calendar by clicking the calendar icon.
- End Date - An optional date for stopping the scheduled deliveries. Format must be YYYY-MM-DD. You can select it from a Calendar by clicking the calendar icon.