Manipulating Existing Underlying Elements
Some of the super-elements include static data sets, such as Format options, that are presented in the user interface as drop-down selection lists. TMFs can also be used to alter this data.

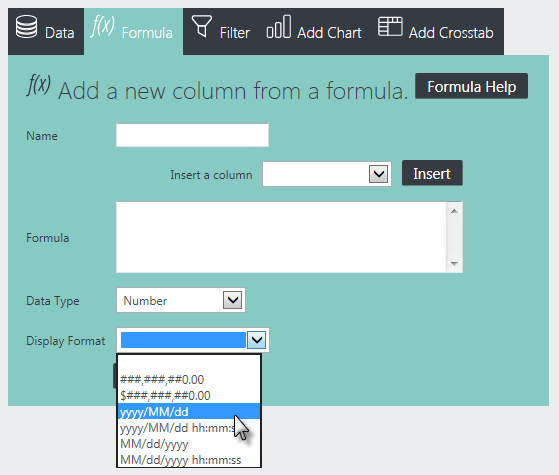
For example, in the Analysis Grid's Formula tab, the user can select from a list of six pre-defined display format options, shown above. Let's see how we can use a TMF to change the format options.
<Column ID="col2Row5Calc">
<InputSelectList OptionValueColumn="Format" ID="rdAgCalcFormats" IncludeBlank="True" OptionCaptionColumn="FormatName" DefaultValue="@Request.rdAgCalcFormats~">
<DataLayer Type="Static" ID="dlCalcFormats">
<StaticDataRow Format="###,###,##0.00" FormatName="###,###,##0.00" />
<StaticDataRow Format="$###,###,##0.00" FormatName="$###,###,##0.00" />
<StaticDataRow Format="yyyy/MM/dd" FormatName="yyyy/MM/dd" />
<StaticDataRow Format="yyyy/MM/dd hh:mm:ss" FormatName="yyyy/MM/dd hh:mm:ss" />
<StaticDataRow Format="MM/dd/yyyy" FormatName="MM/dd/yyyy" />
<StaticDataRow Format="MM/dd/yyyy hh:mm:ss" FormatName="MM/dd/yyyy hh:mm:ss" />
</DataLayer>
</InputSelectList>
</Column>
If we look at Analysis Grid's template definition file again, we find the above code that shows a DataLayer.Static element and child Static Data Row elements are used by default to create the six standard format options. In order to change that list, we need to do two things:
- Provide an XML data file that contains the data for our custom option list, and
- Override the existing datalayer, replacing it with a DataLayer.XML element that will read our custom option list file.
Here's the XML data file with our nine custom format options:
<MyCustomFormats>
<Option Format="###,###,##0.00" FormatName="###,###,##0.00"/>
<Option Format="$###,###,##0.00" FormatName="$###,###,##0.00"/>
<Option Format="Short Date" FormatName="Short Date"/>
<Option Format="MMM dd yyyy" FormatName="MMM dd yyyy"/>
<Option Format="MMMM dd yyyy" FormatName="MMMM dd yyyy"/>
<Option Format="yyyy/MM/dd" FormatName="yyyy/MM/dd"/>
<Option Format="yyyy/MM/dd hh:mm:ss" FormatName="yyyy/MM/dd hh:mm:ss"/>
<Option Format="MM/dd/yyyy" FormatName="MM/dd/yyyy"/>
<Option Format="MM/dd/yyyy hh:mm:ss" FormatName="MM/dd/yyyy hh:mm:ss"/>
</MyCustomFormats>
![]() The column names ("Format" and "FormatName") in the XML data file mustmatch those used in the original Static Data Row elements in the Analysis Grid template definition file. Our custom format options file is stored in the application's _SupportFiles folder as MyCustomFormats.xml
The column names ("Format" and "FormatName") in the XML data file mustmatch those used in the original Static Data Row elements in the Analysis Grid template definition file. Our custom format options file is stored in the application's _SupportFiles folder as MyCustomFormats.xml
<TemplateModifier>
<SetAttribute XPath="//Column[@ID='col2Row5Calc']/InputSelectList/DataLayer" Type="XMLFile"
XMLFile="MyCustomFormats.xml" />
</TemplateModifier>
Finally, we need to create the TMF shown above. It uses XPath notation to change the type of the existing template DataLayer.Static element to a DataLayer.XML element and specifies MyCustomFormats.xml, our custom options file, as the datasource. "Type" and "XML File/URL" are standard attributes of the DataLayer.XML element. When this file has been created and saved to _SupportFiles, all we need to do is set the Analysis Grid's Template Modifier File attribute to our TMF filename and preview it.

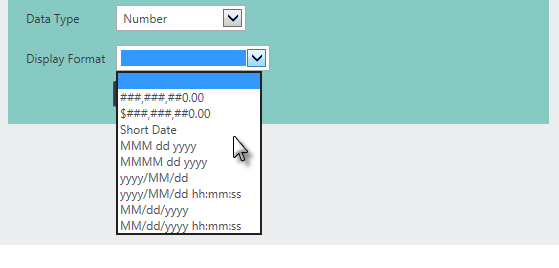
The resulting Display Format option list is shown above and it now contains our nine custom format options. This example demonstrates that TMFs are not limited to mere text changes, but can also be used to manipulate existing elements in more interesting ways.
Working with Underlying Datalayers
In many cases, the text that appears in super-element interfaces is drawn from internal static datalayers. Suppose you needed to change specific text that comes from one of these datalayers, for example, into a different language. To do this you would:
- Provide an XML data file, in _SupportFiles, that includes the translated text.
- Use a TMF to change the relevant internal datalayer element type from "Static" to "XML File" and to point it at your XML data file.
- In the TMF, change the internal Label element that displays the text to use @Data tokens.
There is one complication here: tokens inside the TMF itself are evaluated prior to being used in the modification. This is because you might have @Local, @Request, or other tokens that need to be evaluated in this file prior to being used. However, that won't achieve the "later" evaluation that we need to put the token values in the user interface. To get around this, you need to "escape" the @Data token used in your TMF for Step #3 above like this:
@@Data.dummy~Data.columnName~
This isa "token-within-a-token" construction, where @Data.dummy~ is an arbitrary, dummy token and Data.columnName is the @Data token and column name from the XML data file. When the report runs and the TMF is evaluated, the dummy token will be evaluated first, to an empty string, leaving the real @Data token to be recognized and evaluated later. The odd construction
above
has the result of masking the fact that @Data.columnName~is a token during the first evaluation.