Data Enrichment
"Data Enrichment" refers to instructions in a Dataview definition that enhance the data it retrieves. Enrichment consists of the following possible actions:
- Set a column's "physical" name
- Categorize a column as a Dimension or a Metric value
- Set a column's data type Sub-Category
- Set a column's display Format
- Create a new Calculated column
Additional enrichment options are available when working with DataHub; these are discussed in a separate topic that's included with the DataHub 3.0 documentation. All of these actions are undertaken in a Dataview's Data Enrichment tab:
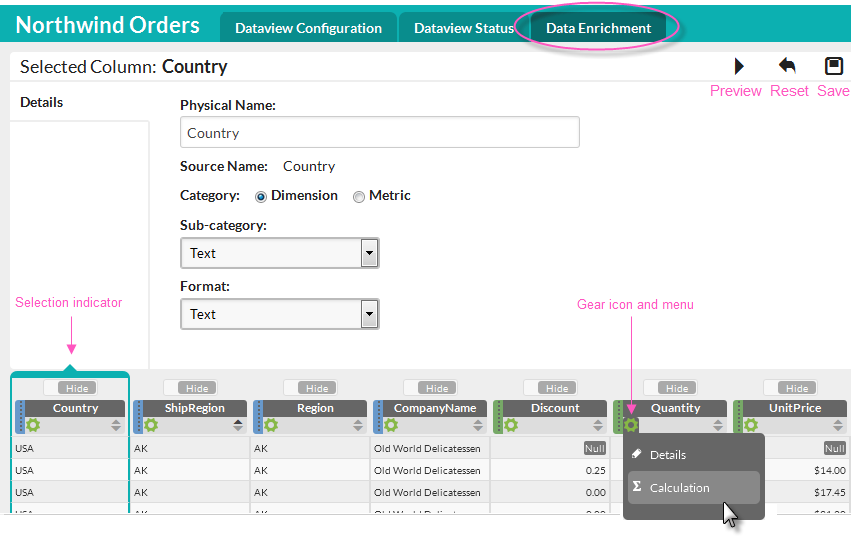
The image above shows the selected column properties, identifies the column selection indicator (simply click a column to select it), and identifies the column gear icon used to display a drop-down menu of options.
Click the Preview icon to preview the effects of formatting changes.
![]() This requires the Physical Name property be the same as the original name of the column in the data (the Source Name). Use Reset icon to undo any previewed changes.
This requires the Physical Name property be the same as the original name of the column in the data (the Source Name). Use Reset icon to undo any previewed changes.
Click the Reset icon to restore all the properties for a column to their original values.
Click the Save icon to save Dataview enrichment changes.
Setting Column Properties
To set column properties, select a column by clicking its name and its properties will be displayed.

The column properties that can be set are shown above and include:
- Physical Name - This property is the column name that will be displayed in the column header and elsewhere, sometimes called the "friendly" name. The Source Name (the name of the column in the data source) is shown below it for reference.
- Category - This property lets you specify if the column should be treated as a Dimension (an independent variable - usually descriptive or categorical) or a Metric (a dependent variable - usually numeric). An initial assignment is made when the data is retrieved, based on ananalysis of the data, but you may wish to change it.
- Sub-Category - This property further categorizes the column data type. If the Category is set to Dimension, then options here include Boolean, Identity, Numeric, Temporal, and Text. If set to Metric, then options include Currency, Decimal, and Integer.
- Format - This property determines how the data values in this column will be formatted for display. Options displayed here are related to the Sub-Category property setting and include a wide variety of formats.
Remember to click the Save icon to save your changes.
Hide / Show / Change Column Order
You can choose to hide or show Dataview columns by clicking the button at the top of the column header:
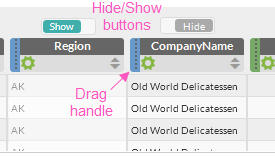
You can rearrange columns by clicking a "drag handle", shown above, and dragging the column to a new location. Drag handles are color-coded by data type.
Creating a Calculated Column
A "calculated column" adds a new column in the data and is usually the result of operations on one or more existing columns. Once defined, a calculated column is created automatically when the data is retrieved.
In the following example, we'll create a new column that contains the
results of multiplying the Quantity column by the UnitPrice column.
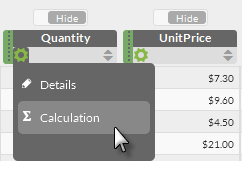
To get started, we'll hover the mouse cursor over the gear icon of one of the existing columns, Quantity, as shown above, and select the Calculation drop-down menu item.
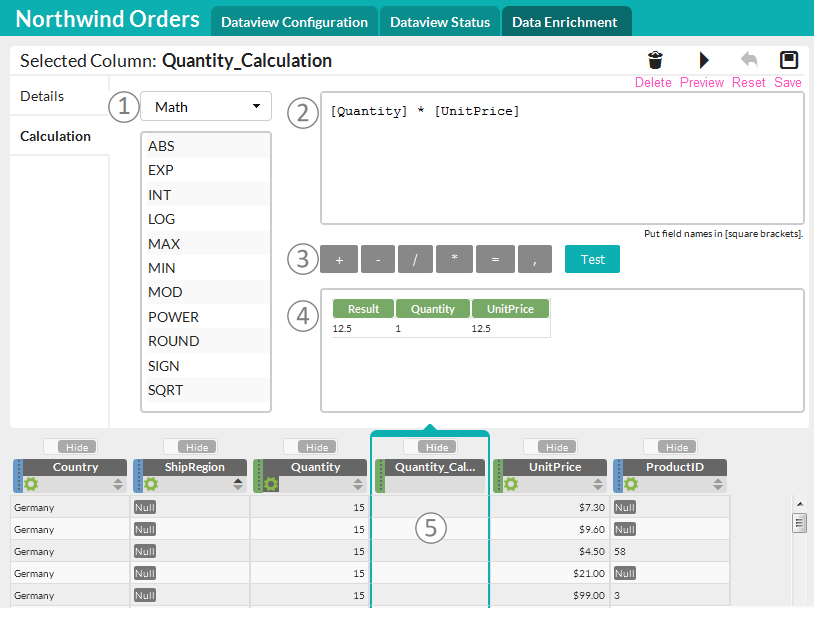
The Calculation panel, shown above, will appear, with these keyed elements:
- Built-in Functions - Hover your mouse cursor over one of these built-in functions to see its description, click to add it to the expression area. See the information at the end of this topic about using special SQL functions.
- Expression Area - This is where you build your expression for generating the calculation column values. You can type directly into this field, if desired. Field names must be enclosed in [square brackets] and, as soon as you type an opening square bracket, a list of available columns will be shown for you to choose from.
- Operators - Click to add one of these standard operators to the expression.
- Test Area - Click the Test button to run the expression and see the results in this area.
- New Column - The new column will be inserted into the columns at the bottom of the page, to the right of the column whose gear icon menu you used, and marked as the selected column.
To exit the Calculation panel, select a different column by clicking on it. You can then re-select the new calculated column and set its properties (for example, if you want to change its name).
Click the Save icon to save the new calculated column.
Click the Reset icon to clear the expression and results before previewing the new column.
Click the Preview icon to preview the calculated column, which will be populated with values based on the expression.
Click the Delete icon to delete the calculated column altogether and start over. To exit the
Calculation panel, select a different column by clicking on it.
Null values in a column pose special challenges. In an application consuming a Dataview, they may be considered when grouping on the column but may not be included in aggregates and charts. While this may be the desired behavior, there are situations where a Null value should be counted. In those cases, the Null must be converted to a real value (e.g. "N/A", 0, -1, "Unknown"). This calculated column expression can be used to convert the Null values to a real value:
- IFNULL ([column], 'N/A')
For Dataviews that use database Sources, you can use SQL functions if the standard expressionfunctions aren't sufficient.
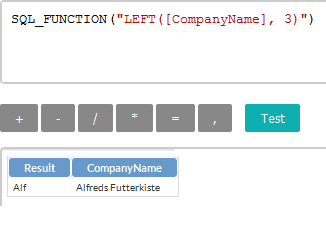
As shown in the example above, you can wrap an ANSI SQL-92-compliant function in a "SQL_FUNCTION( )" structure in your expression and it will be understood and executed as part of the query used in the data retrieval process. Column names must still be enclosed in square brackets. Complex SQL statements, like this, are supported:
- SQL_FUNCTION("CASE WHEN [Country] = 'Argentina' THEN 1 ELSE 0 END")