Fill Effects Dialog Box
You can use the Fill Effects dialog box to specify either a gradient, a texture, or an image as the fill effect. This topic describes the options in the dialog box.
Designer displays the Fill Effects dialog box when you format a color schema for an object in a chart.
The dialog box contains the following tabs (Designer displays the Image tab only for certain chart objects):
You see these buttons in all the tabs:
Default
Select to set all the values in the dialog box to the default settings.
OK
Select to apply all changes and close the dialog box.
Cancel
Select to close the dialog box without saving any changes.
Help
Select to view information about the dialog box.
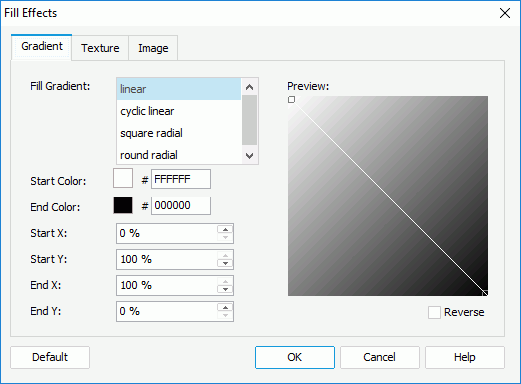
Gradient Tab
Use this tab to specify the gradient colors for the object.

Fill Gradient
Select the type of gradient to fill the object: linear, cyclic linear, square radial, or round radial.
Start Color
Specify the color of the point where the gradient begins. To edit the color, select the color indicator and select a color from the color palette or input the hexadecimal value (for example, 0xff0000) of a color in the text box.
End Color
Specify the color of the point where the gradient ends.
Start X
Specify the horizontal position, measured in the percentage of the object's width, from the left edge of the object, where the gradient starts.
Start Y
Specify the vertical position, measured in the percentage of the object's height, from the top edge of the object, where the gradient starts.
End X
Specify the horizontal position, measured in the percentage of the object's width, from the left edge of the object, where the gradient ends.
End Y
Specify the vertical position, measured in the percentage of the object's height, from the top edge of the object, where the gradient ends.
Preview
The box displays a preview of your settings.
Reverse
Select to reverse values of Start X and End X, and reverse Start Y and End Y.
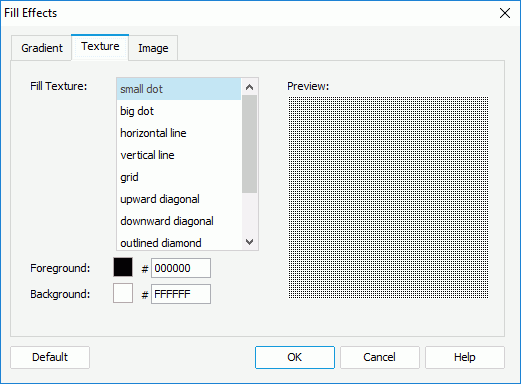
Texture Tab
Use this tab to specify the texture to fill the object.

Fill Texture
Select the type of the texture to fill the object.
Foreground
Specify the foreground color of the texture. To edit the color, select the color indicator and select a color from the color palette or input the hexadecimal value (for example, 0xff0000) of a color in the text box.
Background
Specify the background color of the texture.
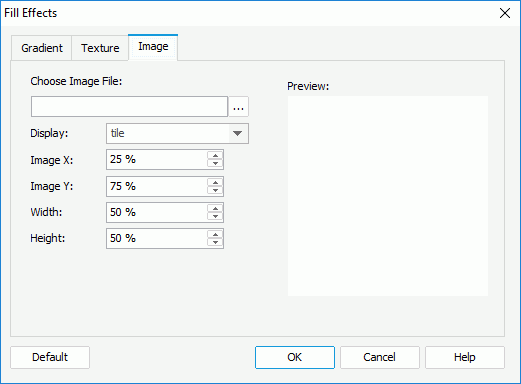
Image Tab
Designer displays the Image tab only when you use the dialog box for specifying the fill effects of the chart platform, chart paper, or chart legend. You can use it to specify the image to fill the object.

Choose Image File
Specify the image file from the current catalog folder. Type the file path in the text box or select the Browse button to find the directory.
Display
Select the layout style of the image in the object: tile, centered, or scaled.
Image X
Specify the left position of the area, measured in the percentage of the image's width, from the left edge of the image.
Image Y
Specify the bottom position of the area, measured in the percentage of the image's width, from the bottom edge of the image.
Width
Specify the width of the area, measured in the percentage of the image's width. If you set this value to less than 100 percent, Designer cuts the image from the right edge.
Height
Specify the height of the area, measured in the percentage of the image's height. If you set this value to less than 100 percent, Designer cuts the image from the bottom edge.
You can use the above four options: Image X, Image Y, Width, and Height, to define an area in the image and put the defined area of the image into the object.
Preview
The box displays a preview of your settings.
 Previous Topic