Using Pre-joins in Queries
When you create queries in a catalog, you can choose to apply the pre-joins that you have predefined in the catalog to allow Designer to automatically join the tables you select to add to the queries. Using pre-joins in queries can free you from repeatedly creating the join relationships between the tables in each query. This topic describes how you can enable using pre-joins in queries and create queries with pre-joins.
This topic contains the following sections:
Enabling Using Pre-joins in Queries
If you want to use pre-joins when creating queries, you need to first enable the function.
- In the Catalog Manager, select the data source to create queries, then select Show Properties to expand the Properties sheet.
- Set the Pre-join property of the data source to true.
Then, when you add tables contained in the catalog data source to queries in the same data source, Designer automatically applies the pre-joins defined in the data source to the tables.
Creating Queries Using Pre-joins
Once you have enabled using pre-joins in queries, when you create queries, Designer automatically joins the tables you add to the queries. However, the following cases may appear:
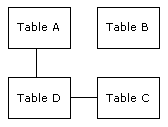
- If Designer needs other tables to bridge the tables you select to add to a query, Designer prompts you whether to add the other tables at the same time. For example,

Suppose you add tables A and C to your query, Designer then prompts you a message box, asking you whether you want to add table D in order to create links between tables A and C. However, if you clear the option "Show warning message when adding tables" in the Query Editor category of the Options dialog box, Designer adds the bridged table automatically without any prompt.
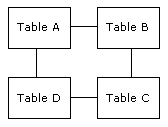
- If there is more than one path available in the pre-joins, for example,

Suppose you add tables A and C to the query and there are two paths available, ABC and ADC, Designer then asks which path you want to apply. You can view the pre-join path that a query applies using either of the following methods:
- In the Catalog Manager, expand the Properties sheet and select the query. Locate the Path Name property and you can see the name of the path.
- In the Query Editor dialog box, select Show Paths.
You can bind a query with at most one path. Once you specify a path for a query, when you modify the relationships among the tables, you can make changes to a specific query based on that path, but the path itself is not changed. Therefore, when you edit a query, the following cases may appear:
- Adding tables to a query for which you have already specified a path - If more than one path is suitable after you add the tables, Designer still applies the specific path, that is, you cannot choose another path to replace the original one.
- If you delete the path specified for a query, Designer disables the Show Paths button in the Query Editor dialog box.
 Previous Topic