Using Action.Add Dashboard Panel
The Action.Add Dashboard Panel element, used in other definitions with elements like data tables and Analysis Grids, adds specified content to a new dashboard panel
which is added to a specified dashboard. A bookmark for the content can optionally be created by adding a
Bookmark Linkback element beneath this action element.
Essentially the element works by allowing the developer to specify all of the necessary content in the current report that will be copied into the new dashboard panel. This includes the properties of the panel itself and any relevant parameters. On execution at runtime, the report definition containing the specified dashboard, and its supporting files, are edited to include the new dashboard panel and its content.

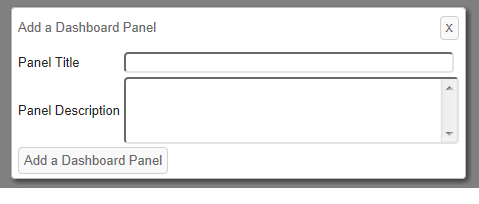
At runtime, when a user clicks on this element's parent element (Button, Label, Image, Event Handler, or Popup Option), a pop-up panel, shown above, is displayed soliciting a title and a description for the new
Dashboard Panel, which is used in the Dashboard Configuration Page. Optional attributes allow default information, and a thumbnail image, to be specified by the developer.
Parameters
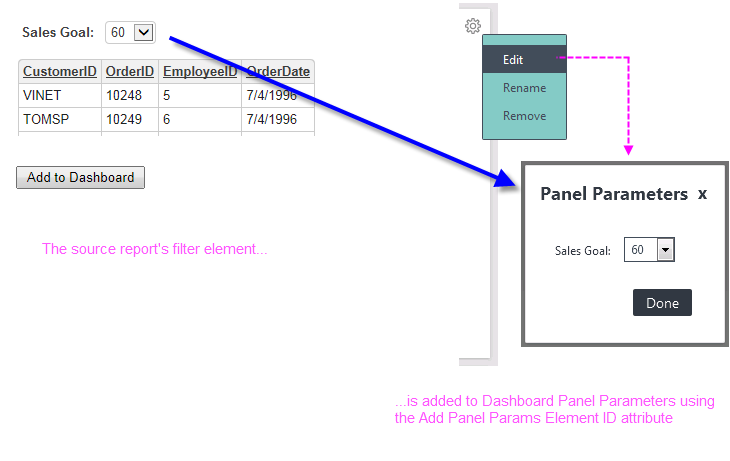
Reports often include input elements that allow users to filter the displayed data at runtime.

Action.Add Dashboard Panel includes a mechanism for copying these elements into the new dashboard panel as Panel Parameters, as shown above. The Add Panel Params Element ID attribute allows you to specify the IDs of the elements to be added as parameters.

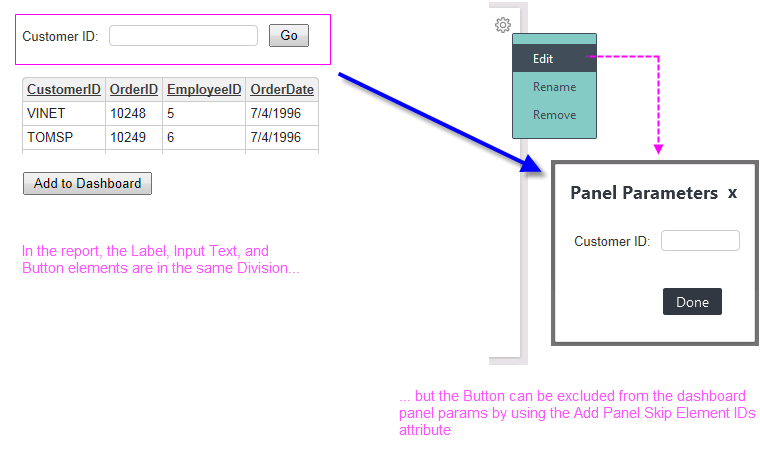
You can specify the ID of a Division or other container element and all of its contents will be added to the panel parameters, with the exception of any elements specified in the Add Panels Skip Element IDs attribute. This allows you to exclude, for example, a Submit button that's in a Div, along with Input elements, in the current report but which won't be needed in the dashboard parameters panel (which has its own Done button).
Token Handling
In anticipation of the need at runtime to "pass along" some tokens (i.e. don't resolve them now) associated with the new content into the new dashboard panel (where they will be resolved when the dashboard definition is run), a special token handling scheme has been provided:
- In general, @Function tokens will not be resolved, but will be passed along with the content into the panel for resolution when the panel is viewed. This was done in anticipation that these tokens will most likely be used to provide date/time- or user-related information.
- @Local tokens, specified by the developer in the Add Panel Local Data IDs attribute, will not be resolved and will be passed along. Multiple tokens can be entered in a comma-separated list. Tokens not listed will be resolved before the panel is created.
- @Request tokens, specified by the developer in the Add Panel Request IDs attribute, will not be resolved and will be passed along. Multiple tokens can be entered in a comma-separated list. Tokens not listed will be resolved before the panel is created.
- @Session tokens, specified by the developer in the Add Panel Session IDs attribute, will not be resolved and will be passed along. Multiple tokens can be entered in a comma-separated list. Tokens not listed will be resolved before the panel is created.
Security
If a value is entered in the Add Panel Security Right ID attribute, access to the resulting dashboard panel access can be controlled with Logi Security. This value should be ID of a security Right defined in the application's _Settings definition, under the Security element. This value is written into the panel's Security Right ID attribute and, with Logi Security enabled, only users with that Right will be able to see the new dashboard panel. Note these two special conditions:
- When user rights come from Right From Role elements under the Security
 User Rights elements, and this element's Security Right ID does not match any of the Right IDs defined in the Settings definition, then the user does have access.
 - But when rights are instead derived from Rights From DataLayer or Rights From Roles elements, and the user does not have a matching Right, then the user does not have access.
Multiple Right IDs can be entered in a comma-separated list. The user will see the dashboard panel if he has any one of the Rights.
Attributes
The Action.Add Dashboard Panel element has the following attributes:
| Attribute | Description |
|---|---|
| Add Panel Content Element ID | (Required) Specifies the ID of the element that will be added to the new dashboard panel. Only one ID is valid, multiple IDs are not allowed. However, you can specify the ID of a Division or similar container element and all of its contents will be added to the new panel. |
| Dashboard Save File | (Required) Specifies the dashboard that will become the parent of the new dashboard panel. Provide a fully-qualified web server file path and file name, with .xml extension, for the target dashboard's existing Save File. Hint: This can be copied directly from the dashboard's Save File attribute. |
| ID | (Required) Specifies a unique element identifier. |
| Add Panel Button Caption | Specifies the text inside the button, in the popup panel, that triggers the addition of the target content as a new panel in the specified Dashboard. Default: Add to Dashboard |
| Add Panel Content Height | Specifies the height of the new dashboard panel content, in pixels. |
| Add Panel Description | Specifies the new panel's default description, which will appear in the Dashboard Configuration Page. Users can change this text prior to executing the process. |
|
Add Panel Local IDs |
Specifies @Local token IDs whose values should be passed into the Dashboard panel. Token IDs listed here are normally saved in the Panel in a Local Data element with a static datalayer. In this way, when the dashboard is run, the @Local tokens get replaced with the same values from when the panel was added. To have the Local Data datalayer re-run when the dashboard is run, set the Add Panel Local Data IDs attribute to the ID of the Local Data element. In this way, the @Local values can change over time. @Local IDs listed will remain in the panel to be resolved by the Local Data defined either in the Dashboard or copied to the Dashboard panel via the Add Panel Local Data IDs attribute. Multiple token IDs can be entered as a comma-separated list. |
| Add Panel Local Data IDs | Specifies the element IDs of Local Data elements to be copied into the Dashboard panel. The Local Data datalayers will be run when the Dashboard is run, replacing @Local tokens. Multiple Local Data IDs can be entered in a comma-separated list. |
| Add Panel Params Element ID | Specifies the ID of the element in the current definition that will be added to the new panel's child Dashboard Panel Parameters element. This is used to include Input elements and supporting data in the panel, accessible using the panel's Edit button. This can be the ID of a Division or other container element, causing all of its child elements to be included. Some of those child elements can be excluded by specifying their IDs individually in the Add Panel Skip Element IDs attribute. |
| Add Panel Popup Caption | Specifies the title text shown in the popup panel displayed when the user clicks the Action.Add to Dashboard Panel element's parent element. |
| Add Panel Request IDs | Specifies the IDs of @Request tokens that will be passed along, unresolved, to the new panel. These tokens will be resolved in the new panel's Default Request Params or Dashboard Panel Parameters. @Request tokens not listed here will be resolved when the panel gets saved into the dashboard. Multiple token IDs can be entered as a comma-separated list. |
| Add Panel Security Right ID | Specifies the security Rights a user must have in order to access the new dashboard panel. Multiple Right IDs can be entered as a comma-separated list. Please see the Security section above for special conditions. |
| Add Panel Session IDs | Specifies the @Session token IDs that will be passed along, unresolved, to the new panel. @Session tokens not listed here will be resolved when the panel gets saved into the dashboard. Multiple token IDs can be entered as a comma-separated list. |
| Add Panel Skip Element IDs | Specifies the ID of one or more child elements of the element named in Add Panel Params Element ID that will be excluded from being added to the new Dashboard Panel Parameters. Multiple element IDs can be entered as a comma-separated list. |
| Add Panel Title | Specifies the new dashboard panel's default caption. Users can change this text prior to executing the process. |
| Image | Specifies the file name of an image that will appear on the left side of the Add Panels section of the Dashboard Configuration page. For the best appearance, images should be less than 200 pixels wide. The file name can be selected from a list of the images in the _SupportFiles folder or be entered manually as a relative URL to a file within the same Logi application. URLs to external sites or applications are not valid. |
| Multiple Instances | Specifies whether or not the new dashboard panel can be added multiple times to the same dashboard or dashboard tab. Default: False |
| Security Right ID | Specifies the security Rights a user must have in order to use this Action element. Users without Rights that match Rights specified here will not be able to execute the action. Multiple Right IDs can be entered as a comma-separated list. |
With Bookmark Linkback
The optional Bookmark Linkback element can be added as a child of Action.Add Dashboard Panel:

As shown above, once you include the element and configure a few attributes, it will automatically add a link to the new dashboard panel which will run the target content with the request variables that were used in the original report. You must provide the name for the Bookmark Collection (usually associated with a user) and provide a Caption, which is the text that appears as the bookmark link in the new dashboard panel. You can optionally decide to "run" the bookmark in a new window or selected window. For more information about this feature, see Bookmarks.