Saving a Page Report
You can save the changes that you made to your page report or save a copy of your page report in Page Report Studio. This topic describes how you can save a page report.
To save your page report, select Menu > File > Save or the Save button  on the toolbar.
If you have saved the report before, Server displays the Save Report Template dialog box. Specify whether to save the sort and filter criteria you have made on the report, then select OK. Server saves the report as a report version to the original location. If you do not want to display the dialog box, you can use the option Pop Up Save Criteria Dialog in the Page Report Studio profile to disable the dialog box from popping up when saving reports.
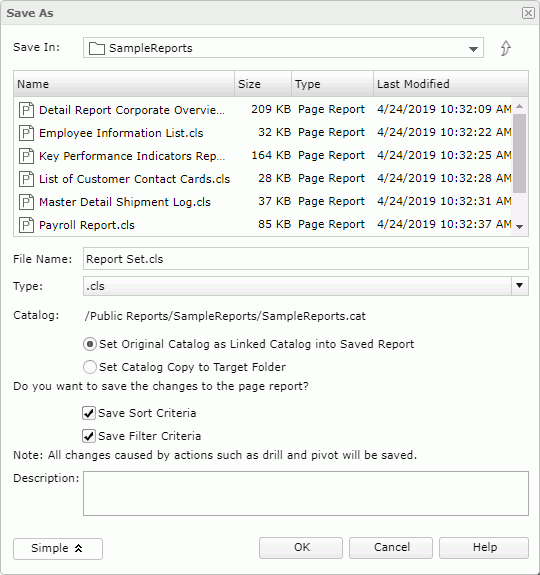
If you have newly created the report and has not yet saved it, Server displays the Save As dialog box.

- In the Save in section, browse to the folder in the server resource tree where you want to save the report. You can use the button
 to go to the parent folder.
The resource table lists the resources in the current directory. You can select the column names to change the order of the resources in the table list.
- In the File Name box, type the name of the report or use the default name.
- From the File Type drop-down list, specify the type of the saved report. Normally you want to use the default (.cls).
- Page Report (*.cls)
Saves the report as a binary formatting file. - Report Template (.rpt)
It is a file saved in text format, which can be edited in any text editor. - Self Contained Page Report (.clx)
It is a binary report file, which contains not only the report's layout but also the catalog with its own resources. - Page Report XML Format (.cls.xml)
It follows the XML standard, which can be edited with both Logi Report Designer and external XML editors. Page reports that contain customized user defined objects (UDO) cannot be saved to XML format. Using the XML format is better for checking into source code control systems than using the binary formats. The XML feature for page reports is under license control. To obtain the special key, contact Logi Analytics Support (support@logianalytics.com).
- Page Report (*.cls)
- Select the Advanced button to set the advanced settings for the report if you want.
- When Select Catalog Linked Model is enabled in the Page Report Studio profile, specify the relationship between the saved report and the catalog used to run it:
- Set Original Catalog as Linked Catalog into Saved Report
If the option is selected, the saved report will be linked with the catalog and the saved report will run with the catalog no matter whether the two are in the same directory. If later the catalog is updated, the saved report will run with the latest version of the catalog. - Set Catalog Copy to Target Folder
If the option is selected, the catalog will be copied to the directory where the report is saved and the saved report will run with the copied catalog. There should be only one catalog per folder so if there is already a catalog in the folder where you are going to save the report, it may cause other reports in the folder not to be able to run as they may try to use the wrong catalog. Also, if there is an existing version of the same catalog in the target folder, it will be overwritten and existing reports that use it may not run with the new catalog version. Therefore, it is always better to link the catalog rather than copy it.
- Set Original Catalog as Linked Catalog into Saved Report
- If you want to save the report together with the sort and filter criteria, select Save Sort Criteria and Save Filter Criteria correspondingly. With the criteria saved, Page Report Studio will automatically apply them to the report the next time it is opened.
- Optionally, type comments in the Description box as a description for the report.
- When Select Catalog Linked Model is enabled in the Page Report Studio profile, specify the relationship between the saved report and the catalog used to run it:
- Select OK to save the report.
To save a copy of a report, select Menu > File > Save As, or the Save As button  on the toolbar to show the Save As dialog box, and then do as above. If you are saving to an existing file, Report Server will display a Confirm dialog box asking whether you want to replace the file or save a new version into the file.
![]()
- You cannot save the report to some locations if you do not have the required permissions. You need to have Write access to the directory.
- If one of the report tabs in a report contains subreports, when you save the report, Server does not save the changes that you have made on the subreports along with the primary report.
 Previous Topic