REST API Test
In this sample we will write a simplistic web page that tries calling a REST API then displays the response.
- We will test with the GET advancedSetting/category/(tenant_id) API.
- We will use JQuery ajax to call the API.
- We will display the response in the browser’s JavaScript Console.
Folder preparation
-
Create a folder named “ui_react_examples” in our web server root folder.
A web server is not required for our tutorials. In case of none, just create the “ui_react_examples” folder anywhere available.
-
Inside it, create a folder named “vendor”. This is where we will put the JavaScript library files.
-
If using a web server, check the permissions to make sure that it can read the files inside these two folders.
API Access Token preparation
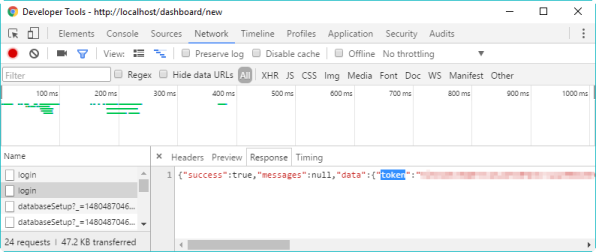
API calls need an access token to verify that the client has logged in the system. This access token is returned in the login API result.
- Open Izenda login page in browser.
- Open the browser developer tool (by pressing F12 on most browsers).
- Login to Izenda.
- Switch to Network tab in the developer tool.
- Find the login API response and copy the content of the token field.
How to use JQuery library
The JQuery library is packaged into a single .js file, with two versions:
-
Production, which has been minified and compressed.
The filename for production version ends with
.min.js. -
Development, which contains uncompressed and readable code.
We will use the development version for debugging purpose.
There are also two ways to use the library:
- Include it from a content delivery network such as Google or Microsoft.
- The link for Google hosted library:
https://ajax.googleapis.com/ajax/libs/jquery/1.12.2/jquery.min.js - The link for Microsoft hosted library:
http://ajax.aspnetcdn.com/ajax/jQuery/jquery-1.12.2.min.js
- The link for Google hosted library:
- Download it and put into a local folder on our web server, then include the local file in our web page.
We will use a local file for instructional purpose:
- Go to http://jquery.com/download/ and download the uncompressed, development version (jquery-1.12.2.js).
- Put it into the “ui_react_examples/vendor” folder.
Boilerplate HTML page
-
In “ui_react_examples” folder, create a blank text file and name it “REST API Test.html”.
-
Edit the file with a text editor such as Notepad or Notepad++ and paste the following boilerplate HTML code:
<!doctype html><html><head><scriptsrc="vendor/jquery-1.12.2.js"type="text/javascript"></script></head><body><scripttype="text/javascript">// TODO</script></body></html>
For production web site, we will replace vendor/jquery-1.12.2.js with the link for Google or Microsoft hosted, minified and compressed library.
Code sample for calling REST API
Edit the “REST API Test.html” file to replace //TODO with our JQuery ajax call:
$.ajax({headers:{access_token:"<the token returned from the login API>"},url:"http://127.0.0.1:8888/api/advancedSetting/category",type:"GET",contentType:"application/json",success:function(response){console.log(JSON.stringify(response));},error:function(response){console.log(JSON.stringify(response));}})
The url http://127.0.0.1:8888/api/advancedSetting/category should be updated with the correct IP and port of our API server.
In this JQuery ajax call, we:
- fill out the url.
- set the type GET, POST, or DELETE.
- set the content type application/json.
- register two anonymous call-back functions for success and error cases.
- write the call-back functions to format as text (
JSON.stringify) the response from server, then display to the browser’s JavaScript Console (console.log).
View the web page in browser and the JavaScript Console
-
We can either open the file locally, or through a web server if available.
- To open the file through a web server, we must know the address and port of the server (e.g.
http://127.0.0.1:81), then add/ui_react_examples/RESTAPITest.htmland type in the address bar. - To open the file locally, in the browser press Ctrl + O or go to File, Open then browse to the file location and open it.
- To open the file through a web server, we must know the address and port of the server (e.g.
-
After the file has been opened, activate the JavaScript Console. In most browsers, this can be done by pressing F12 then choosing “Console” menu item.
For more help, this link has the instructions to open the JavaScript Console on many browsers https://codex.wordpress.org/Using_Your_Browser_to_Diagnose_JavaScript_Errors#Step_3:_Diagnosis.
-
In the JavaScript Console, we can see the response from the server similar to this:
[{"name":"Category_1","tenantId":null,"deleted":false,"id":"cf484173-e03a-46a8-aa23-c628e28a6e9e","state":0,"modified":"2016-05-06T04:43:01.1300000-07:00","dateTimeNow":"2016-05-06T06:44:15.3911108Z"},{"name":"Category_2","tenantId":null,"deleted":false,"id":"04d67b3c-e93e-4b93-88e2-e4c6199d9671","state":0,"modified":"2016-05-06T04:43:01.1130000-07:00","dateTimeNow":"2016-05-06T06:44:15.3911108Z"}]
Summary
In this sample, we went through these activities:
- created a boilerplate web page.
- included the JQuery library.
- made an ajax call to the GET advancedSetting/category/(tenant_id) API.
- displayed the response from this API to the JavaScript Console.
