Using Validation Elements
Validation elements are provided to allow you to validate the data users enter. All of them have some behaviors and attributes in common. For example, if validation fails, the page submission is aborted, an error message is displayed, and, optionally, the offending user input element can be highlighted by applying a different style class to it (coloring its background, for example). Multiple validation elements can also be used in combination under a single Input element.
![]() You must give each Input element being validated a unique ID. This allows the validation process to correctly identify the element in case validation fails; failing to do this will result in validation being ignored.
Some validation elements are not appropriate (nor available in Studio) for some user input elements. For example, it makes no sense to try to validate a numeric entry for the Input Radio Buttons element.
You must give each Input element being validated a unique ID. This allows the validation process to correctly identify the element in case validation fails; failing to do this will result in validation being ignored.
Some validation elements are not appropriate (nor available in Studio) for some user input elements. For example, it makes no sense to try to validate a numeric entry for the Input Radio Buttons element.

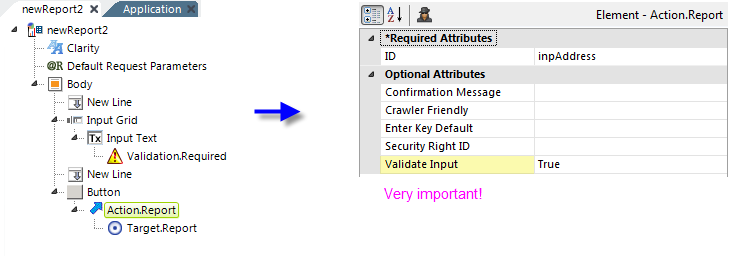
![]() A very important step, one that developers often overlook when working with Validation elements, is enabling input validation. As shown above, the Action element used to submit the page has a Validate Input attribute which must be set to True or else none of the Validation elements will do anything.
A very important step, one that developers often overlook when working with Validation elements, is enabling input validation. As shown above, the Action element used to submit the page has a Validate Input attribute which must be set to True or else none of the Validation elements will do anything.
Validation.Date
The Validation.Date element allows the developer to validate several things about dates entered in an Input Date element. The Validation.Date element's attributes include those discussed above for the Validation.Required element and also adds Range Start and Range End attributes. Validation.Date will ensure that the date was entered in a format that matches the mask in the Input Date element's Format attribute. So, if the Input Date element's Format value is "MM/dd/yyyy" and the user enters "12/25/15", an error message will be displayed because a 4-digit year was not entered. Validation.Date can also ensure that the date entered falls within the date range specified by its Range Start and Range End attributes. To be validated, the date entered must be on or after the Range Start date, and be on or before the Range End date. For this validation to work correctly, the format of the Range Start and Range End values entered must match the format described in the Input Date element's Format attribute. If you use @Date tokens for the Range attributes, be aware that their default format, "yyyy-M-d", is not very user-friendly and might not match a more normal format you establish for Input Date. To reconcile this, in your _Settings definition, add a Globalization element and set its Default Input Date Reformat attribute to the same user-friendly format as your Input Date element. This will change the format of the @Date tokens, they'll match the Input Date element's Format attribute, and the validation will work correctly.
Validation.Email
The Validation.Email element allows the developer to validate the value entered in an Input Email element. Validation.Email ensures that a properly formatted email address value has been entered. The address is validated for the "@" symbol and a domain name. Certain special characters forbidden in email addresses are not allowed. The validation elements provide a quick, easy method of implementing simple validation and can catch many data entry errors.
Validation.JavaScript
The Validation.JavaScript element allows you to validate the value entered by using a custom JavaScript function.
To use this element, enter a call to a custom function (found in the report definition) in its Javascript Function attribute. Usually this call will include the ID of the Input element as argument. Here's an example of the complete attribute value:
- validateMustBeX(document.getElementById('inpText'));
The function itself can be included in your report definition using any of the elements that run script in the browser, such as Include Script or Include Script File.
When the page is submitted, the custom function will be run by the browser. If the function detects an error, it should call throw(<errorMessage>) to trigger display of an error message.
Here's an example of a custom validation function that requires the letter "x" to be entered:
function validateMustBeX(eleInput){
if (eleInput.value != 'x') {
throw('The input value is: "' + eleInput.value + '". But it must be "x".')
}
}
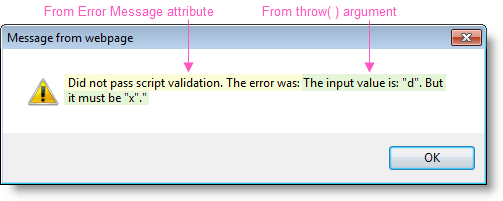
If the validation fails, the text in the Validation element's Error Message attribute gets displayed in a message box. If the attribute's value contains the special string variable {error} it will be replaced with the custom function's throw( ) argument, providing a customizable error message. For example, the attribute value could be:
- Did not pass script validation. The error was: {error}
When used with the custom function shown earlier, the resulting message box would look like this (assuming a the letter "d" was entered):

Here's a particularly good example of Validation.JavaScript in use: when using Input Date with a date range, ensuring that the Start date is not later than the End date. Assuming the input element is configured so that its ID is inpDateStart and its End Date Range ID attribute is set to inpDateEnd, here are the Validate.JavaScript element's attributes:
Error Message: Did not pass validation! {error}
JavaScript Function: validateMe(document.getElementById('inpDateStart'), document.getElementById('inpDateEnd'));
As you can see, the function call above uses the element IDs to pass the input objects as parameters to the validating function.
And, in an Include Script element at the end of the definition, here's the code for the "validateMe" function:
function validateMe(objStart, objEnd) {
var sDate = new Date(objStart.value);
var eDate = new Date(objEnd.value);
/* development only */
alert(sDate);
alert(eDate);
if (sDate > eDate) {
throw('The Start Date must be earlier than the End Date');
}
}
JavaScript makes it easy to compare the Date objects directly, without having to parse them.
Validation.Length
The purpose of the Validation.Length element is to ensure that a minimum and/or maximumnumber of characters has been entered.

The Validation.Length element's attributes include those discussed above for the Validation.Required element and also adds Maximum Length and Minimum Length attributes, which are optional (though you should enter something for at least one of them or why bother with the element at all?)
Validation.Numeric
The purpose of the Validation.Numeric element is to ensure that all of the characters entered in the text box are numbers. If any of the characters entered are letters or symbols, the validation fails, the error message is displayed, and the text box can have an optional style class applied to it. Page submission is aborted. The Validation.Numeric element's attributes are the same as those discussed above for the Validation.Required element.
Validation.Required

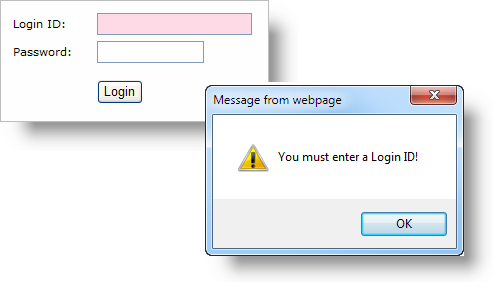
The purpose of the Validation.Required element, as shown above, is to ensure that the user enterssomething in the control. If the text box is left blank and the page is submitted,

a popup error message window will appear displaying the text set in the Error Message attribute. If the optional Class attribute is set, then the offending user input element will be set to that style class (allowing the developer to color its background). After the OK button in the popup error message window is clicked, submission of the page is aborted.
Validation.Time
The Validation.Time element allows the developer to validate the time value entered in an Input Time element. The Validation.Time element's attributes include those discussed above for the Validation.Required element and also adds Range Start Time and Range EndTime attributes.
Validation.Time ensures that a time value has been entered. The format of the time entered must conform to that in the Format attribute of the parent Input Time element. Validation.Time can also ensure that the time falls within a time range, specified with the Range Start Time and Range End Time attributes. To pass the validation, the time entered must be on or after the Range Start Time, and be on or before the Range End Time.