Multitenancy Supported via Organizations
Logi Report Server supports the multitenancy architecture by organizing users into different organizations. An organization is a group of users that has its own administrator. This enables the tenant administrators for fine-grained management of their own resources, security, and user policies.
The Organization feature is a separately licensed feature of Logi Report Server. It is installed together with Logi Report Server so only the license key needs updating to enable it to work. To find out how to license Organization, please contact Logi Analytics sales at sales@jinfonet.com or contact your Enterprise Account Manager.
When Logi Report Server is Organization enabled, users need to specify the organization name before logging onto Logi Report Server. The organization name System means that the login user does not belong to any organizations. For organization users, the correct organization name must be provided, otherwise they cannot log in.
Select the following links to view the topics:
Organization Definitions
To use the Organization feature, you should first have a general idea of the following:
- System admin
The overall server system administrator who has the administrators role. System admin must be a user that does not belong to any organizations. - Organization admin
The administrator who has the administrators role in an organization. You cannot log onto Logi Report Server Monitor as an organization admin. Only the system admin can log onto Logi Report Server Monitor and view both organization and non-organization information. The organization admin of an organization can manage resources and users in the organization and configure Logi Report Server to adapt for the organization the same as system admin does, however some administration features are unavailable to an organization admin.
- Non-organization users
Belong to no organizations. When upgrading from a version earlier than version 13, the users, groups, and roles in the earlier version are all regarded as non-organization principals. - Organization users
Users, groups, and roles created in an organization are called organization principals.An organization principal can belong to any other non-organization group/role, but a non-organization principal cannot belong to any organization group/role. An organization principal cannot belong to any group/role of other organizations.
Organization admin cannot add principals to non-organization groups/roles.
The naming rule of an organization user is composed of the organization name and the user name separated by "\". The format is [Organization Name]\[User Name]. For example, a\b, here "a" is the organization name and "b" is the user name.
If organization is disabled, the organization principals will not be supported. However the information will be saved in the server and can be retrieved next time when organization is enabled again.
- System public resources
Public resources that can be accessed by all organization users and non-organization users. They are located in the Public Reports and Public Components folders. - Organization public resources
Each organization has its own public resources which can only be accessed by the users within the organization. Organization admin has built-in permissions on the organization public resources the same as system admin on the system public resources. Organization public resources are located in the Organization Reports and Organization Components folders.
Creating Organizations
The system admin can create organizations.
- In the Logi Report Server console, point to Administration on the system toolbar, and then select Security > Organization from the drop-down menu. Report Server displays the Organization page.

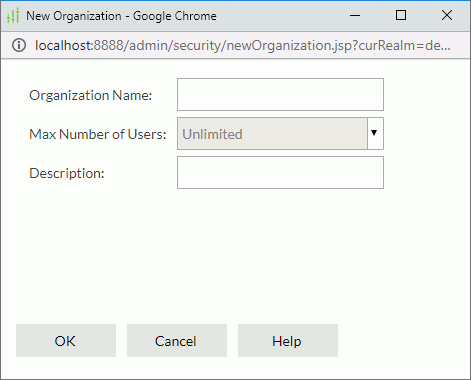
- Select the New Organization link. Report Server displays the New Organization dialog box.

- Specify the name of the organization, the maximum number of users allowed in the organization, and the description about the organization.
- Select OK to create the organization.
The new organization is then added in the organization table which consists of the following columns.
| Column Name | Description |
|---|---|
| Organization Name | Displays the organization names. |
| Max Number of Users | Displays the maximum number of users allowed in the organizations. The values are editable. Double-click in the text box and then select a value from the drop-down list or type an integer number in the combo box directly, then select outside of the combo box to accept the change. The x in the combo box is used to clear the input text. |
| Description | Displays the information about the organizations. It is editable. |
| Control |
|
In the organization table, the system admin can sort the organizations by the first three columns, search for required organizations, change the maximum number of users in an organization, and delete the organizations that are not required.
- To sort the organizations by a column, select on the column name.
- To search for organizations, in the Search box, type the text of the organization names you want to search for and the organizations containing the matched text will be listed. After typing text in the Search box, you can select
 that appears in the box to specify the following search options: Highlight All, Match Case, and Match Whole Word. To cancel the search operation, clear the text or select
  .
.
- To change the maximum number of users in an organization, in the Max Number of Users text box for the organization, select a value from the drop-down list or type an integer number in the combo box directly.
- To delete any organizations, select the check boxes ahead of the organizations (to select all organizations, select the check box on the column header), then select Delete above the table.
Allocating Server Resources to Organizations
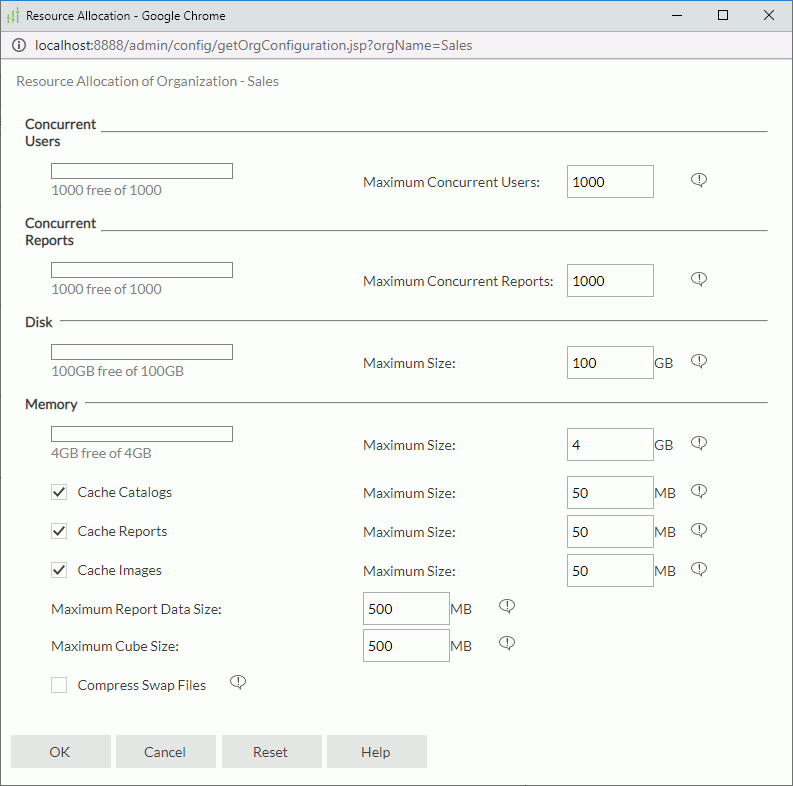
System admin can allocate server resources to different organizations, then when one organization encounters report running performance problems, the other organizations will not be affected. The server resources include maximum concurrent users/reports, maximum disk/memory size, whether to cache catalogs, reports, or images used in the organization and the maximum memory size for them as well as for cached report data and cube, and whether to compress swap files so as to reduce I/O time by increasing CPU usage.
Resource allocation can be achieved either via UI or by modifying the property file.
- Allocating via UI
- Select the Resource Allocation link of the organization in the Control column of the organization table. Report Server displays the Resource Allocation dialog box.

- Configure the settings as required.
- Select OK to finish allocating resources to the organization.
- Select the Resource Allocation link of the organization in the Control column of the organization table. Report Server displays the Resource Allocation dialog box.
- Allocating by modifying property file
System admin can also modify the organization_config.properties file in the
<install_root>\propertiesfolder directly. The property file provides default values to all newly created organizations.The following table lists the mapping relationship between properties in the file and options in the Resource Allocation dialog box.
Property in organization_config.properties Option in the Resource Allocation dialog box Concurrent_Users Maximum Concurrent Users Concurrent_Reports Maximum Concurrent Reports Maximum_Disk_Size Disk > Maximum Size Maximum_Memory_Size Memory > Maximum Size Enable_cache_catalogs Cache Catalogs Maximum_cache_catalog_size Cache Catalogs > Maximum Size Enable_cache_reports Cache Reports Maximum_cache_report_size Cache Reports > Maximum Size Enable_cache_images Cache Images Maximum_cache_image_size Cache Images > Maximum Size Maximum_report_data_size Maximum Report Data Size Maximum_cube_size Maximum Cube Size Compress_Swap_Files Compress Swap Files
 Previous Topic