
Add a Materialized View Definition
 This is an experimental feature.
 Pre-aggregated data is not managed by Composer, so it should be maintained manually and kept up to date by the owner of the data.
To add a materialized view definition to a data source using the UI:
Make sure you are logged in as a Composer administrator or a user with the Can Administer Sources or the Can Create new Data Sourcesprivilege and that you have write permission for the data source.
List the materialized views for the data source to which you want to add a materialized view. See List Materialized View Definitions.
Select
 . The New Materialized View (External) dialog appears. This dialog is used to identify where the aggregated result from a query is stored so it can be quickly recalled in visuals.
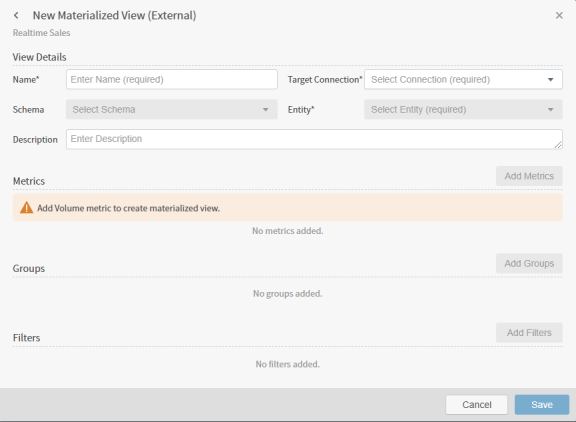
Specify a name for the materialized view in the Name field. This is required.
Select an external target connection in the Target Connection field. This is required. The connections listed for this field match the list of connections defined for the Composer instance. The target connection is not required to be the same as the connection of the data source; it can be any other connection configured in Composer.
 If you do not have read permissions for the target data store, an error message appears.
Use the Schema and Entity fields to identify the target entity that will store the aggregated data. The target entity is required, while the schema is not. However, selecting a schema filters the list of entities so you can more quickly find the entity you want.
As soon as an entity is specified, the
 ,
,  , and
, and  buttons become available on the dialog.
Optionally supply a description in the Description field.
Select
to add metrics to your materialized view definition. The Volume metric is must be added because it is required. Other metrics are optional, but must match the metrics used in your visuals. Materialized views only work if you specify the metrics and groups used by your visuals in the materialized view definition. For example, if you use Sales (SUM) as your metric and State as your group in a visual, be sure to add these metrics and groups to your materialized view definition. If they don't match, Composer will not use the materialized view to boost your visual rendering time.The Select Metric dialog appears.
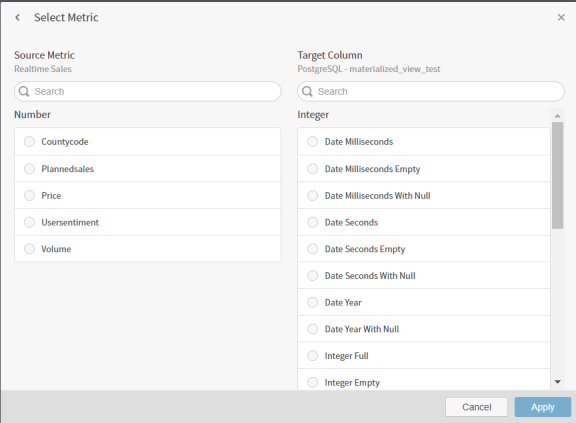
Select a source field in the Source Metric list and a target column in the Target Column list to which the source field should be mapped. Aggregated data for the source field will be taken from the target column to provide the results of the query.
When you select a source field (other than Volume), you are also prompted to select a metric function to be used to aggregate the field data. Use the drop-down list to select the metric function. See Metric Aggregation Functions.
Use the search boxes at the top of the Source Metric and Target Column to quickly locate a source metric or target column in their lists.
Select
 to apply the mapping to the materialized view definition.
 Repeat this step for as many metrics as needed for the definition.
If you have two visuals that differ only in their metrics, and you have an externally stored table containing pre-aggregated data for both visuals, you can specify all of the metrics for both visuals in a single materialized view. When the visuals are rendered, both visuals will be matched by the same materialized view.Select
 to add groups to your materialized view definition. The groups must match the groups used in your visuals. Be sure that the target entity contains correct data for this materialized view. If there are more pre-aggregated group columns in the target entity than configured groups in the materialized view, the data for the query will be taken as-is from the target entity. This might result in incorrect data shown on the visual, (for example, non-unique group values and incorrect metrics). Materialized views only work if you specify the metrics and groups used by your visuals in the materialized view definition. For example, if you use Sales (SUM) as your metric and State as your group in a visual, be sure to add these metrics and groups to your materialized view definition. If they don't match, Composer will not use the materialized view to boost your visual rendering time.
The Select Group dialog appears.

Select a source field in the Source Column list and a target column in the Target Column list to which the source field should be mapped. Aggregated data for the source field will be taken from the target column to provide the results of the query.
Use the search boxes at the top of the Source Column and Target Column to quickly locate a source field or target column in their lists.
Select
to apply the mapping to the materialized view definition. Repeat this step for as many groups as needed for the definition.Select
 to add filters for the data that is stored in the target entity. Only requests that match the specified filters in the materialized view definition will be processed using the data from this materialized view.
The Select Field dialog appears.
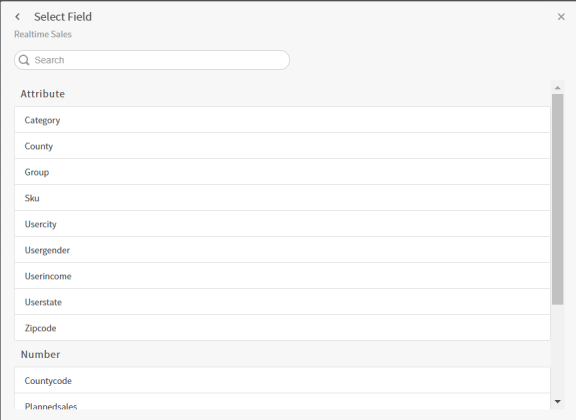
Select a source field for the filter. Use the search box at the top of the list to quickly locate a source field in the list. The Select Values dialog appears.
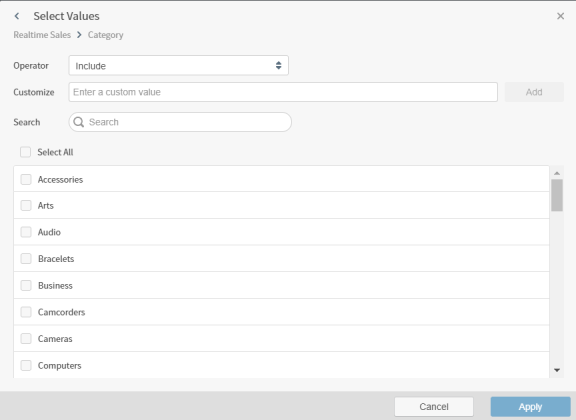
Select an operator for the filter in the Operator drop-down menu.
Optionally enter a custom value in the Customize field. The field name you supply is added and selected in the value list on the dialog.
Select one or more values in the value list. Use the search box at the top of the list to quickly locate a value in the list.
Select
to apply the filter to the materialized view definition. Repeat this step for as many filters as needed for the definition.Select
 to save the materialized view definition.
Comments
0 comments
Please sign in to leave a comment.